Using symbol and text substitution, you can easily write any special character or symbol like ™ or ® just by typing something like TM or (r). You can adjust this and set your own, and it's very easy to configure.
• Open "System Settings..." from the Apple menu
• Go to "Keyboard"
• Click on the "Text Replacements..." button
• Adjust text to replace with a symbol or add more text to replace by hitting the plus (+) button
• Click "Done"
For example, if you set "JS" to be replaced with "John Smith", anytime you type JS and hit space the text will be replaced.

Split View is a useful feature in macOS that lets you split the screen between two different applications or windows, in complete full screen mode. Split View is appreciated by many users who find it to boost productivity and focus, particularly if they already enjoy and appreciate full screen app mode on the Mac.
Split View is accessed slightly different with macOS Tahoe, unlike the original implementation releases, you now have to go into a sub menu to access it:
• Open whatever applications or windows you want to use
• Click and hold on the Green button in the title bar to bring up the window options
• Go to "Full Screen" submenu and choose “Left of Screen” or “Right of Screen”
• The opposite panel will now open into Expose where you can select another open app or window to split the screen with in Full Screen mode
You can resize either the left or right split view panel using the slider button in the middle of the screen. To exit Split Screen Mode in full screen, simply pull the cursor to the top of the screen and access the Green buttons again, or press/hold the Escape key.
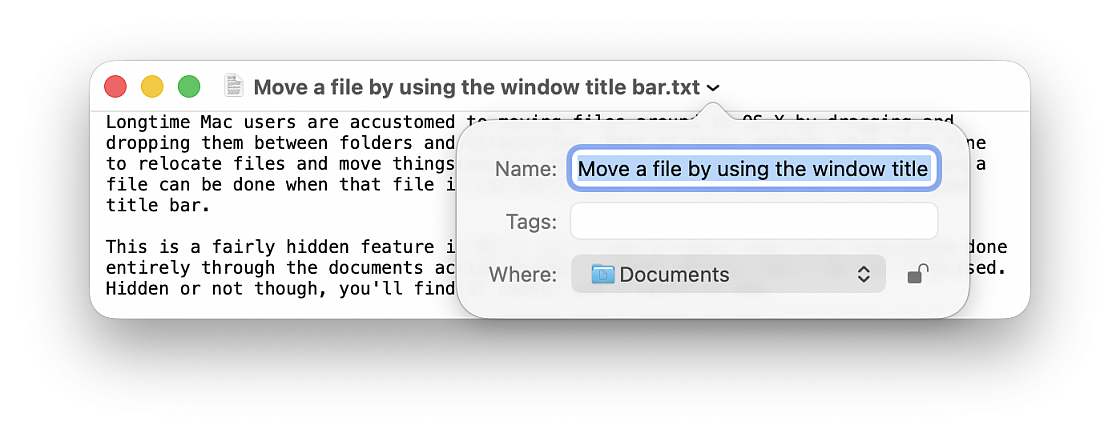
Longtime Mac users are accustomed to moving files around in macOS by dragging and dropping them between folders and directories. This method work just fine to relocate files and move things around, but another lesser known option to move a file can be done when that file is currently open, just by using the files window title bar.
This is a fairly hidden feature in macOS, so if you've never seen file relocation done entirely through the documents active window titlebar before, don't be too surprised. Hidden or not though, you'll find it useful and a cinch to use.
• With a file open, click on the files name in the window title bar to reveal a contextual menu (be sure to click on the text name itself, not the little document icon)
• Click on the pulldown menu alongside “Where” (the location shown is where the file is currently located)
• Select the destination you want to move the file to from the list (including iCloud) or choose “Other...” to browse the file system and select somewhere specific.
• Click away from the title bars contextual menu to hide it and resume work within the document as usual.
That's it, the document has moved. Simply changing the “Where” selection will move the file to the chosen destination instantly. There's no confirmation, no dragging and dropping, nothing else is necessary to relocate the file, it will move immediately as the window title bar action is taken, to the location specified by “Where”.
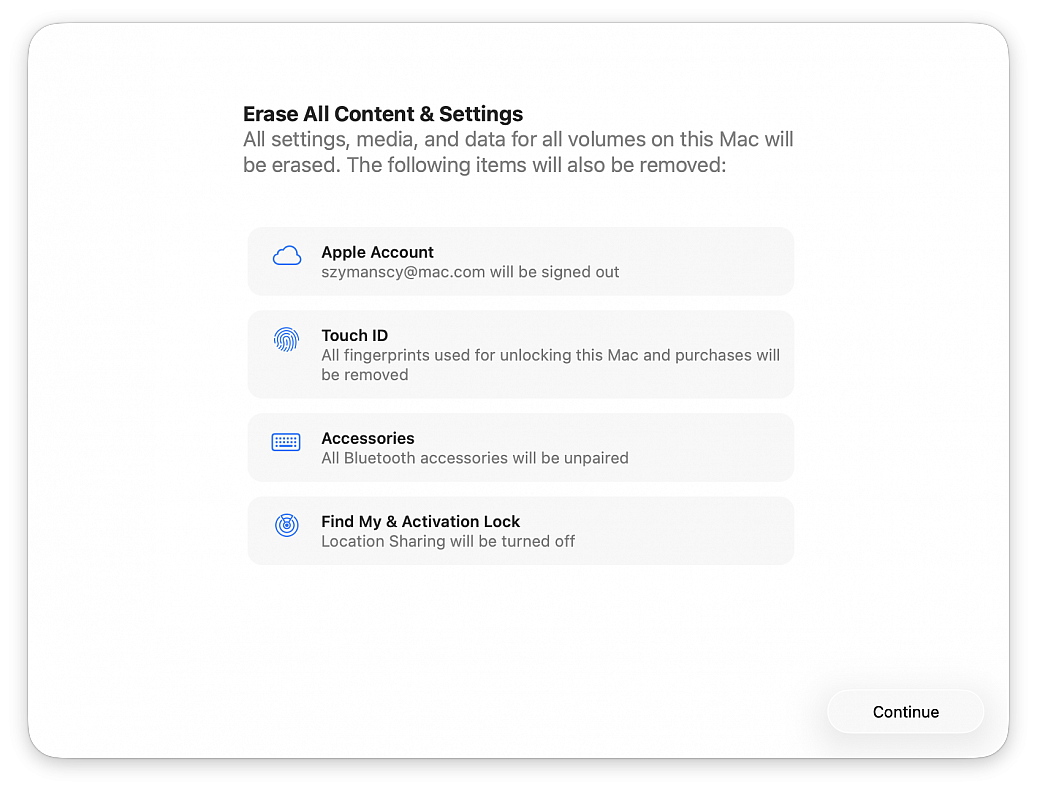
If you are going to sell, return, or give away a Mac, you almost certainly want to factory reset the computer first. Performing a factory reset on a Mac will erase all data on the Mac, and return it to a clean slate as if the computer were brand new, without any data or personal files on the computer at all.
Erasing a Mac and returning it to factory defaults has never been easier, thanks to the addition of a “Erase All Content & Settings” feature introduced in newer versions of macOS system software. Gone are the days where you had to manually erase and then reinstall system software, now you can simply let MacOS handle the task for you by choosing to erase and factory reset the Mac through a handy built-in feature.
The approach is available in macOS Ventura and newer only.
Be sure to back up the Mac with Time Machine first! Proceeding will erase all data, files, and information from the computer. This will erase all data on the Mac. Do not proceed unless you have backups of your data. Failure to backup will result in permanent data loss!
• Pull down the Apple menu and go to “System Settings...“
• Go to “General“
• Choose “Transfer or Reset”
• Click on “Erase All Content and Settings”
• Confirm that you want to erase everything, log out of your Apple ID, and remove all data from the Mac by clicking “Continue”
• Follow the onscreen instructions to complete the process
When the Mac has finished factory resetting and erasing everything, a freshly installed version of the current version of macOS will boot into the typical “Hello” screen. Assuming you’re going to be gifting this Mac or selling it, you probably do not want to set it up yourself, instead let the recipient handle it.
This same factory reset feature also exists in macOS Monterey, but it is accessed slightly differently on those Macs. To factory reset a macOS Monterey Mac, go to the Apple menu > System Preferences > System Preferences menu > Erase All Content And Settings. Be sure to backup all data beforehand, as usual.
macOS Tahoe has killed Launchpad, but if you miss it, here are two alternatives to Launchpad that you can use to see Mac apps in one spot and open them quickly.
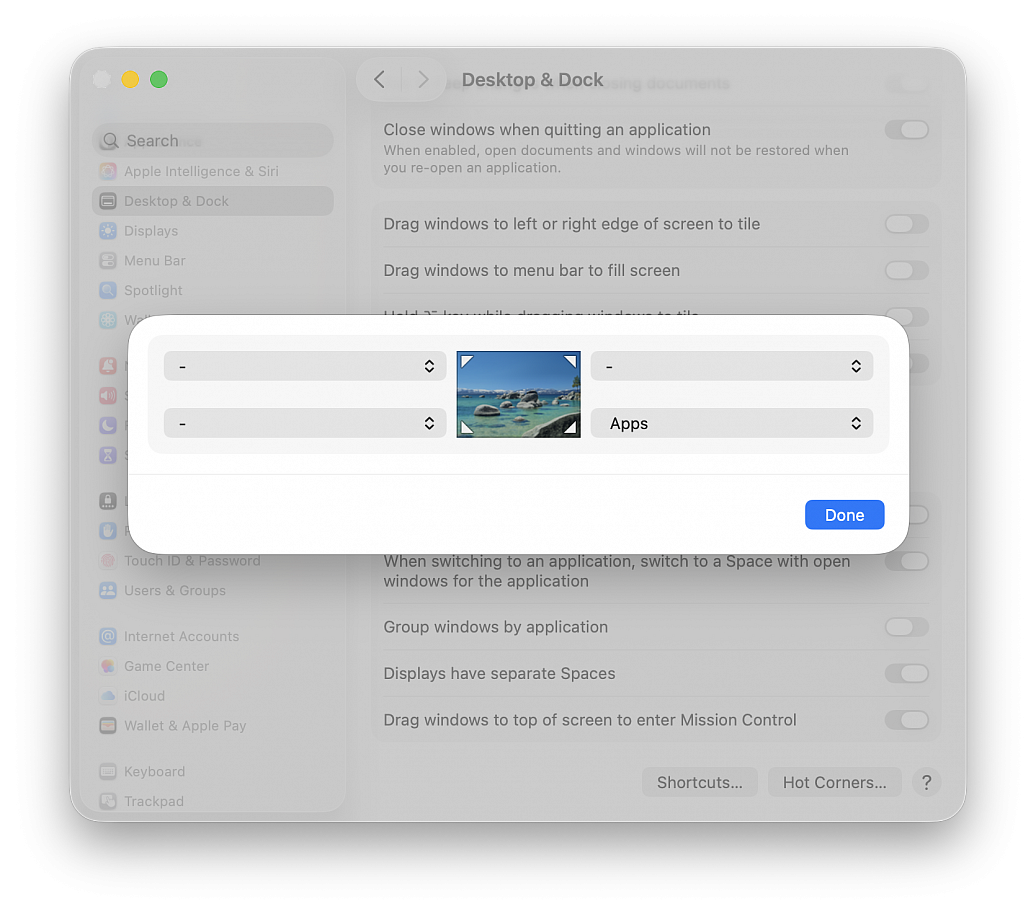
Add Apps to a Hot Corner. Setting up Hot Corners is very easy:
• Go to the Apple menu and choose "System Settings..."
• Click Desktop & Dock in the side column
• Click the Hot Corners... button at the bottom of the menu
• In the dialog that appears, click the chevrons to open the dropdown menu corresponding to the screen corner that you want to use and assign this corner to Apps, then click Done
• Now, you can open the new macOS Tahoe Applications overlay by taking the pointer to that corner of the screen
Add an Applications folder to the Dock:
• Open a Finder window
• Right-click over Applications in the sidebar and select Add to Dock
• An Applications shortcut will be added to the left of the Trash icon, click it to view all apps and open one (you can also right-click on this icon and change a few things)