If you’re a legal or governmental official, journalist, researcher or in a similar profession, you may need to enter the current date and/or time in your documents for timestamping, record-keeping, regulatory compliance, etc. Learn how to use a Mac shortcut to quickly enter the current date and/or time in a text field without typing those details manually.
Instead of checking your computer’s clock and manually typing the date and/or time, you can automate it using a shortcut. This also ensures you can fill in the precise current date and/or time without the possibility of an error. It involves two simple steps: creating the shortcut once and then using it whenever needed.
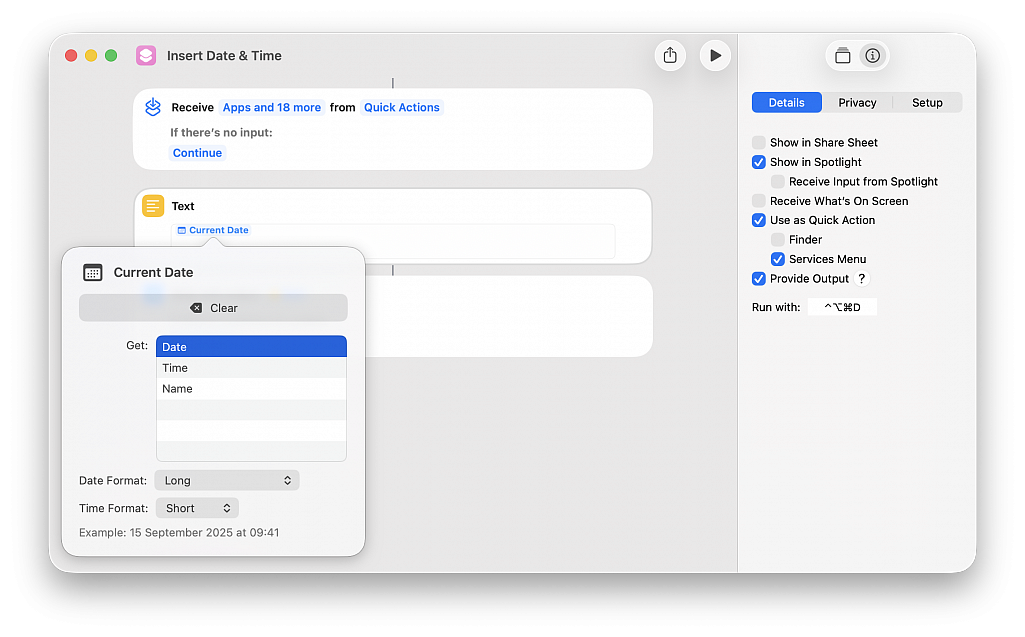
• Open the Shortcuts app and choose File > New Shortcut
• Type “Text” in the top right search field and double-click the Text action to add it to your build
• Click in the text field, start typing “Current,” and select Current Date from the suggestions
• Select a Date Format (you can also pick a format for Time or set it to None if you only want to insert the date)
• Click the triangle Run button at the top to test your build; you’ll see the date and/or time appear on the screen
• Click the info button (i) in the top right corner of the window and check the box for Provide Output
• Click Add Keyboard Shortcut and press the keys you want to assign to run this shortcut (for instance, Control + Option + Command + D)
• Give a name to your shortcut (for instance, Insert Date & Time) and save the shortcut by closing the window (hit the red traffic light button)
• Open an app like Pages, Text Edit or Google Docs in Chrome and press the key combination; you’ll see that the current date and/or time are automatically typed in
New Liquid Glass design has received most of the attention in news about macOS Tahoe, but there are quite a few new features that make the Mac better than ever, including some that are not super obvious.
Customize Lock Screen Font
macOS Tahoe lets you customize the clock that appears on your Mac's Lock Screen. You can't adjust size like you can in iOS 26, but you can change the font style and thickness. To adjust your clock, go to System Settings > Wallpaper > Clock Appearance. You can choose from six different font styles, and adjust the weight with a slider. You can opt to have the clock show on your Lock Screen or on the Lock Screen and Screen Saver.
Search Your Tabs
When you search in Spotlight, the results include the Safari tabs that you have open. If you tend to have dozens of tabs open at once, it can be a good way to find the specific tab you're looking for rather than clicking through them one-by-one. Open tabs show up at the top of the list when you enter a relevant search term.
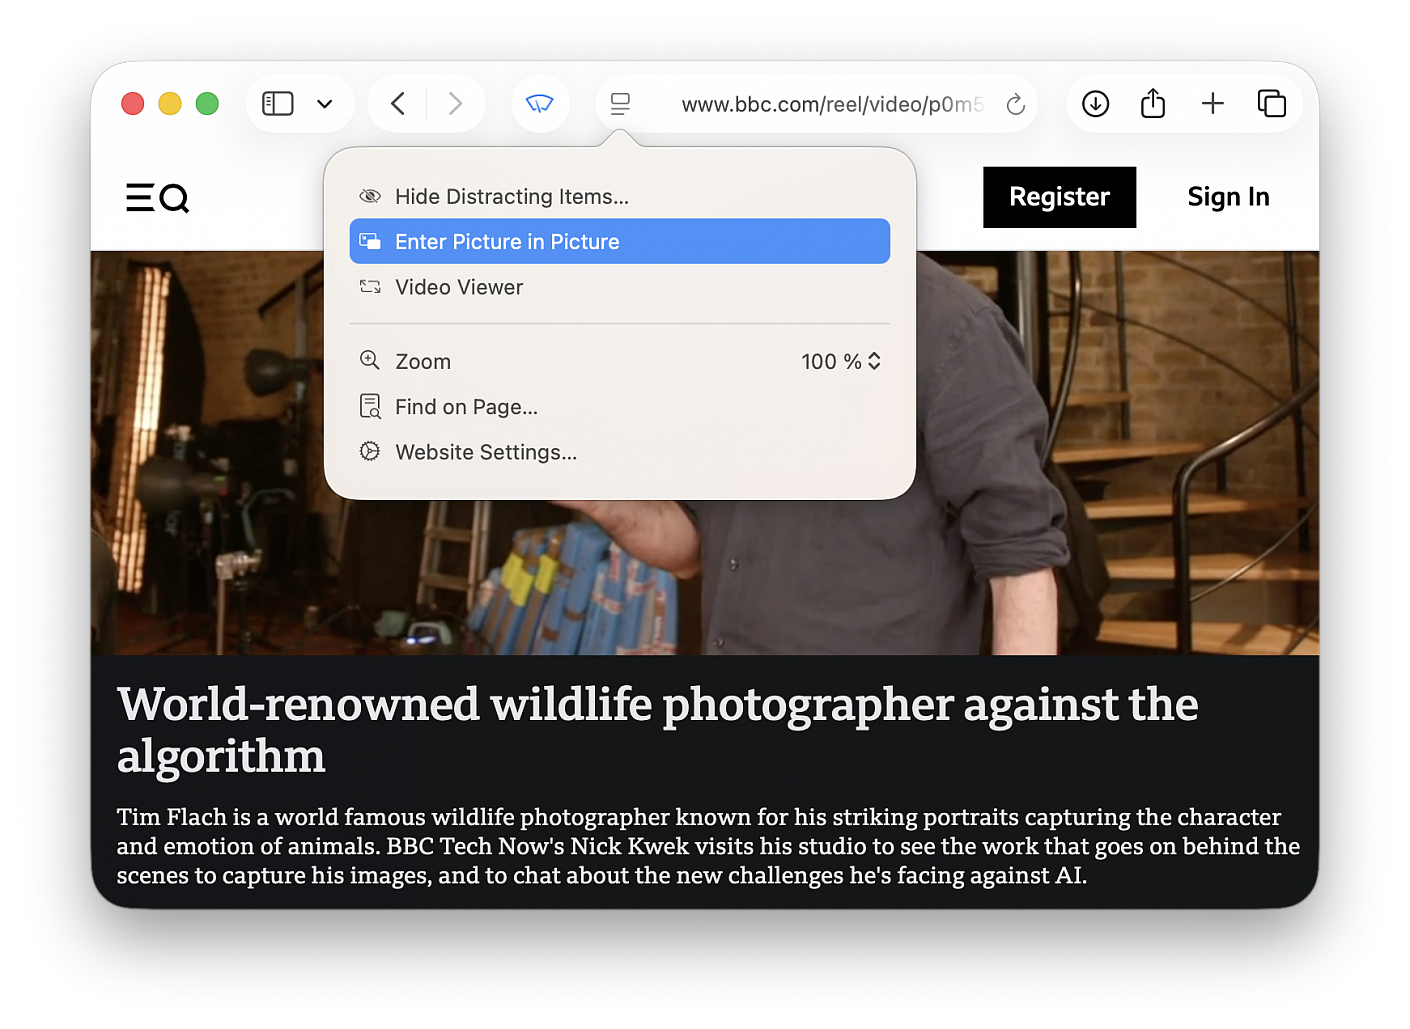
Safari Picture in Picture
Picture-in-picture has been available in Safari for several years, but macOS Tahoe brings easier activation, new controls, and customization options. In an article where there's a video, click on the Page Menu icon in the left side of the URL bar to enter picture-in-picture mode. You can now access playback controls for skipping forward and backward, and you can skip ads directly from the picture-in-picture window.
See Your Spotlight History
You can see your past Spotlight searches and actions in macOS Tahoe, which makes it easy to get back to something that you did before. With Spotlight open, press on the up arrow to scroll through your past queries.
Game Overlay
When you're playing a game in macOS Tahoe, you can tap Command + ESC to bring up a new Game Overlay. From the Game Overlay, you can view achievements and leaderboards, connect with friends, and adjust settings like brightness and volume.
Apple released macOS Tahoe on September 15, which means it's now available for all Macs that support it. If you didn't download the new software yet, here are some features that might entice you to upgrade.
Liquid Glass
macOS Tahoe has a new design. Buttons, navigation bars, widgets, the Dock, menus, side bars, and more all have a more translucent look that reflects the background underneath and refracts light. There are new icon options, including tinted and entirely clear.
Customizable Control Center
You can rearrange the Control Center in macOS Tahoe, putting what you access most often front and center. You're also able to use multiple Control Center pages, and add third-party app controls.
Customizable Menu Bar
You can also rearrange the Menu Bar, plus add Control Center controls to it. Live Activities from the iPhone will also show up in the Menu Bar now through iPhone Mirroring.
Spotlight Redesign
Spotlight is very different in macOS Tahoe, and it might take some getting used to. There's no more Launchpad, because the new Spotlight functionality has replaced it. There are four main Spotlight options to access apps, files, complete actions, and access the Clipboard History.
Clipboard
Spotlight now saves what you copy and paste, so you have a log of what you've been doing that you can go back and reference. You can see your entire history for the day, but it is limited to 24 hours.
Spotlight Actions
You can use Spotlight Actions to do all kinds of things without opening an app. You can send texts, emails, create shortcuts for features in apps, set timers, create Calendar events, make reminders, and much more, plus there's integration with the Shortcuts app to take things even further. There are quick access phrases you can assign to launch tasks quickly, like CH for bringing up ChatGPT.
Folder Customization
You can assign colors to folders, and also add an emoji or character to help you better organize your files. Folders get a color tag, which is a useful way to group things together.
Widgets
You can move widgets from the Notification Center to the desktop for quicker access. This works with widgets from Apple apps and from third-party apps.
Shortcuts
The macOS Shortcuts app supports creating automations. You can make Shortcuts that run at a specific time of day, with a trigger action, when an accessory connects, when an action in an app takes place, when the battery drains to a certain level, when activating a Focus mode, and more. It's super powerful when paired with Spotlight's new functionality.
Phone App
Apple brought the Phone app to the Mac, so you can make calls, accept calls, and use features like Hold Assist and Call Screening. You still need a connected iPhone with Wi-Fi Assist turned on.
Journal App
The Journal app is new to the Mac, and it makes a lot of sense on a platform that has a full keyboard. It works just like the iOS version of the app, but there are also some added features like the option to create multiple journals.
Games App
The Games app is also new to the Mac. It's a cross-platform app that aggregates Mac App Store games and Apple Arcade games with your own games library, plus it provides options for playing with friends. There's a new Game Overlay that lets you adjust game settings and connect with friends without exiting the game, and if you're on battery, there's a Low Power Mode so you can play longer.
Learn what to do if your Apple’s Magic Keyboard, Trackpad, or Mouse fails to connect and work with your Mac. Note that the solutions are for fixing the wireless connection between your Mac and Magic accessories. You can always connect your Magic Keyboard or Trackpad via a cable to your Mac, and it should work, provided there are no hardware problems.
Make sure you have the following:
Lightning cable: You will need it to establish a wired connection between your Mac and the Magic Keyboard, Trackpad, or Mouse. You will also need a USB hub if the Lightning cable has a USB-A port on one end and your Mac only has USB-C ports.
Wired keyboard or mouse: Since your wireless Magic accessories are not working, you will need to directly plug in a wired keyboard or mouse to navigate around your Mac. Of course, you don’t need these if you are troubleshooting the connection issue on your MacBook.
Fix Magic Keyboard, Trackpad, or Mouse not working when you power on your Mac.
After you switch on your MacBook, its built-in trackpad and keyboard are ready to use the moment you see the Lock Screen. However, when you boot up your desktop Mac, it takes a moment for the wireless Magic Keyboard/Trackpad/Mouse to become available for use. When you enter the password and go to the Desktop, you will again have a brief moment of downtime until the accessories starts working.
Both these short connection wait times are a normal occurrence. However, if your Magic Keyboard, Trackpad, or Mouse are not connecting automatically to your desktop Mac and you have waited for a while, just connect them with a Lightning cable, and it should become available for use. Leave your Magic accessory connected to your Mac via a cable for a minute or two. After that, you can disconnect the cable, and the accessory will continue to work wirelessly. You can also force your Mac to shut down using its power button, wait for a while, and then power it back on. It should auto-connect to your Magic Keyboard, Trackpad, or Mouse.
What to do if your Magic Keyboard, Trackpad, or Mouse has suddenly stopped working?
In rare cases, your keyboard, trackpad, or mouse may stop working midway after losing connection or going out of battery. Here are all the effective tips to fix it.
Plug the accessories. If you get an alert when your Magic Keyboard, Trackpad, or Mouse battery gets critically low, simply connect it to your Mac with a cable, and you can start using it. You can check the battery percentage of it by going to the Bluetooth section in macOS Control Center or using the Batteries widget.
Restart your Magic accessory. Turn off your Magic Keyboard, Trackpad, or Mouse using the small power button and wait for at least 30 seconds. After that, flip the switch back on and wait once again for it to connect automatically to your Mac. Of course, make sure your Mac’s Bluetooth is enabled in Apple menu > System Settings... In case auto-connect doesn’t work, connect it manually from Apple menu > System Settings... > Bluetooth.
Restart your Mac. Random glitches in macOS can cause all sorts of trouble, including issues between your Magic Keyboard, Trackpad, and Mouse. So, simply restart your Mac using the wired mouse, and hopefully, the problem will go away. You can also force your Mac to turn off by holding the power button for a few seconds until the screen goes black. After that, wait for about a minute, and then press the power button once to turn it back on.
Toggle Bluetooth off and on. You cannot turn off Bluetooth on your desktop Mac if the Magic Keyboard and Magic Trackpad/Mouse are connected to it. So, connect a wired keyboard and mouse to your Mac and then go to System Settings to turn Bluetooth off and back on.
Forget the accessory and connect again. If the problem continues, you should forget the Magic Keyboard, Trackpad, or Mouse from Mac’s Bluetooth settings and then reconnect it. Grab your Lightning cable and follow these detailed steps on your Mac with a wired keyboard and mouse connected to it:
• Open Apple menu > System Settings... and select Bluetooth
• Click the info button (i) next to your Magic Keyboard/Trackpad/Mouse and hit Forget This Device > Forget Device
• Turn off your Magic Keyboard/Trackpad/Mouse using its power switch, and then restart your Mac
• Lastly, turn on your Magic Keyboard/Trackpad/Mouse and go to Apple menu > System Settings... > Bluetooth to connect it to your Mac
This step should address connection issues, and now your Magic accessory will work as intended.
Also, don't forget to update your Mac. If your Mac is not running the latest version of macOS, go to Apple menu> System Settings... > General > Software Update to download and install the newest version of the operating system.

Learn how to efficiently manipulate text on your Mac using Find and Replace, simplifying tasks and boosting productivity in popular apps like Notes, Pages, Numbers, TextEdit, etc.
In addition to words, you can also find and replace spaces, numbers, and special characters from your document. You can use it to substitute a word or make corrections in a lengthy document. Other times, it can be handy if you want to delete specific words, symbols, or phrases from your writing.
• Open Notes, Pages, or Numbers and go inside the relevant note or document
• Click Edit from the top menu bar and select Find > Find or Find and Replace (in apps like Pages and Numbers, you can also click the View button from the top left of the app window and choose Show Find & Replace
• Enter the term you want to look for (click the tiny arrow next to the search glass icon for more options, for instance, you can uncheck Ignore Case to find the words that exactly match the capitalization style you specify
• In the second box, enter what you want to replace the found term with
If you type nothing in the Replace box and go ahead with the next steps, it will delete the found words from the document. In other words, you will be replacing found words with nothing, which obviously equates to deleting the searched-for word. You can also choose to replace the found words with just a space (press the Space Bar once) or the desired symbol.
• Click All, and it will replace the found word with the replacement at every instance, or, click Replace, and it will replace only at the selected position (you can also use the arrow icons or press the return key to cycle through the found instances of the word without actually replacing them with the said term)
If you’re using Pages or Numbers, you will see three buttons: Replace All, Replace & Find, or Replace buttons. Replace & Find will replace the selected match with the replacement text and then automatically move to the next match. The Replace button replaces the selected match but does not auto-move to the next one.
