Trash is one of those overlooked aspects of macOS that you probably don't think much about. That's fine, but there are also a handful of genuinely useful keyboard shortcuts that pertain to Trash on the Mac, and if you spend any time in the file system they're worth learning.
Send an item to Trash instantly.
Command+Delete with any file or folder selected will send it instantly to the Trash.
Return items from Trash to original location.
Command+Delete with anything currently in the Trash selected returns it to the original location in the file system. You can also access this by right-clicking an item and choosing "Put Back".
Empty Trash.
Shift+Command+Delete will immediately empty the Trash. This is the safer approach since it brings up the warning dialog telling you the action is permanent.
Empty Trash without warning.
Shift+Option(Alt)+Command+Delete will immediately force empty the Trash with no warnings, regardless of what's in the Trash.
If you have a MacBook, MacBook Air or MacBook Pro, you can check the battery cycle count to get an idea of overall battery health. Here’s how you can do that yourself, right from the macOS built in system management functions.
This works for all batteries in portable Mac models.
• Pull down the () Apple menu and choose "About This Mac".
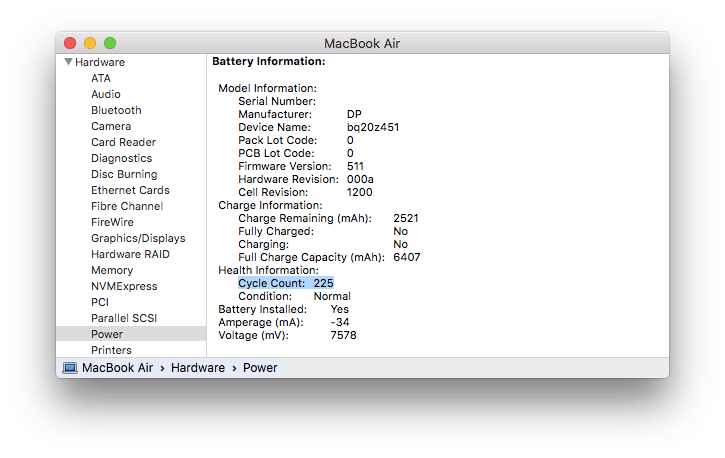
• Click the "System Report…" button.
• Under Hardware, select "Power" and look for "Cycle Count" under the "Battery Information" portion.
The number shown is the cycle count of the current battery. A battery charge cycle is when the battery has been drained to 0% and then refilled to 100% of it's maximum capacity. Knowing the cycle count is helpful if you suspect your battery is having problems retaining a charge. Apple says new notebook batteries are designed to retain 80% of original capacity after 1000 cycles. If your battery is performing at less than expected and is still under warranty, it may be a good idea to schedule an appointment with an Apple Genius.
DNS server can be described as a phone book for the internet. Every website on the internet has an IP-address (for example Google's is 74.125.95.104), but remembering these addresses for every website you want to visit is a pain. What the DNS (Domain Name Server) server does is translate www.google.com into 74.125.95.104 and direct your browser to that page.
Normally the DNS server is hosted by your internet service provider but Google claims that their server is both faster and more secure, giving you a better online experience.
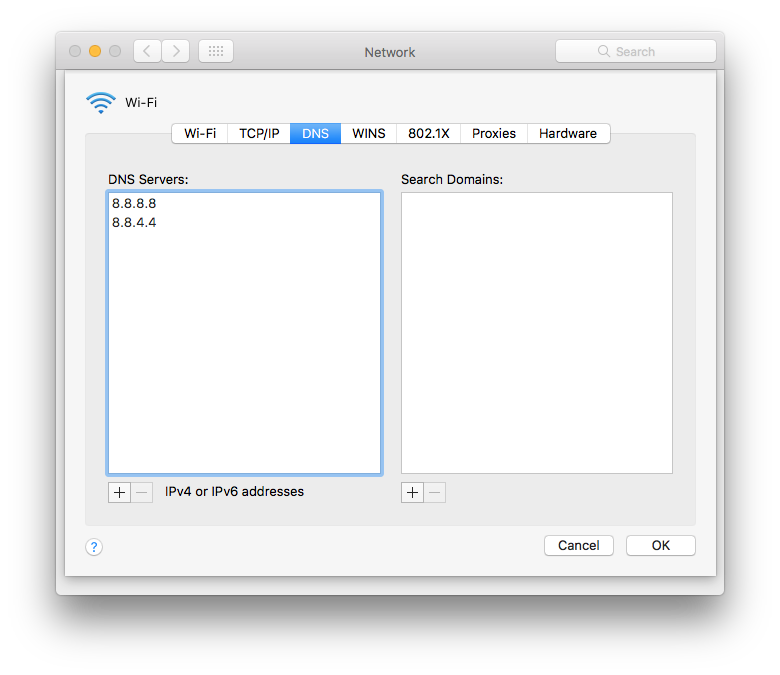
To use Google’s servers simply open System Preferences and click Network. Select the network connection you use to go online (normally AirPort if you use wireless or Ethernet if you are wired), press "Advanced…" and then select DNS at the top. Now you are presented with two lists, below left one there is a button with a plus sign. Click it and enter:
8.8.8.8
and in a new line:
8.8.4.4
Click OK, then Apply (if the DNS options are grayed out when you try to change them, just click the padlock in the lower left of the Network settings screen and enter your password when prompted). You may have to restart your browser for the changes to take effect.
It is worth keeping in mind that Google will be able to view your browsing habits, so it is a good idea to have a read through their privacy statement (https://developers.google.com/speed/public-dns/privacy).
Otherwise, if you'd rather not use Google’s DNS server but want faster browsing, you can use a tool such as Namebench (http://code.google.com/p/namebench) which tests a whole bunch of DNS servers (such as OpenDNS or DNS.WATCH) and finds out which one is the fastest for you.
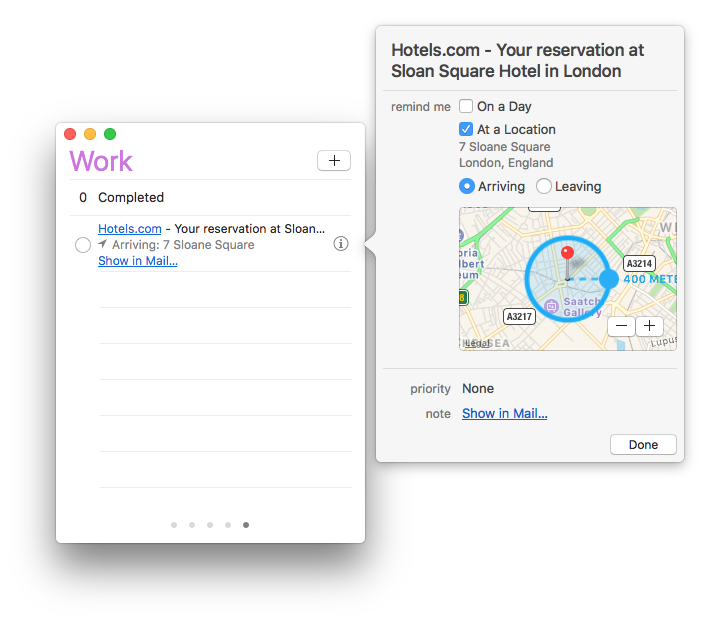
To easily remind yourself about an email message in Mail that needs your attention, you can use the Reminders or Calendar app.
Simply drag and drop the message from Mail to the Reminders application icon in the Dock. The Reminders app will present a new item in your default list with the name of the email as the title, and a link to the message. Clicking the link will open the email in Mail. You can easily set a reminder for a location or date, along with a priority from here.
You can also drag and drop an email from the Mail app into the Calendar app on a specific date. This will create a new event on that date.
Those who use external Bluetooth devices with a Mac, whether it's a keyboard, mouse, headset, or anything else, are probably aware that connection strength between the device and the computer is going to directly impact how usable the device is.
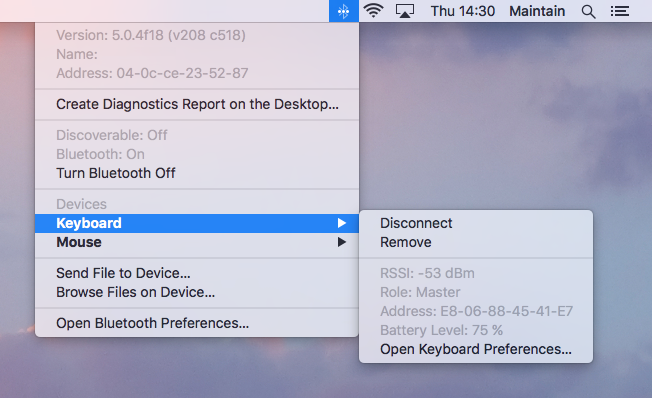
If your Bluetooth device connections seem flakey, or if your wireless keyboard or mouse isn't as responsive as you think it should be with your Mac, there is a easy way to check Bluetooth signal strength in macOS. Simply Option (Alt) click the Bluetooth menu bar item, then move the mouse cursor over the Bluetooth item you want to check the signal strength for and look for "RSSI".
RSSI (Received Signal Strength Indicator) can be a bit weird to read, but essentially a higher number means a better connection, and a lower number means a worse connection. Note however that the numbers are negative, so that may read opposite to what you'd expect. For example, a connection of -45 is significantly stronger and better than a connection of -100, which is weaker and more likely to have issues. The rough guidelines below may help read the connection, though the precise signal you get is going to vary on other factors we’ll discuss below:
-40 to -55 is a very strong connection
-70 and above represents a good connection
-100 and below represents a bad connection
-110 and below is almost unusable
The two most likely reasons for a bad Bluetooth connection are low batteries and heavy interference from something in the environment. Batteries are easy to test, all you need to do is swap in a new set of batteries or charge the device in question and see if the RSSI increases and if the device becomes more stable. Environmental factors can be trickier to track down, but if you see a huge drop in the RSSI when you move a headset behind a fireplace for example, you can surmise that something in the wall is causing the interference and you should rearrange the equipment accordingly. It's also vaguely possible that the device itself has a defective antenna, though that’s fairly rare for most quality devices.