Windows has a program manager in the Control Panel that lets you uninstall applications, but you will not find a similar function on your Mac. So what's the best way to uninstall macOS apps?
In general, applications in macOS are packaged into a ".app" bundle that appears to be a single file but is actually a self-contained folder. Unlike Windows, in which an application usually installs a folder that contains the executable and supporting files, most of what an macOS app needs to run is stored within the .app bundle. Deleting an application bundle will remove that application's binary and all the supporting files contained within. Many apps, however, also install additional files in the user's Library folder, such as application preferences and caches.
To manually remove an macOS app, make sure the app is closed and head to the user's Library folder (in OS X Lion and above, hold down the Option key while selecting the Go menu from the Finder's menu bar and select Library). Here, you'll want to check for references to the application in the Application Support, Caches, LaunchAgents, and Preferences folders. Remove any files or folders that you are certain belong to the application you're trying to uninstall. You may also want to check the main Library folder by navigating to the top level of your hard drive and opening the /Library folder, although most applications will confine their files to the user-specific Library. Due to sandboxing requirements imposed by Apple, apps obtained from the Mac App Store are even easier to remove. Simply delete two items: the application file itself from the Applications folder and the application-specific folder in ~/Library/Containers (user's Library folder).
Another way to remove macOS apps is to use third-party tools. Take note, however, that automated tools can sometimes miss certain files or folders, and users employing these tools should always perform a manual check to ensure that all remnants of the application have indeed been removed. Finally, some applications (such as Cocktail) have their own uninstaller. Wherever possible, use the application-specific uninstaller for these applications.
Regardless of which method you choose, remember that leaving behind the occasional abandoned preference file is not likely to cause harm or performance issues. In general, removing the app bundle from the Applications folder and a file or two from the user's Library folder is enough to remove the application from the drive and free up disk space.
In lots of places around your Mac, holding down the Command key while you're clicking on an item will give you info about where it lives rather than opening it. For example, you can Command-double-click a Spotlight result to open it in the Finder, or Command-click a Finder window's title to get a hierarchical view of where you are in your file system.
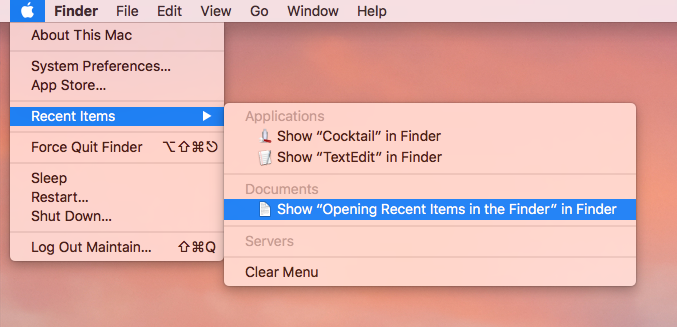
One of this feature's most useful implementations, though, is for the things you've accessed recently. If you click on the Apple menu in the upper-left corner of your screen and choose Recent Items, you've got fast access to recent applications, servers, and documents that you've used. If you then hold down the Command key before you click on an application or a document, you'll see the menu change, and you'll be given the option to open the item in the Finder instead.
The battery is the key component of any portable device, but did you know that battery maintenance is important to keeping your MacBook healthy? With proper maintenance and calibration, you can keep your computer's battery performing at its optimum, providing you with more juice when on the go.
Battery Calibration
A Mac portable is just that: a portable computer. It was designed to be plugged and unplugged to allow the battery to discharge and recharge on a normal cycle. As such, if you use your machine plugged in all the time, then it is important that you discharge (or calibrate) your battery every so often. If you rarely use the battery, then Apple recommends completely discharging the battery and charging it again at least once a month. If you use your notebook frequently on the battery and plug it in to "top off" the battery, then a full discharge cycle is required less often.
Follow these steps to calibrate the battery:
1. Plug in the power adapter and fully charge your MacBooks's battery until the light ring or LED on the power adapter plug changes to green and the onscreen meter in the menu bar indicates that the battery is fully charged.
2. Allow the battery to rest in the fully charged state for at least two hours. You may use your computer during this time as long as the adapter is plugged in.
3. Disconnect the power adapter while the computer still on and start running the computer off battery power. You may use your computer during this time. When your battery gets low, the low battery warning dialog appears on the screen.
4. At this point, save your work. Continue to use your computer; when the battery gets very low, the computer will automatically go to sleep.
5. Turn off the computer or allow it to sleep for five hours or more.
6. Connect the power adapter and leave it connected until the battery is fully charged again.
Checking Battery Condition
If you hold down the Option (alt) key on your keyboard while clicking the menu bar battery icon, then you'll see a Condition option. The battery condition can be in either one of four states: Normal, Replace Soon, Replace Now, or Service Battery.
Normal means that the battery is operating properly.
Replace Soon means that the battery is functioning normally, but is currently holding less charge than it did when new, and may need replacing.
Replace Now means that the battery is functioning normally, but holds significantly less charge than the battery when new, and needs replacing before it could possibly do harm to your hardware.
Service Battery means that the battery isn't functioning properly or your computer has noticed a change in its behavior. You should take your battery and/or computer in for servicing if this problem continues after a few restarts.
Long-term Storage
If you don't plan on using your Mac portable for more than a six-month time period, then you'll want to properly store your Mac's battery with a 50% charge. This will ensure that it won't fall into a deep-discharge state, or lose capacity and therefore have a shorter life.
Temperature is also a huge factor when storing your computer. You'll want to ensure your Mac and its battery are stored in an environment where the temperature is between 50ºF and 95ºF (10ºC and 35ºC). Anything more or less, and you could seriously damage your battery over a long period of time.
One of the scariest things that can happen to your Mac is a failure to turn on at all. You press the power button and nothing happens - no startup sound, no light, nothing. If this happens, you can check several things before hauling your Mac to the nearest Apple Store for repair.
First, trace the entire flow of electricity to your Mac. Check your Mac's power cord to ensure it is firmly seated where it connects to the computer as well as where it plugs into the wall. If it goes through an outlet strip or a UPS, make sure that's also connected and turned on. Also check that any surge protectors are still working - a power surge might have knocked them off. You can confirm that an outlet is good by plugging in something else, such as a light. If the outlet and all cable connections check out, make sure the power cord has no crimps, breaks, or other damage.
Once you've established that your AC power path is good, it's time to look at your Mac itself. Unplug everything you can - not the power cord, your mouse and keyboard if they're wired, and your monitor if it's not built in - but disconnect everything else and try pressing the power button again. If your Mac turns on, you know that one of your peripherals was at fault.
If your Mac doesn't turn on, it's worth trying to reset your Mac's SMC (System Management Controller), a chip that manages a number of hardware functions - including the operation of the power button. Directions vary by Mac model; see Apple's instructions for details (http://support.apple.com/kb/ht3964).
If you have a Mac laptop, its battery should last through most power outages, so you may not notice that you have a power-related problem until the battery runs out, at which point your Mac might simply appear to be dead. So try all the above tips, but also check your power adapter. If you have an AC cable attached to the adapter (as opposed to a plug going directly into the wall), make sure that cable is securely connected. If you have access to another AC adapter, switch to it briefly - that will tell you whether the original adapter is bad or whether it's something in your Mac itself.
Still no luck? In that case, it's time for professional help. An Apple Store or authorized repair center should be able to diagnose and fix the problem.
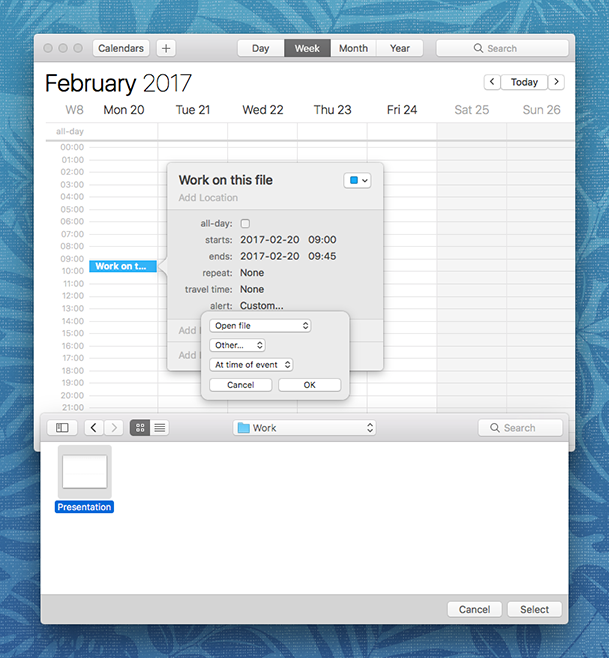
If you've ever wished you could schedule the opening of a specific file, or set an application to launch on a specific date and time, either on a one off basis or on a recurring scheduled event, you can actually do both right in macOS with the help of none other than the default Calendar app.
• Open Calendar in macOS and create a new event, either by clicking the [+] plus button or by double-clicking on any date
• Double-click the event to display event details
• Click on the date and time section
• Pull down the "alert" menu and choose "Custom…"
• Pull down the "Message" menu and choose "Open file"
• Directly under the menu, pull down the next menu and choose "Other...", then use the file browser to select the file you want to open on a schedule
• Choose "OK" when finished
Once the date arrives, the selected file will launch automatically in the default application at the date and time specified in Calendar as the alert. Use the “repeat" function to set the file to consistently relaunch on the given date and time provided. These can be standard, or custom repeating schedules like every last Friday of the month. The repeat feature is an excellent additional trick for repetitive tasks that use the same file, like a weekly or monthly earnings report, tax document, expense sheet, or whatever else requires regular use on a scheduled basis.