Your Mac is pretty safe on your private home network, but what about when you're surfing the Web in coffee shops? Anyone with a computer and rudimentary hacking skills could target you, which is why it's important to make sure your Mac's built-in firewall is enabled and that stealth mode is turned on.
macOS's firewall feature blocks unwanted network traffic coming into your computer, and stealth mode makes your Mac essentially invisible to hackers snooping for computers to target. They aren't foolproof features, but they will keep most people from finding and attacking your Mac on public networks.
First, you need to make sure your Mac's firewall is enabled:
• Open "System Settings..." from the Apple menu
• Go to "Network"
• Click "Firewall" and enable it
Next, enable stealth mode:
• Click "Options..."
• Scroll down and enable "Enable stealth mode" setting
• Click OK
"Automatically allow built-in software to receive incoming connections" and "Automatically allow downloaded signed software to receive incoming connections" should already be checked. Those settings let the apps you already have communicate through the firewall without you having to take any extra steps. Leave those checked unless you know what you're doing and plan to manage app network access manually. You should leave "Block all incoming connections" disabled, unless all you're doing is surfing the Web.

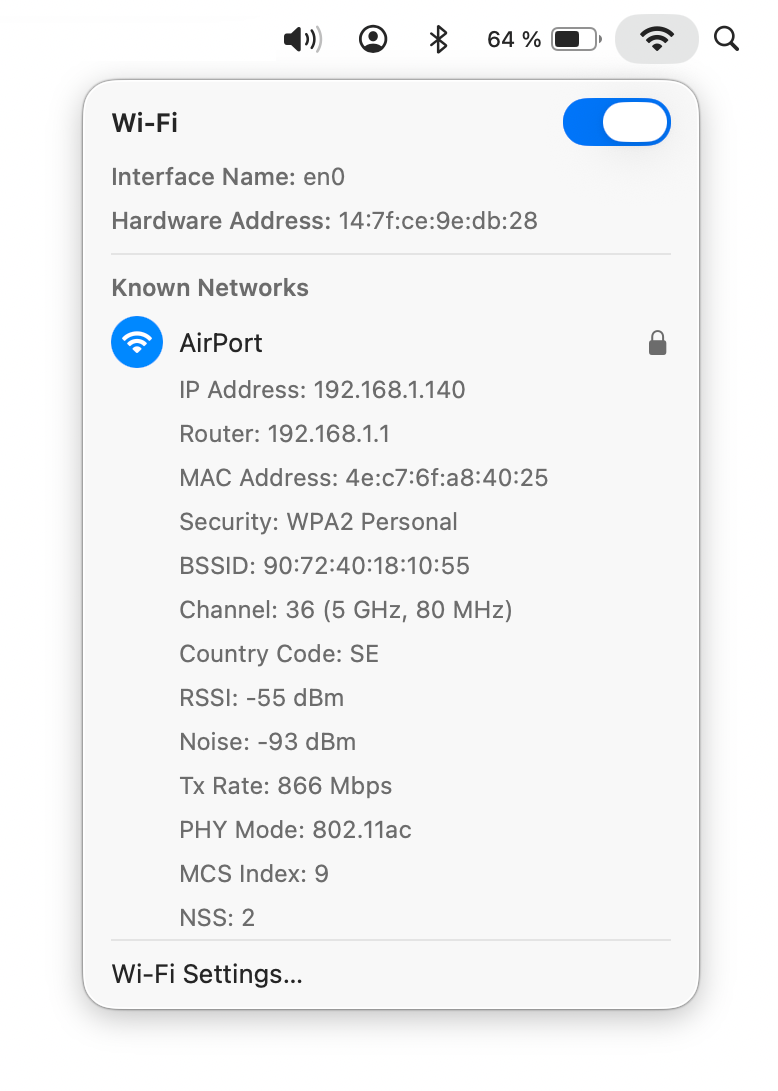
Did you know that you can quickly access information about your router, and check if your network is performing well? See your BSSID, signal-to-noise ratio, and even the transmit rate between your router and computer. All it takes is a press of a button and a click of your mouse/trackpad.
If you hold down the Option (alt) key and click the Wi-Fi icon in the menu bar, it will provide you with details about your router and the network you're using. The items in gray are all pieces of additional information seen only in this mode.
• IP Address: This is your computer's IP address.
• Router: Your router's IP address. You can type this into your browser to access your router's web interface.
• Security: Your router's security. Most routers on the market offer WPA2 Personal, and it keeps your network encrypted.
• BSSID: This is your router's MAC, or hardware address. It acts as an identifier for your router that lets it talk to other network-connected devices.
• Channel: This is your WLAN channel, and it determines which radio frequency the router uses to transmit information.
• RSSI: Received Signal Strength Indicator measures how well a device "hears" a signal from the router. It's useful for determining if you have enough signal to get a good wireless connection.
• Noise: This measures how much radio noise is interfering with the RSSI signal. Signal-to-noise ratio is a measure used in science and engineering that compares the level of a desired signal to the level of background noise. It is defined as the ratio of signal power to the noise power, often expressed in decibels.
• TX Rate: The transmit rate is the speed of the data that is transmitted between your router and your computer. Right now I have a speed of 450 Mbps.
• PHY Mode: This is the wireless protocol that the router uses, according to the IEEE 802.11 wireless standard.
• MCS Index: This number corresponds to the protocols uses to encode the radio signal.
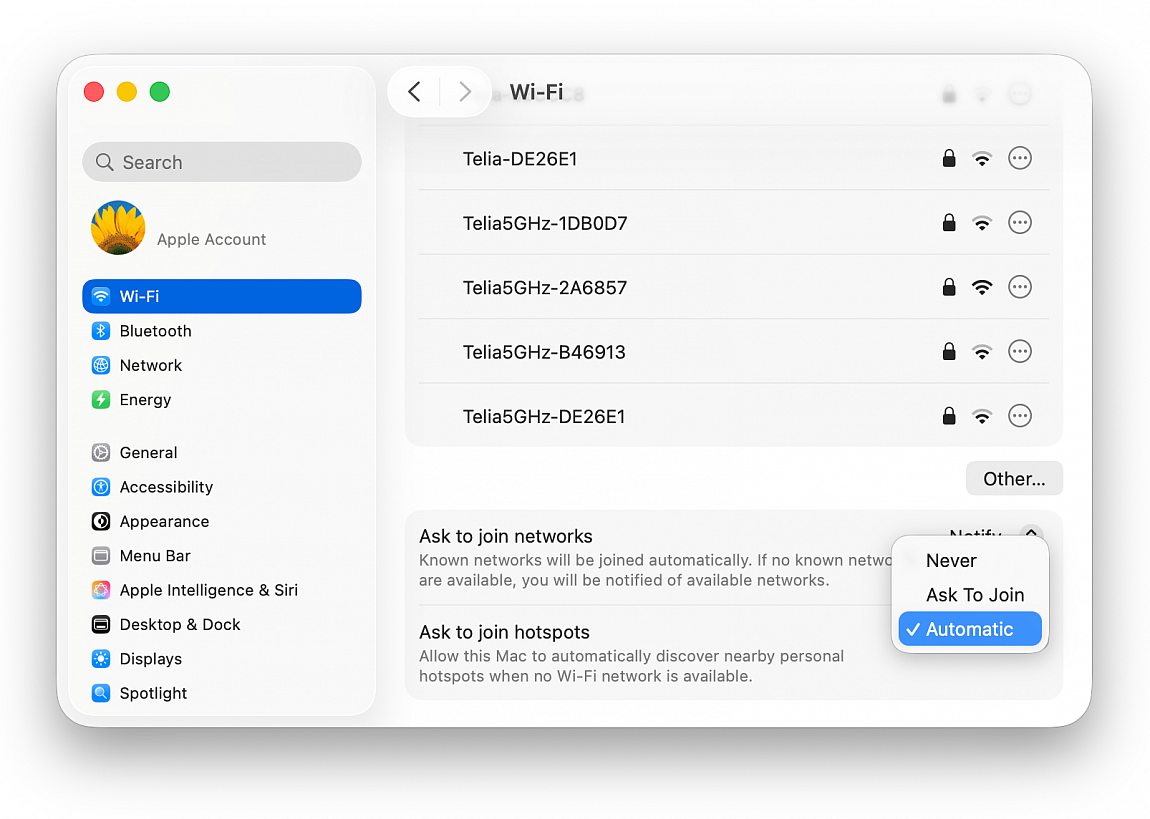
macOS Tahoe 26 gets a handy feature that allows your Mac to automatically connect to your iPhone or cellular iPad’s Personal Hotspot when no known Wi-Fi is available. Additionally, Mac can also be configured to automatically join the Personal Hotspot of a family member’s iOS device.
Make sure that Wi-Fi, Bluetooth, and Personal Hotspot are enabled on your or a family member’s nearby iPhone or cellular iPad. You can enable all these from the Settings app. In case of connecting to a family member’s iPhone or cellular iPad, make sure that person is added to your family group.
To allow your Mac to automatically connect to personal hotspots:
• Open System Settings on your Mac running macOS Tahoe 26
• Click Wi-Fi
• Scroll to the bottom and set “Ask to join hotspots” to Automatic in place of Never or Ask to Join
Going forward, your Mac will automatically connect to your iPhone or iPad’s cellular hotspot when no Wi-Fi is available and your iOS device has Wi-Fi, Bluetooth, and Personal Hotspot enabled.
To allow automatic connection to a family member’s hotspot:
• Go to System Settings > Wi-Fi and choose Automatic for “Ask to join hotspots"
• Open the Settings app on that family member’s iPhone or cellular iPad, tap Personal Hotspot > Family Sharing, select your name and set it to Automatic instead of Ask for Approval
From now on, your Mac will auto-join the hotspot of your family member’s iPhone or cellular iPad when Wi-Fi is unavailable, and your family member’s iOS device is nearby with Wi-Fi, Bluetooth, and Personal Hotspot enabled.
There is a delay in automatically switching to an iPhone or iPad’s personal hotspot after your Mac disconnects from regular Wi-Fi. This process is not seamless, and you may experience an offline period of up to a minute or more. However, if you boot up your Mac and Wi-Fi is unavailable from the start, your computer may automatically connect to Personal Hotspot from the beginning.
To improve privacy, your Mac (or any other of the Apple devices) can identify itself to each network using a different Wi-Fi address, and might rotate (change) the address periodically.
To communicate with a Wi-Fi network, a device must identify itself to the network using a unique network address called a Media Access Control (MAC) address. If the device always uses the same Wi-Fi MAC address across all networks, network operators and other network observers can more easily relate that address to the device's network activity and location over time. This allows a kind of user tracking or profiling, and it affects all devices on all Wi-Fi networks. The Private Wi-Fi Address feature is designed to address this concern.
Using a private Wi-Fi address helps reduce tracking of your Mac by Wi-Fi network operators. Tracking can occur when your address always appears the same to other devices and networks.
Turn this feature off or on for a network:
• On your Mac, choose Apple menu > System Settings..., then click Wi-Fi in the sidebar
• Click the "Details..." button
• Click the “Private Wi-Fi address” pop-up menu, then choose an option:
Off: Private Wi-Fi address is turned off. This Mac can be identified and tracked on this network, and across other networks.
Fixed: A fixed private address allows this network to track this Mac, but helps reduce tracking across other networks.
Rotating: A rotating private address reduces tracking on this network, and across other networks.
• Click OK
A private Wi-Fi address doesn't affect how you join or use most Wi-Fi networks. For improved privacy, allow your device to continue using a private addresses with all networks and software that support it.
If your Mac is a managed computer, you may not be able to change this setting. Contact a system administrator in the school or organization that provided you with the computer for more information.

Window Tiling
With macOS Sequoia, Apple has introduced a new window tiling management feature that aims to make it easy to arrange open windows into a layout that works best for you. When you drag a window to the edge of the screen, macOS Sequoia suggests a tiled position by displaying a frame, and you release the window to drop it right into place. This way, you can quickly arrange two app windows side by side, or place four windows in corners to keep several apps in view at once. When a window has been dragged to tile on one side or the other, dragging it back immediately resizes it to its original width and height.
macOS 15 also adds new tiling options to the green traffic light in the top corner of windows. Hover your pointer over the green button, and a menu appears with options to move and resize or fill and arrange all open windows.
Safari Video Viewer
When watching a video in Safari, click the menu icon in the left-hand side of the address bar and select the new Video Viewer option. This makes the playing video expand within the Safari window into a kind of theater mode that blurs everything out behind it, bringing the content front and center.
It also includes a native playback controls interface that replaces YouTube's – or the UI of whatever video you are playing. Options include AirPlay, volume, Picture in Picture, and playback speed.
Move & Resize Windows Controls
Accessed from the menu bar, a new "Move & Resize" option in the Window menu allows you to easily manage and arrange windows on your screen by offering various tiling and resizing options. You can move a window to the top, bottom, left, or right half of the screen, or position it into one of the four corners if you prefer a quarter-screen layout.
macOS also provides more flexible arrangements, such as splitting the screen horizontally or vertically, where you can tile windows side by side or one above the other. For even more control, there's a feature to quickly return a window to its previous size and position, making it easy to undo any changes.
iPhone Notifications
In System Settings > Notifications, there's an "Allow notifications from iPhone" menu that gives you several options. These include options to enable or disable sounds for notifications from iPhone, select which specific app notifications to mirror, and turn the entire feature on and off.
Show Passwords in Menu Bar
If you want to make access to the new Passwords app a lot more convenient, go to Passwords ➝ Settings... and check the box next to "Show Passwords in Menu Bar." When you're next on a website in Safari that you have login credentials for, click the key icon in the menu bar, and you'll see the dropdown menu automatically detect which login details you're looking for, ready for you to select. This also works with other browsers that have the iCloud Passwords browser extension installed.
Highlight Text in Notes
The Notes app now supports colors for typed text, allowing for highlighting. Apple added five colors, including pink, purple, orange, mint, and blue, with the colors able to be added through the formatting interface. Simply click on the Aa button in the toolbar to get to the color options when a word or phrase is selected.
Math Notes
Apple has added a powerful new feature to your Mac's Calculator app: Math Notes. This integration between Calculator and Notes offers a versatile tool for all your calculation needs. It's particularly handy for splitting bills, calculating group expenses, or working through more complex mathematical problems.
Math Notes allows you to type equations directly into a note, with automatic solving when you add an equals sign. You can perform a wide range of calculations, including defining variables for more complex math. For example, if you're planning a night out, you could write "dinner = $57" and "movies = $24" in a note, then simply type "dinner + movies =" to get the total cost. To access the feature, click the calculator symbol at the bottom left of the calculator window and select Math Notes.
You're not limited to accessing Math Notes through the Calculator app – you can also use the feature directly within the Notes app using any new or existing note. In fact, you can get Math results almost anywhere in the operating system. If you type an equation into Spotlight, for example, you'll get a result, and the same goes for apps like Messages.
Private Wi-Fi Address Options
In System Settings > Wi-Fi, if you click the Details button next to the currently connected network, there's a new Private Wi-Fi address option that may be familiar to users with iOS devices. A fixed private address reduces cross-network tracking by using a unique Wi-Fi address on the network. You can make it Fixed, Rotating, or turn off the option.
Record and Transcribe Voice Notes
Apple has made a significant enhancement to the Notes app, introducing a built-in audio recording feature that streamlines the process of capturing and transcribing voice notes. The new audio recording tool in Notes offers more than just simple voice capture. As users record, the app automatically generates a real-time transcript, making it easier to review and search through recorded content.
To record a voice note, simply click the new waveform icon in the Notes toolbar. An interface will appear on the right showing the audio recording controls, as well as a speech bubble icon that you can use to view the transcript. When you've finished your recording, it will be saved in the note along with the accompanying transcription.
Window Title Bar Double-Click Options
In System Settings > Desktop & Dock, there's a new option to change the behavior of a window when you double-click its title bar. In Sonoma, the default behavior is to zoom the window, but in Sequoia you can change "Double-click a window's title bar to" Fill, Zoom, Minimize, or Do Nothing.