Window Tiling
With macOS Sequoia, Apple has introduced a new window tiling management feature that aims to make it easy to arrange open windows into a layout that works best for you. When you drag a window to the edge of the screen, macOS Sequoia suggests a tiled position by displaying a frame, and you release the window to drop it right into place. This way, you can quickly arrange two app windows side by side, or place four windows in corners to keep several apps in view at once. When a window has been dragged to tile on one side or the other, dragging it back immediately resizes it to its original width and height.
macOS 15 also adds new tiling options to the green traffic light in the top corner of windows. Hover your pointer over the green button, and a menu appears with options to move and resize or fill and arrange all open windows.
Safari Video Viewer
When watching a video in Safari, click the menu icon in the left-hand side of the address bar and select the new Video Viewer option. This makes the playing video expand within the Safari window into a kind of theater mode that blurs everything out behind it, bringing the content front and center.
It also includes a native playback controls interface that replaces YouTube's – or the UI of whatever video you are playing. Options include AirPlay, volume, Picture in Picture, and playback speed.
Move & Resize Windows Controls
Accessed from the menu bar, a new "Move & Resize" option in the Window menu allows you to easily manage and arrange windows on your screen by offering various tiling and resizing options. You can move a window to the top, bottom, left, or right half of the screen, or position it into one of the four corners if you prefer a quarter-screen layout.
macOS also provides more flexible arrangements, such as splitting the screen horizontally or vertically, where you can tile windows side by side or one above the other. For even more control, there's a feature to quickly return a window to its previous size and position, making it easy to undo any changes.
iPhone Notifications
In System Settings > Notifications, there's an "Allow notifications from iPhone" menu that gives you several options. These include options to enable or disable sounds for notifications from iPhone, select which specific app notifications to mirror, and turn the entire feature on and off.
Show Passwords in Menu Bar
If you want to make access to the new Passwords app a lot more convenient, go to Passwords ➝ Settings... and check the box next to "Show Passwords in Menu Bar." When you're next on a website in Safari that you have login credentials for, click the key icon in the menu bar, and you'll see the dropdown menu automatically detect which login details you're looking for, ready for you to select. This also works with other browsers that have the iCloud Passwords browser extension installed.
Highlight Text in Notes
The Notes app now supports colors for typed text, allowing for highlighting. Apple added five colors, including pink, purple, orange, mint, and blue, with the colors able to be added through the formatting interface. Simply click on the Aa button in the toolbar to get to the color options when a word or phrase is selected.
Math Notes
Apple has added a powerful new feature to your Mac's Calculator app: Math Notes. This integration between Calculator and Notes offers a versatile tool for all your calculation needs. It's particularly handy for splitting bills, calculating group expenses, or working through more complex mathematical problems.
Math Notes allows you to type equations directly into a note, with automatic solving when you add an equals sign. You can perform a wide range of calculations, including defining variables for more complex math. For example, if you're planning a night out, you could write "dinner = $57" and "movies = $24" in a note, then simply type "dinner + movies =" to get the total cost. To access the feature, click the calculator symbol at the bottom left of the calculator window and select Math Notes.
You're not limited to accessing Math Notes through the Calculator app – you can also use the feature directly within the Notes app using any new or existing note. In fact, you can get Math results almost anywhere in the operating system. If you type an equation into Spotlight, for example, you'll get a result, and the same goes for apps like Messages.
Private Wi-Fi Address Options
In System Settings > Wi-Fi, if you click the Details button next to the currently connected network, there's a new Private Wi-Fi address option that may be familiar to users with iOS devices. A fixed private address reduces cross-network tracking by using a unique Wi-Fi address on the network. You can make it Fixed, Rotating, or turn off the option.
Record and Transcribe Voice Notes
Apple has made a significant enhancement to the Notes app, introducing a built-in audio recording feature that streamlines the process of capturing and transcribing voice notes. The new audio recording tool in Notes offers more than just simple voice capture. As users record, the app automatically generates a real-time transcript, making it easier to review and search through recorded content.
To record a voice note, simply click the new waveform icon in the Notes toolbar. An interface will appear on the right showing the audio recording controls, as well as a speech bubble icon that you can use to view the transcript. When you've finished your recording, it will be saved in the note along with the accompanying transcription.
Window Title Bar Double-Click Options
In System Settings > Desktop & Dock, there's a new option to change the behavior of a window when you double-click its title bar. In Sonoma, the default behavior is to zoom the window, but in Sequoia you can change "Double-click a window's title bar to" Fill, Zoom, Minimize, or Do Nothing.
Some macOS users have found that file sharing between a Mac running macOS Ventura or Sonoma does not work reliably between such Mac and another Mac with older OS, iPhone, iPad, Windows PC, and even some NAS drives like Synology. For many users, file sharing setups that worked fine for years prior to updating to macOS Ventura or Sonoma are now no longer working at all or behaving in an inconsistent manner.
If you’re experiencing problems with file sharing not working in macOS Ventura or Sonoma, there is a fix to resolve the issue. This solution applies to SMB file sharing with macOS Ventura or Sonoma and devices connecting to or from the Mac, whether you’re experiencing connectivity failures, time outs, server unavailable, server may not exist, or other similar error messages.
• Open the "System Settings" on Mac from the Apple menu
• Go to "General" and then to "Sharing"
• Find the switch for "File Sharing" and toggle it Off
• Restart the Mac by going to the Apple menu and choosing Restart
• Upon reboot, return to the Sharing system settings panel and turn "File Sharing" back to the On position
• Resume file sharing as usual, it should work as expected
You may need to repeat this process after a few days, or at random, if file sharing suddenly stops working again between the macOS Ventura or Sonoma Mac and another Mac or device. Why you need to disable file sharing, reboot, then re-enable file sharing, is a bit of a mystery. Simply toggling file sharing off and on does not do the trick.
AirDrop offers a fantastic wireless file sharing option for Mac, but not everyone may want to have it enabled. If you’re a Mac user you may find yourself in a situation where you’d like to disable AirDrop on the Mac for whatever reason. Using AirDrop is super easy, and you’ll find that turning the feature off is simple too.
Whether you’re wanting to stop receiving inbound AirDrop requests for files, trying to avoid a networking conflict, troubleshooting, or just limit your network footprint, it’s easy to turn off AirDrop on MacOS.
Turning off AirDrop in MacOS is the same in all versions of macOS and Mac OS X, regardless of system software version. Here’s how:
• Open the Finder on Mac
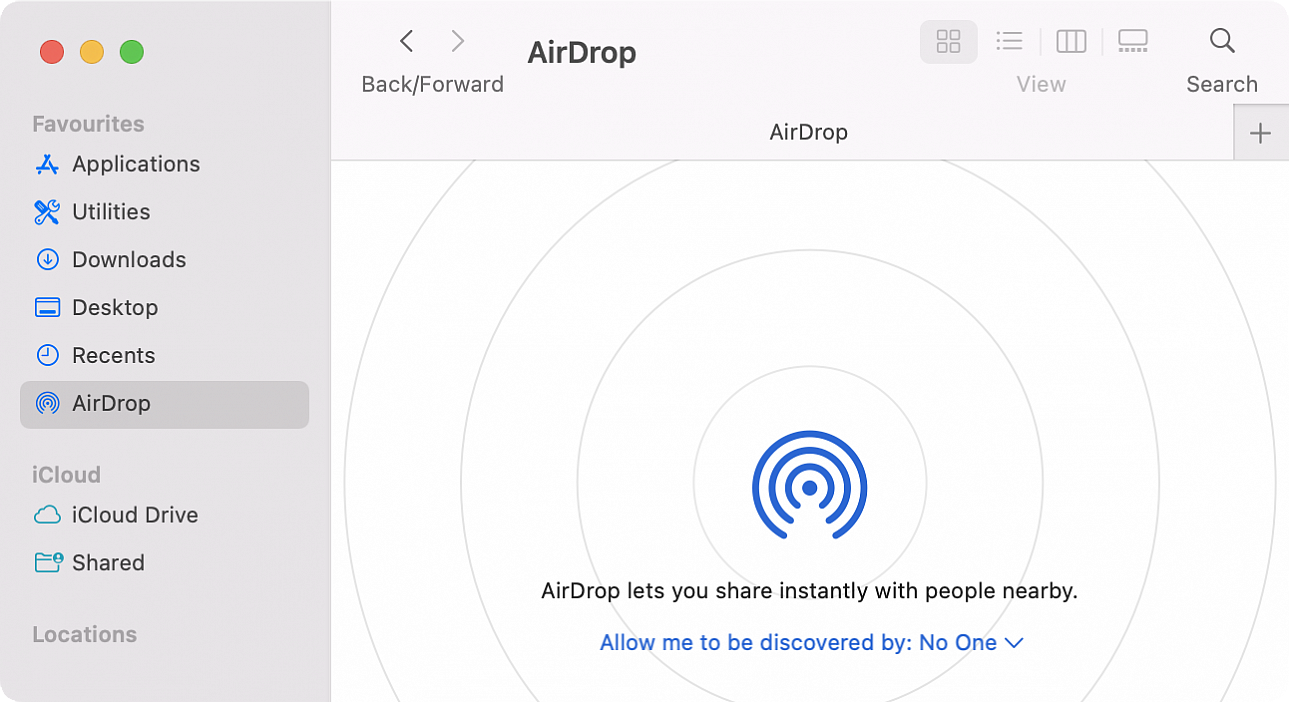
• Go to “AirDrop” in the Finder window sidebar, or pull down the Go menu and choose AirDrop from there
• Click the small blue text at the bottom of the AirDrop window that says “Allow me to be discovered by:” and select “No One” to turn AirDrop off
With AirDrop turned off you will not be discoverable by other devices that are looking for AirDrop destinations. This means you won’t be able to receive any files or data sharing requests from anyone via AirDrop.
If you’d like to enable AirDrop at any time, simply switch the AirDrop allowing options to either Contacts Only or Everyone, like so:
• Open the Finder on Mac
• Go to “AirDrop” in the Finder window sidebar, or pull down the Go menu and choose AirDrop
• Click the “Allow me to be discovered by:” text at the bottom of the window and choose “Contacts Only” or “Everyone”
This turns on AirDrop again and allows the Mac to be available for AirDrop requests. You will also need to make sure you have Bluetooth enabled on the Mac to be able to use AirDrop successfully.
If you're having persistent networking issues on a Mac, like constantly dropping from a Wi-Fi network, inability to join networks, inappropriately sluggish internet connections that only impact the particular Mac, or other networking related issues, it may be helpful to reset the network settings.
The easiest way to reset Wi-Fi settings is to delete Wi-Fi related configuration files. Please note that by resetting network settings you will need to re-add and re-join any networks and enter the passwords again.
• Disable Wi-Fi by pulling down the Wi-Fi menu and choosing to toggle the Wi-Fi switch Off
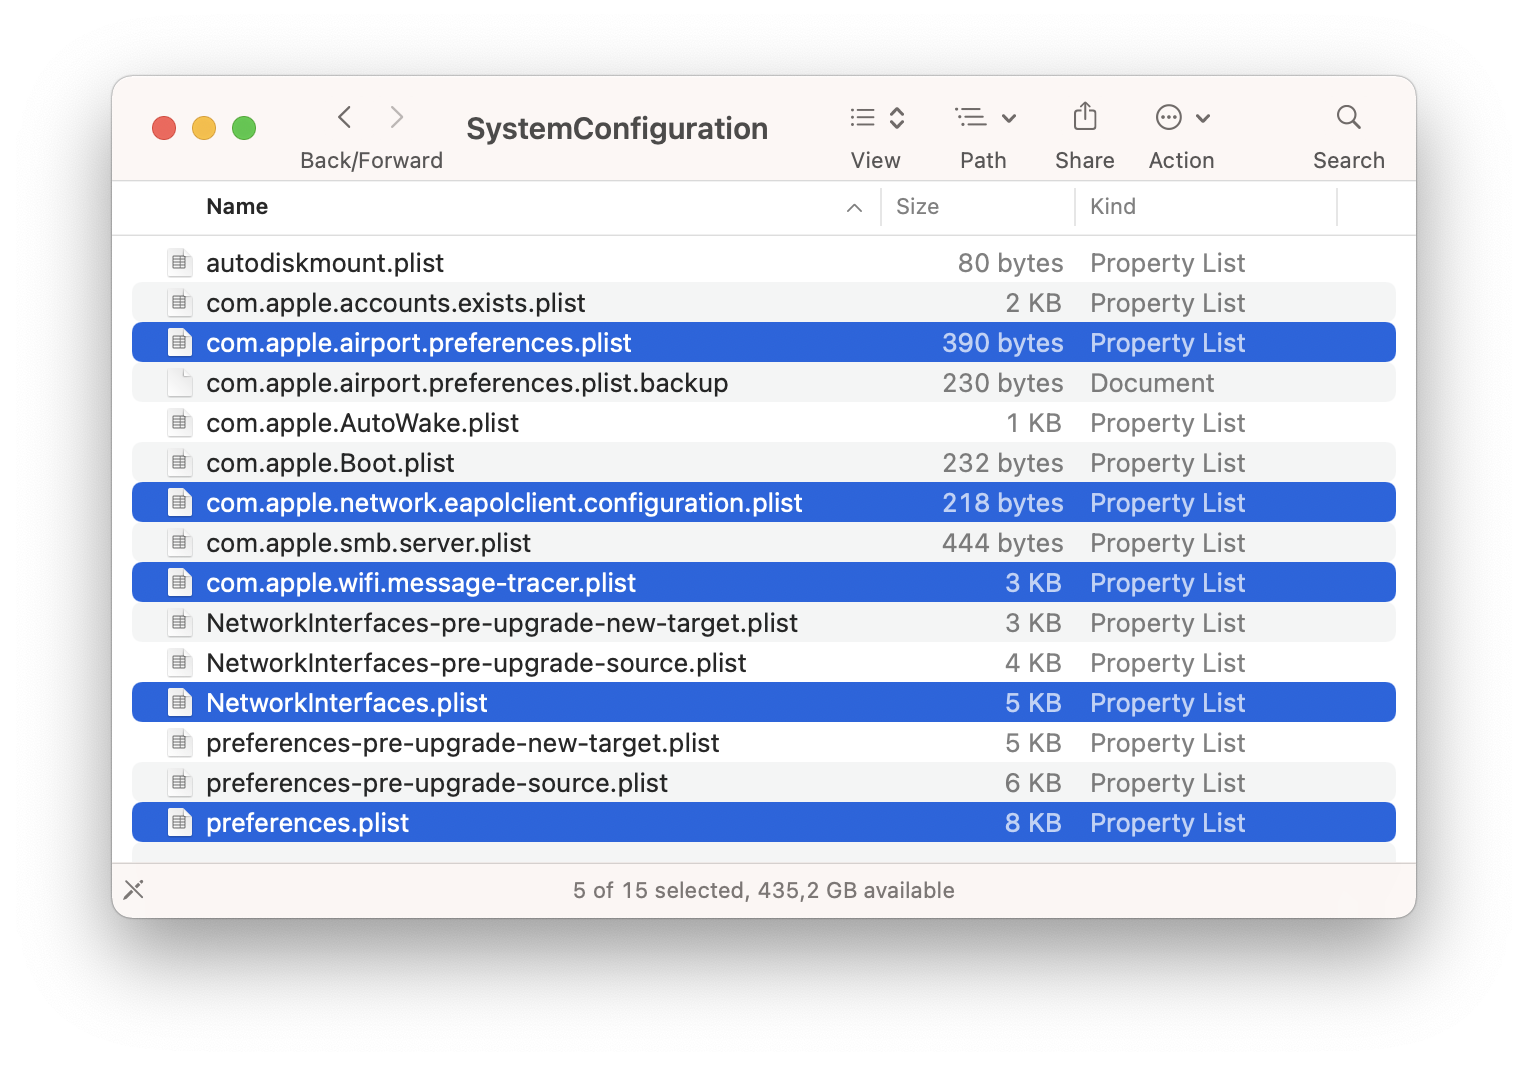
• Go to the Finder, pull down the "Go" menu, choose "Go to Folder..." and enter the following path:
/Library/Preferences/SystemConfiguration/
the click the "Go" button
• Select and delete the following files from this folder:
com.apple.airport.preferences.plist
com.apple.network.identification.plist
com.apple.wifi.message-tracer.plist
com.apple.network.eapolclient.configuration.plist
NetworkInterfaces.plist
preferences.plist
• Restart the Mac by going to the Apple () menu and choosing "Restart..."
• When the Mac boots back up, enable Wi-Fi again by going to the Wi-Fi menu and toggling it back On
• Select the network you wish to join
This approach will often resolve many wireless networking issues encountered on the Mac, but if you're still experiencing any Wi-Fi networking issues, you might want to reset the router and the modem itself, which typically involves unplugging those devices from power source for 10-15 seconds and then plugging them back in again, then waiting a few minutes for those to rejoin the appropriate networks.
If you need to quickly offer help to another Mac user you know, there's no quicker way to remotely provide assistance than via Apple's own Messages. Here's how to take control of another person's Mac on their behalf, and how to allow others to do the same to your desktop.
As part of the Messages app in macOS, it is possible to establish a remote desktop session where you have control of a Mac across the Internet or someone else has control over your Mac desktop. What's more, as well as being simple to get going, it also doesn't require any real installation of extensions or other components.
What does Messages' screen sharing feature do? When a screen share is initiated, the screen from the Mac being controlled will be streamed as a live video feed to the other participant, the Mac that will be used for control. This will allow the user on the controlling Mac to see what is on the desktop of the Mac being controlled. At the same time, a FaceTime Audio call is started between the two users, providing two-way audio. This enables the users to speak to each other, such as advising on what they are doing for the other user or additional instructions. The feature doesn't automatically enable the ability to remote control the other person's display by default, but the option is presented. If control isn't provided by one party to the other, the screen is shared but it is not remotely controllable.
To share your screen with another user:
• Open Messages on your Mac.
• Select the conversation with the person you want to share the screen with. If no prior conversation exists, send a message to them.
• In the main menu, select Conversations then Invite to Share My Screen. The sharing and audio call will begin automatically once the remote user accepts the invitation.
To request another user shares their screen:
• Open Messages on your Mac.
• Select the conversation with the person you want to share the screen with. If no prior conversation exists, send a message to them.
• In the main menu, select Conversations then Ask to Share Screen. The sharing and audio call will begin automatically once the invitation is accepted.
Once sharing is enabled, a new window appears called Screen Sharing, which will host the call and show the sharing user's desktop. There are also some options within the window that can be used. Clicking the mouse pointer icon in the menu will send a request to the sharer to enable remote control of the Mac. Clicking on the remote display will highlight elements on the shared Mac, which can be useful for pointing out elements of an app's interface without taking control. When you have control of the remote Mac, you can also control the Clipboard, which means you can copy and paste text and images between the two computers. This is handy to save you from retyping a URL into a remote browser when you have the link locally. You can even transmit files from the remotely-controlling Mac to the shared Mac by dragging and dropping them onto the window.
To end a screen sharing session:
• For the screen-sharing Mac, click the Sharing icon in the menu bar then End Screen Sharing. Alternately, you can select Pause Screen Sharing if you want to stop for a while.
• The remote controlling Mac can do the same by selecting Screen Sharing in the menu followed by Quit Screen Sharing.
If screen sharing doesn't work, make sure the user of the Mac being shared is signed in to iCloud on that Mac using the same Apple ID that they are using for messages. If they are using different IDs, add both Apple IDs to the same contact within the Contacts app and try again. Also, make sure that they are not limited by Screen Time. If one party is restricted and the initial Messages communication cannot be established, that could prevent Screen Sharing from functioning properly.