Your Mac is pretty safe on your private home network, but what about when you're surfing the Web in coffee shops? Anyone with a computer and rudimentary hacking skills could target you, which is why it's important to make sure your Mac's built-in firewall is enabled and that stealth mode is turned on.
macOS's firewall feature blocks unwanted network traffic coming into your computer, and stealth mode makes your Mac essentially invisible to hackers snooping for computers to target. They aren't foolproof features, but they will keep most people from finding and attacking your Mac on public networks.
First, you need to make sure your Mac's firewall is enabled:
• Open "System Settings..." from the Apple menu
• Go to "Network"
• Click "Firewall" and enable it
Next, enable stealth mode:
• Click "Options..."
• Scroll down and enable "Enable stealth mode" setting
• Click OK
"Automatically allow built-in software to receive incoming connections" and "Automatically allow downloaded signed software to receive incoming connections" should already be checked. Those settings let the apps you already have communicate through the firewall without you having to take any extra steps. Leave those checked unless you know what you're doing and plan to manage app network access manually. You should leave "Block all incoming connections" disabled, unless all you're doing is surfing the Web.

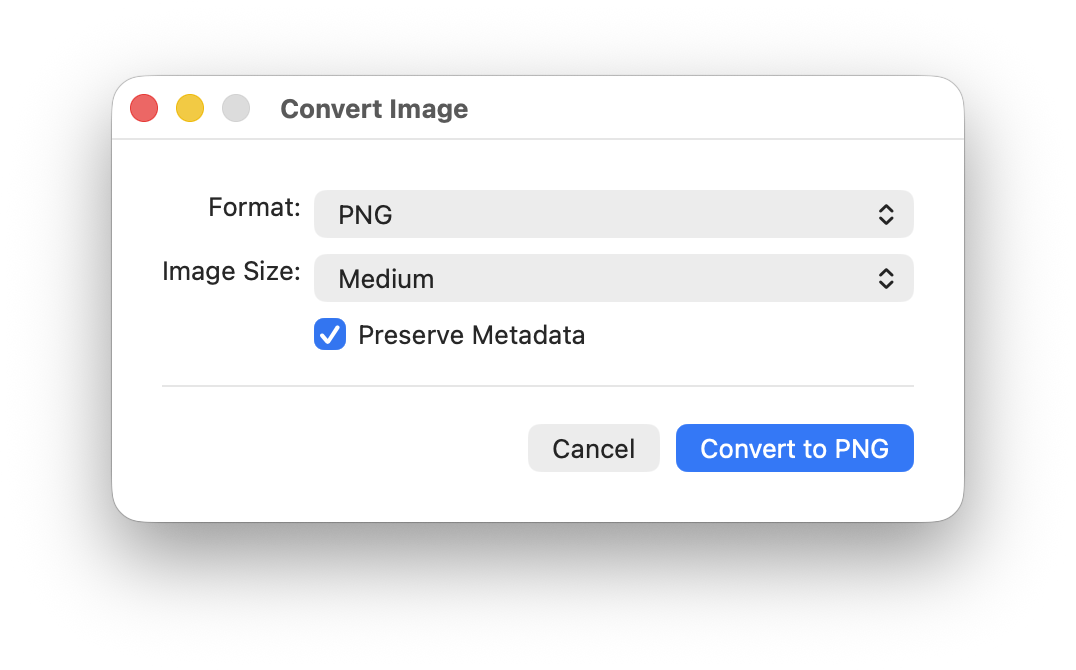
macOS offers a super simple and fast way to convert images, directly from the Finder. Thanks to the handy Quick Actions feature, Mac users are able to convert any images from anywhere in the Finder, with just a few clicks.
This is a powerful and useful feature that is often overlooked. Here’s how it works:
• From Finder, locate the image you want to convert
• Right-click, control-click, or two-finger click on the image you wish to convert, and go to “Quick Actions” and then select "Convert Image" from the menu
• Select the file format type you wish to convert the image to and select the image size (choose "Actual Size" if you do not want to resize the image), choose whether or not you wish to preserve metadata, then click on the "Convert" button
The image will convert almost instantly and appear in the same folder with the same file name as the origin image. This Quick Action image conversion tool is super fast and powerful, but is limited to JPG, PNG, and HEIF/HEIC formats. If you wish to convert to additional image file formats, you will have to use Preview.
Apple has increasingly made it hard to mess with macOS system files. That’s true whether you intentionally want to extend macOS’s functionality or if a malicious party is trying to install and activate a virus. However, many system components and all Apple and third-party apps rely on preferences and other files to store your custom settings, caches for work in progress, and other data. If those files corrupt, macOS may be perfectly fine, but you can’t get anything done in an app or your account.
Once you’ve gone through troubleshooting your Mac within your account that doesn’t seem to improve matters, the next big leap before reinstalling macOS is to set up a fresh macOS user account. From this account, you can test hardware, like your Wi-Fi or ethernet adapter; add printers and scanners; or run third-party software that keeps crashing on launch.
Because a fresh account typically contains nothing that would already be corrupted, you can isolate whether a problem is in your everyday user account or a system-wide issue–maybe even hardware related.
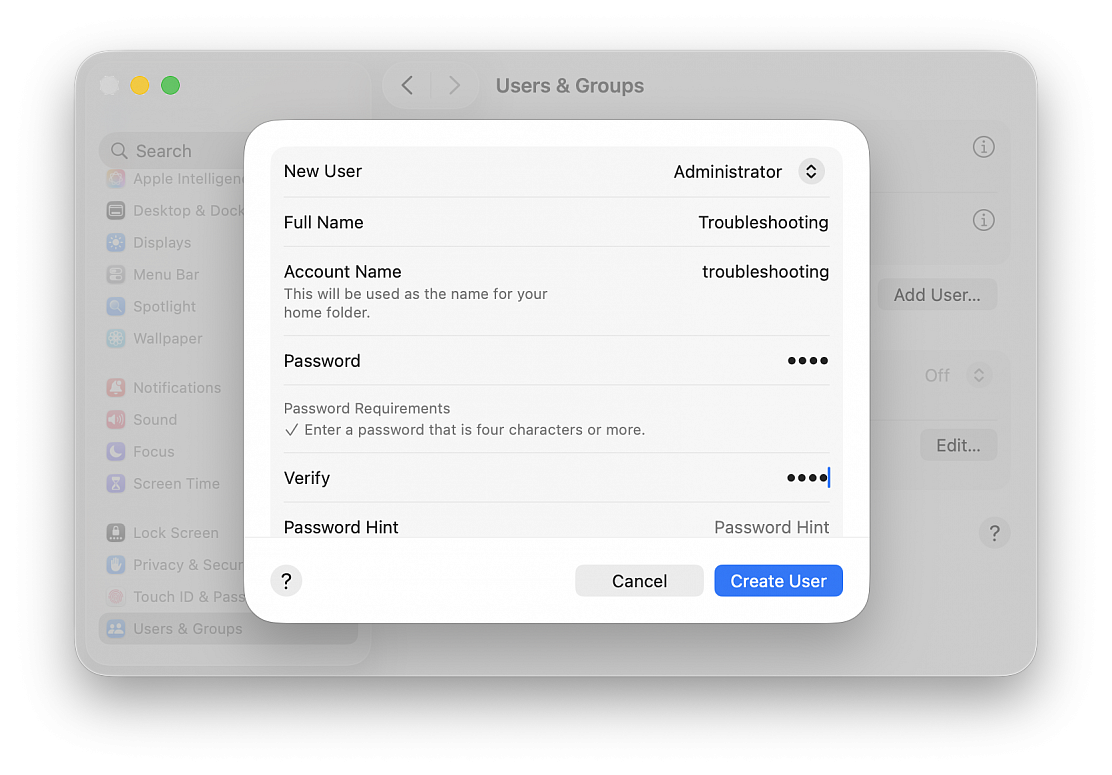
Here’s how to set up a fresh, new user account:
• Open "System Settings..." from the Apple menu
• Go to "Users & Groups"
• Click the "Add User..." button
• Enter your password if prompted
• Choose whether to create a Standard or Administrator account, give it a name, password, and hint, and click "Create User"
When making the account, what kind should it be?
Create a Standard account if you want to test a problem from the perspective of a user without any extra privileges.
Create an Administrator if that’s your normal account type–that’s typical–and you’re trying to perform an apples-to-apples comparison.
• Choose Apple menu > Log Out [name]
• At the login screen, select the new account, enter the password, and click the arrow to log in
Now you can check if your problem persists.
When you’ve debugged your problem, you can get rid of the account. You must be logged in using an Administrator account to do this.
Many apps automatically save versions of documents as you work on them. Apple offers a built-in feature for its document-focused apps, like Pages and Numbers, and a framework that some other developers tie into as well. It resembles Time Machine, but doesn’t require that you are using a Time Machine backup.
A version is saved automatically every hour, or more frequently when you’re making many changes, when you open, save, duplicate, lock, rename, or revert a document. You can also explicitly save a version.
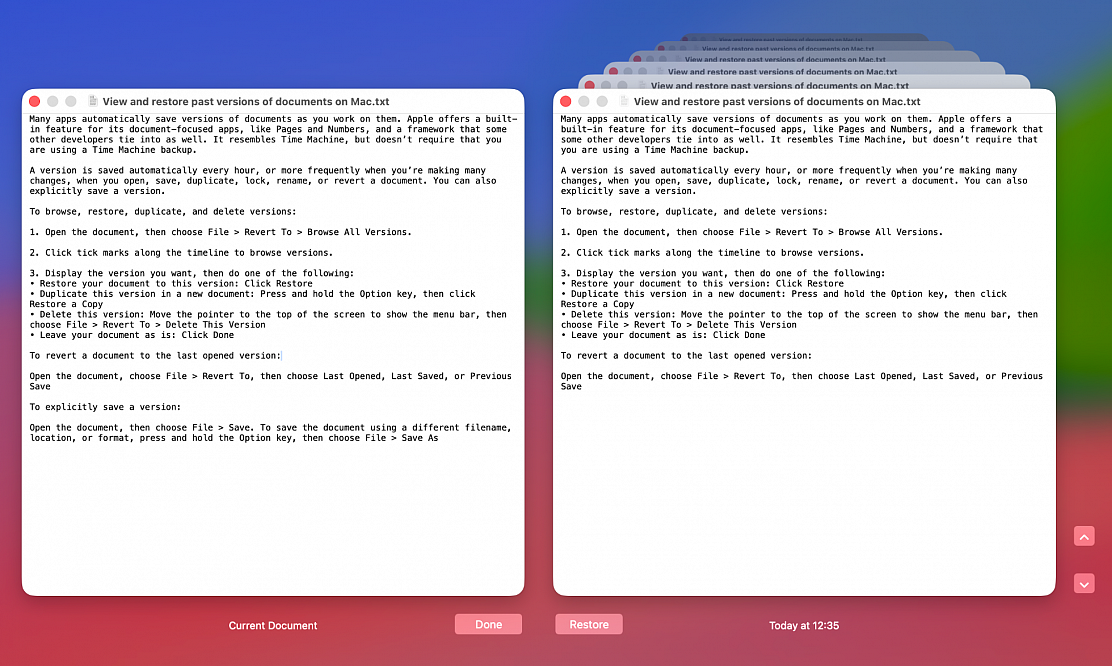
To browse, restore, duplicate, and delete versions:
1. Open the document, then choose File > Revert To > Browse All Versions.
2. Click tick marks along the timeline to browse versions.
3. Display the version you want, then do one of the following:
• Restore your document to this version: Click Restore
• Duplicate this version in a new document: Press and hold the Option key, then click Restore a Copy
• Delete this version: Move the pointer to the top of the screen to show the menu bar, then choose File > Revert To > Delete This Version
• Leave your document as is: Click Done
To revert a document to the last opened version:
Open the document, choose File > Revert To, then choose Last Opened, Last Saved, or Previous Save
To explicitly save a version:
Open the document, then choose File > Save. To save the document using a different filename, location, or format, press and hold the Option key, then choose File > Save As
If you suspect a hardware component is not working properly, you can let your Mac scan your system and find which hardware component is failing.
Your Mac includes a built-in tool called Apple Diagnostics (formerly called Apple Hardware Test). This tool will be handy if you are dealing with a hardware issue and not a software issue. You can use it to find and diagnose issues with your Mac’s internal hardware such as the Wi-Fi hardware, the Bluetooth hardware, Touch ID, the fan, or the power adapter, etc.
Prepare your Mac
• If you can install the latest macOS updates (https://support.apple.com/en-us/108382)
• Disconnect all external devices except keyboard, mouse, display, Ethernet connection and connection to AC power
• Determine if you have an Apple silicon Mac or an Intel Mac, go to the Apple menu > About This Mac to find out (on a Mac with Apple silicon, About This Mac shows an item labeled Chip, followed by the name of the chip, on an Intel-based Mac, About This Mac shows an item labeled Processor, followed by the name of an Intel processor)
• Shut down your Mac (if you can't shut it down normally, press and hold its power button for up to 10 seconds, until your Mac turns off - every Mac has a power button; on laptop computers that have Touch ID, press and hold the Touch ID button)
• Turn off your Mac, then wait a few seconds for your Mac to completely turn off
On an Apple silicon Mac
• Press and hold the power button on your Mac (on laptop computers that have Touch ID, press and hold Touch ID)
• As you continue to hold the power button, your Mac turns on and loads startup options
• When you see Options, release the power button
• Press and hold Command (⌘)-D on your keyboard until your Mac restarts
On an Intel Mac
• Turn on your Mac, then immediately press and hold the D key on your keyboard as your Mac starts up (if using the D key doesn't work, press and hold Option (⌥)-D at startup instead)
• Release the key when you see a progress bar or you're asked to choose a language
Run Apple Diagnostics
Follow the onscreen instructions, which vary based on your Mac, the version of macOS that it’s using, and whether certain parts of your Mac have been repaired or replaced.
As you follow the onscreen instructions:
• If your Mac isn’t already connected to the internet, you’re asked to choose a Wi-Fi network, or you can use an Ethernet cable to connect to your network
• If asked to review terms and conditions, you might be given the option to run diagnostics offline (in that case, click Run Offline)
• In macOS Tahoe 26 and later, you’re asked to choose a specific diagnostic to run, such as a diagnostic for your built-in display, keyboard, or trackpad; in earlier versions of macOS, this is automatic
When testing is complete, Apple Diagnostics shows the results. If you see one or more reference codes and need more explanation, refer to the list of Apple Diagnostics reference codes (https://support.apple.com/en-us/102334).
If you can't use this information to resolve the issue on your own, you might need service (https://getsupport.apple.com/?caller=kbase). Provide the reference code you receive from the test when taking your Mac to an Apple Authorized Service Provider, Apple Store, or an Independent Repair Provider. Genuine Apple parts are also available for out-of-warranty repairs through Self Service Repair (https://support.apple.com/self-service-repair).
