The Type to Siri feature on Mac is super useful, particularly now that Siri has Apple Intelligence features. Using Type to Siri is perhaps even more handy for Mac users than using the voice activated Siri commands, but some Mac users may find themselves accidentally triggering Type to Siri by inadvertently pressing the initiating command sequence.
If you wish to change the keyboard shortcut for Type to Siri on Mac, you can do so rather quickly with a settings change:
• Go to the Apple menu and choose “System Settings...”
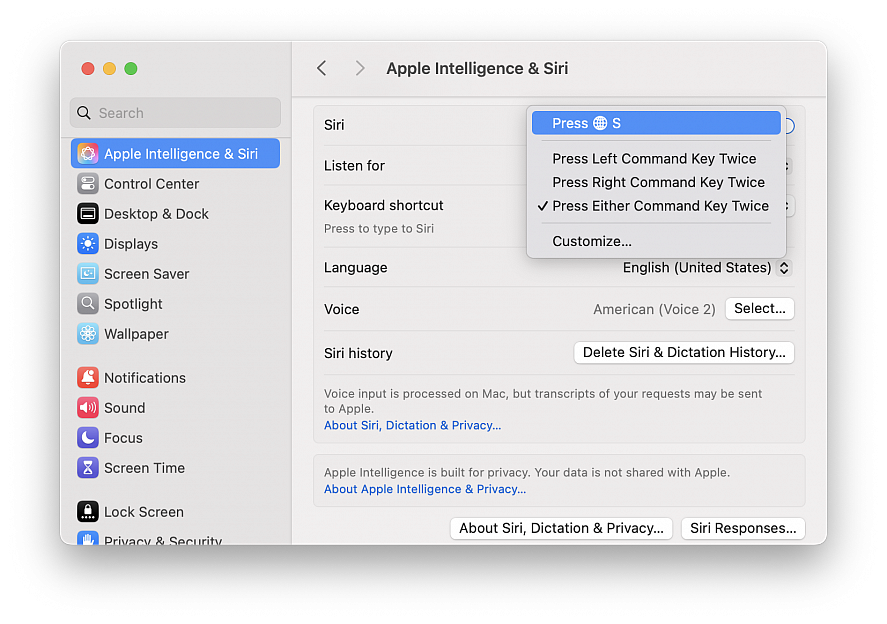
• Select “Apple Intelligence & Siri”
• Select the “Keyboard Shortcut” dropdown menu to choose your desired keyboard shortcut for starting Type to Siri, the default options are: Globe/fn+S, Press Left Command key twice, Press Right command key twice, Press either command key twice or Customize (you can select just about any keyboard shortcut this way)
If you find yourself accidentally initiating the Type to Siri feature with the double press of command key, you might try switching the Type to Siri keyboard shortcut to Globe/fn+S instead, or something else entirely using the customize feature. Or, if you only use one of the Command keys, you might find switching the keyboard shortcut to the non-used Command key to be helpful as well.
Sometimes when you share a webpage link with someone, you just want to bring their attention to a specific passage or sentence to make your point, rather than have them read through the entire article.
To copy link with highlight in Safari visit a web page and simply highlight the text you want to create a link to, then right-click and choose Copy Link with Highlight from the dropdown menu.
This will generate a special URL that includes a hash (#) symbol and "text" element, followed by a few words that bookend the selected text. All you need to do is share the link with someone, and when they click it they'll be sent directly to that part of the webpage with the specific passage highlighted.
Bear in mind that the look of highlighted text can differ depending on whether the page author has styled it to look a certain way. Also, text fragment linking does not work in PDFs.

Most long-time macOS users will be aware of the Application Switcher. It's invoked using the Command+Tab keyboard shortcut, and lists all of the apps currently running on your Mac, enabling you to quickly switch between them.
When you hold Command and press Tab, the Application Switcher overlay appears above all other open windows on your desktop, and remains visible until you release the Command key. Letting go switches you to the last active app, prior to the one you were just using.
Repeatedly tapping Tab with the Command key held down cycles you through the list of apps in the Application Switcher from left to right, while releasing Command takes you to the selected app. You can also press the right and left arrow keys to move the selection box forwards and backwards. A two-finger drag on a trackpad does the same thing, or you can use your mouse cursor to highlight an app in the list and then click to select it.
Bring back a minimized app
While the Application Switcher allows you to cycle through open apps, selecting an app with minimized windows doesn't automatically restore those windows. To do that, activate the Application Switcher and navigate through the row of icons. With the desired app highlighted, press and hold the Option key, then release the Command key. This action will restore the minimized window of the app in question.
Close and hide apps via the Application Switcher
Pressing the H key in the Application Switcher hides all the windows of the selected app (pressing the H key again reveals them). It's a neat way to quickly clear a space on a desktop cluttered with windows. This method streamlines window management by avoiding minimization. By invoking the Application Switcher again you can switch back to the hidden app.
Lastly, highlighting an icon in the Application Switcher and tapping Q has to be one of the fastest ways to individually quit open Mac apps.
In macOS, a Text Clipping is a selection of text that you've dragged from an application to another location on your Mac, where it becomes a unique kind of standalone file. The relatively little-known feature has been around since at least Mac OS 9, and it offers a convenient way to save out pieces of text from pretty much anywhere for later use in another app or document.
To create a Text Clipping, simply highlight any piece of text, then hold left-click and drag it with your mouse to your Desktop or an open Finder window. This saves the highlighted text – including any rich text formatting – as a .textclipping file named after the first few words of text that you selected, but you can easily rename it to make it more identifiable.
To use the selected text in another file like a Pages document, drag the Text Clipping into the open document and the text will be automatically pasted wherever the cursor is located. You can paste the clipping in the same way into all sorts of open files and apps, including browser search engines, Mail compose windows, and more.
To quickly view the contents of a Text Clipping, simply double-click it to view the text in a dedicated window, and even highlight and copy (Command-C) just a snippet of the text from this window for pasting elsewhere.
Text clippings can speed up many repetitive tasks, making things like reusing email/letter templates and code snippets a cinch. Bear in mind that Text Clippings store content in a unique format that may not be compatible across all platforms or devices. So if you're sharing clippings, it's best to convert them into standard text formats to ensure they can be opened elsewhere.

To improve privacy, your Mac (or any other of the Apple devices) can identify itself to each network using a different Wi-Fi address, and might rotate (change) the address periodically.
To communicate with a Wi-Fi network, a device must identify itself to the network using a unique network address called a Media Access Control (MAC) address. If the device always uses the same Wi-Fi MAC address across all networks, network operators and other network observers can more easily relate that address to the device's network activity and location over time. This allows a kind of user tracking or profiling, and it affects all devices on all Wi-Fi networks. The Private Wi-Fi Address feature is designed to address this concern.
Using a private Wi-Fi address helps reduce tracking of your Mac by Wi-Fi network operators. Tracking can occur when your address always appears the same to other devices and networks.
Turn this feature off or on for a network:
• On your Mac, choose Apple menu > System Settings..., then click Wi-Fi in the sidebar
• Click the "Details..." button
• Click the “Private Wi-Fi address” pop-up menu, then choose an option:
Off: Private Wi-Fi address is turned off. This Mac can be identified and tracked on this network, and across other networks.
Fixed: A fixed private address allows this network to track this Mac, but helps reduce tracking across other networks.
Rotating: A rotating private address reduces tracking on this network, and across other networks.
• Click OK
A private Wi-Fi address doesn't affect how you join or use most Wi-Fi networks. For improved privacy, allow your device to continue using a private addresses with all networks and software that support it.
If your Mac is a managed computer, you may not be able to change this setting. Contact a system administrator in the school or organization that provided you with the computer for more information.
