AirDrop offers a fantastic wireless file sharing option for Mac, but not everyone may want to have it enabled. If you’re a Mac user you may find yourself in a situation where you’d like to disable AirDrop on the Mac for whatever reason. Using AirDrop is super easy, and you’ll find that turning the feature off is simple too.
Whether you’re wanting to stop receiving inbound AirDrop requests for files, trying to avoid a networking conflict, troubleshooting, or just limit your network footprint, it’s easy to turn off AirDrop on MacOS.
Turning off AirDrop in MacOS is the same in all versions of macOS and Mac OS X, regardless of system software version. Here’s how:
• Open the Finder on Mac
• Go to “AirDrop” in the Finder window sidebar, or pull down the Go menu and choose AirDrop from there
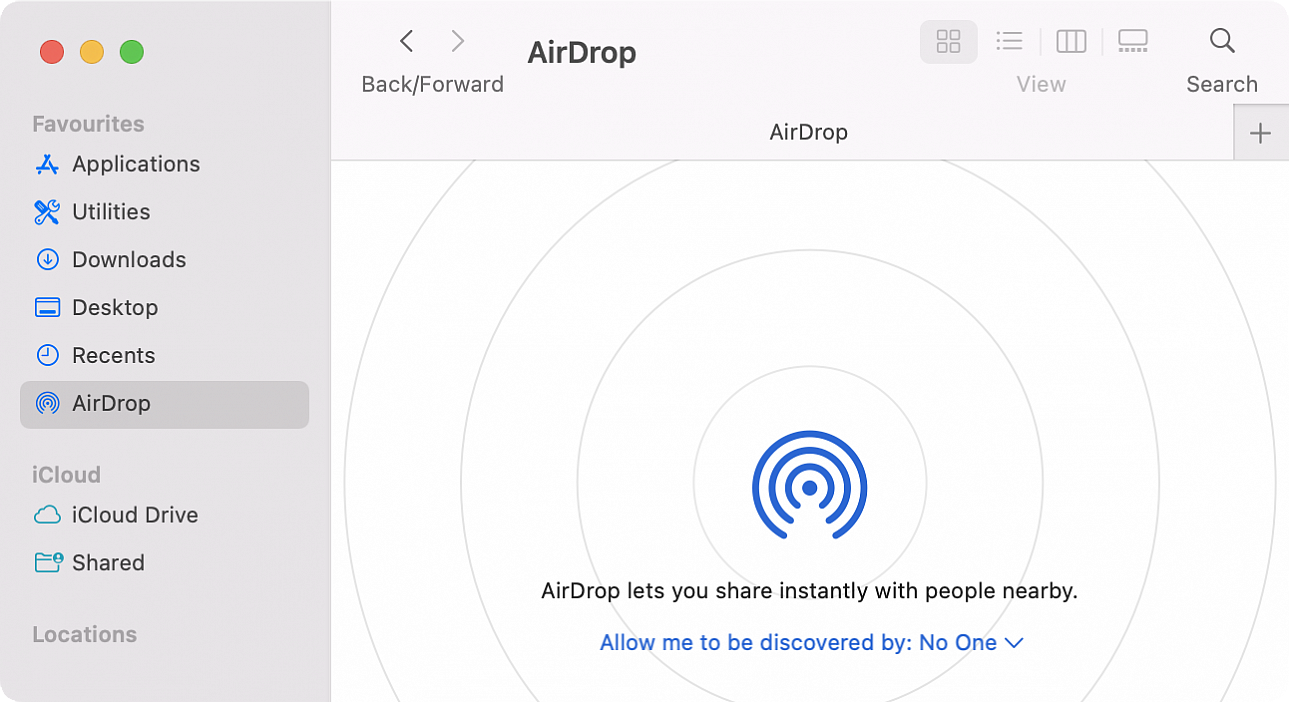
• Click the small blue text at the bottom of the AirDrop window that says “Allow me to be discovered by:” and select “No One” to turn AirDrop off
With AirDrop turned off you will not be discoverable by other devices that are looking for AirDrop destinations. This means you won’t be able to receive any files or data sharing requests from anyone via AirDrop.
If you’d like to enable AirDrop at any time, simply switch the AirDrop allowing options to either Contacts Only or Everyone, like so:
• Open the Finder on Mac
• Go to “AirDrop” in the Finder window sidebar, or pull down the Go menu and choose AirDrop
• Click the “Allow me to be discovered by:” text at the bottom of the window and choose “Contacts Only” or “Everyone”
This turns on AirDrop again and allows the Mac to be available for AirDrop requests. You will also need to make sure you have Bluetooth enabled on the Mac to be able to use AirDrop successfully.

Renaming your Mac computer name offers a way to customize your Mac, differentiate it between other machines when using AirDrop, and make it easy to identify on a network. With macOS Ventura 13 and newer, how you change a Mac computer name is different than before, and you may have become accustomed to the previous approach which was fairly obvious in a Sharing system preference. With macOS Ventura, the setting is less than obvious, but you can still rename your Mac easily.
Renaming a Mac is simple enough in macOS Ventura, but it is not obvious, here’s how it works:
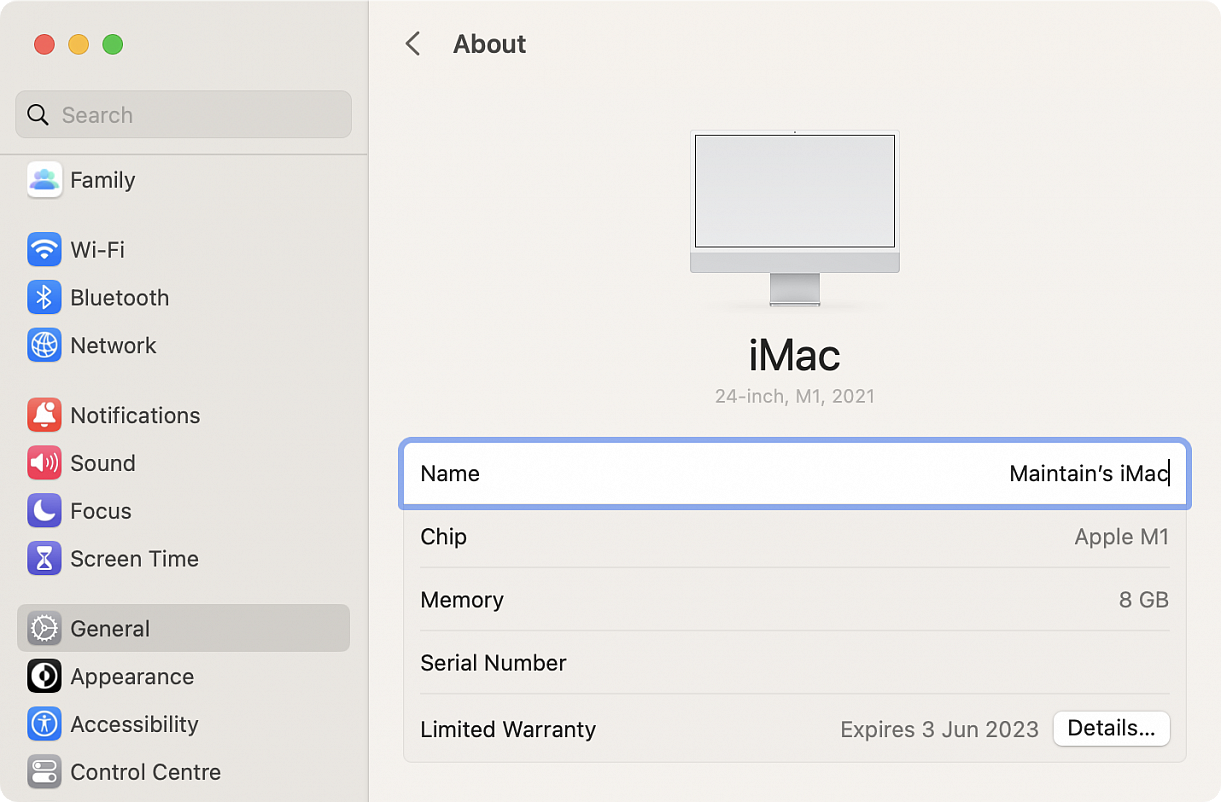
• Go to the Apple menu and choose “System Settings”
• Choose the “General” system settings from the side menu
• Click on “About”
• Look for “Name” and click on the text to the right of that to edit the computer name of the Mac, then hit Return or click away when finished
And there you go, you have changed the name of your computer in macOS Ventura. The change in the Mac computer name will reflect not only locally on the Mac, but also as it is identified to you and others through AirDrop, networking, and the computers hostname.

Apple has increasingly made it hard to mess with macOS system files. That’s true whether you intentionally want to extend macOS’s functionality or if a malicious party is trying to install and activate a virus.
However, many system components and all Apple and third-party apps rely on preferences and other files to store your custom settings, caches for work in progress, and other data. If those files corrupt, macOS may be perfectly fine, but you can’t get anything done in an app or your account.
Once you’ve gone through troubleshooting your Mac within your account that doesn’t seem to improve matters, the next big leap before reinstalling macOS is to set up a fresh macOS user account. From this account, you can test hardware, like your Wi-Fi or ethernet adapter; add printers and scanners; or run third-party software that keeps crashing on launch.
Because a fresh account typically contains nothing that would already be corrupted, you can isolate whether a problem is in your everyday user account or a system-wide issue–maybe even hardware related.
Here’s how to set up a fresh, new user account in macOS Ventura:
• Go to System Settings > Users & Groups.
• Click the Add Account button.
• Enter your password if prompted.
Here’s how to set up a fresh, new user account in macOS Monterey and earlier versions of macOS:
• Go to System Preferences > Users & Groups.
• Click the lock icon and enter your administrator password.
• Click the + sign at the bottom-left corner of the user list.
Then, after those first three steps in any version of macOS:
• Choose whether to create a Standard or Administrator account. Give it a name, password, and hint, and click Create. When making the account, what kind should it be?
Create a Standard account if you want to test a problem from the perspective of a user without any extra privileges.
Create an Administrator if that’s your normal account type–that’s typical–and you’re trying to perform an apples-to-apples comparison.
• Choose > Log Out [name].
• At the login screen, select the new account, enter the password, and click the arrow to log in.
Now you can check if your problem persists. For instance, if you can’t get a Wi-Fi adapter to show up in your regular account, this new one should have a fresh set of adapters that represent all the hardware your Mac recognizes. It should pull those into the System Preferences > Network pane (macOS Monterey or earlier) or System Settings > Network view (macOS Ventura). If Wi-Fi doesn’t show up as an adapter in the list, it’s likely a hardware problem, though reinstalling macOS is the next step before a repair shop just in case.
When you’ve debugged your problem, you can get rid of the account. You must be logged in using an Administrator account to do this. (Warning! These steps are irreversible. Choose “Don’t change the home folder” to retain it.)
In Ventura, go to System Settings > Users & Groups, click the i info button next to the account, click Delete Account, enter your administrator password, and click Unlock. Now select “Delete the home folder,” click Delete Account, and confirm.
In Monterey, go to System Preferences > Users & Groups, click the Lock icon to authenticate, select the account you create to debug macOS, click the – sign at the bottom-left corner, choose “Delete the home folder,” click Delete User, and confirm.
Some Mac users have found that a directory called AppleInternal is sitting in the root of their Macintosh HD. The folder itself is empty, but is not removable through the typical means.
AppleInternal is apparently used by Apple for internal development purposes, and thus likely has no benefit or reason to be installed on an average users Mac. Why it is included on some macOS installations with new Macs (and apparently some reinstalls too) is a bit of a mystery, since these are not Apple employee computers.
To delete AppleInternal from the Mac, you can open the Terminal application and issue the following command at the command line:
sudo rmdir /System/Volumes/Data/AppleInternal
Enter your administrator password and press Enter.
Then, you should reboot your Mac and the /AppleInternal directory will no longer be there.
Full screen mode on the Mac defaults to hiding the menu bar, and while you can swing your cursor to the top of the screen to reveal the menu bar, some Mac users may prefer to have the menu bar always visible when in full screen mode.
If you want to make sure the menu bar remains visible even when in full screen mode for any app on the Mac, here’s what you can do:
• Pull down the Apple menu and go to “System Preferences”
• Choose “Dock & Menu Bar” preferences
• Uncheck “Automatically hide and show the menu bar in full screen” so that it’s disabled
Now when you enter full screen mode on any window or app in macOS, the menu bar will remain visible at the top of the screen.

