Apple specifies ambient operating temperatures for most Macs as between 50°F and 95°F (10°C and 35°C), this means that anything above 95°F (35°C) goes beyond the conditions the Mac was specified to function within. Does that mean you can’t use your computer in intense heat? Most likely not, it just means you have to find ways to help keep it cool. With that in mind, here are some tips to keep a portable Mac cool when faced with blazing temperatures.
• Avoid using a Mac on a bed or fabric surface. Anything soft doesn’t allow for sufficient heat dispersion and can even block the air ventilation on many portable Macs, try to always use a Mac on a hard surface of wood, metal, or glass.
• Use a laptop stand. On hot summer days a laptop stand can mean the difference between having the fans blasting or not having them on at all. Anything that raises a Mac away from a base surface allows for heat to radiate out and for air to flow around it, cooling the hardware. Some laptop stands have built-in fans that blow directly onto the underside of a computer, these can be very effective.
• Raise the rear of a MacBook. No laptop stand? Make do with what you have, and try placing the rear of the Mac elevated by a hardcover book or something similar. It’s not as effective as a laptop stand, but this promotes airflow and can make a significant difference in keeping hardware cool.
• Place a Mac at the edge of a table or desk. No stand and no book to raise the computer with? Try hovering the rear end of a MacBook over the edge of a desk or surface to increase air flow where Macs blow out their heat.
• Use a fan. Yes, a standard room fan. This may sound silly but if you’re in an environment without air conditioning, pointing a fan onto a Mac will blow cool air onto it and help disperse heat. If you’re using a Mac in temperatures over 90°F (32°C), this is one of the best things you can do to not only keep yourself cool but also your computer.
• Keep away from the sun. Again this may seem like common sense, but using a computer in direct sunlight places an unnecessary burden on the fans. Even on reasonably mild sunny days the sun can cause fans to go into overdrive, it’s best to avoid direct sunlight completely.
Finally, a quick word of advice: if you’re in extreme heat and you don’t have any method to cool down your Mac, do yourself a favor and don’t use it at all until you get out of the crazy weather. Heat is one of the most detrimental forces to anything electronic and overheating can lead directly to reduced lifespan of hardware, diminished battery capacity, and other problems. It’s always better to be safe than sorry.
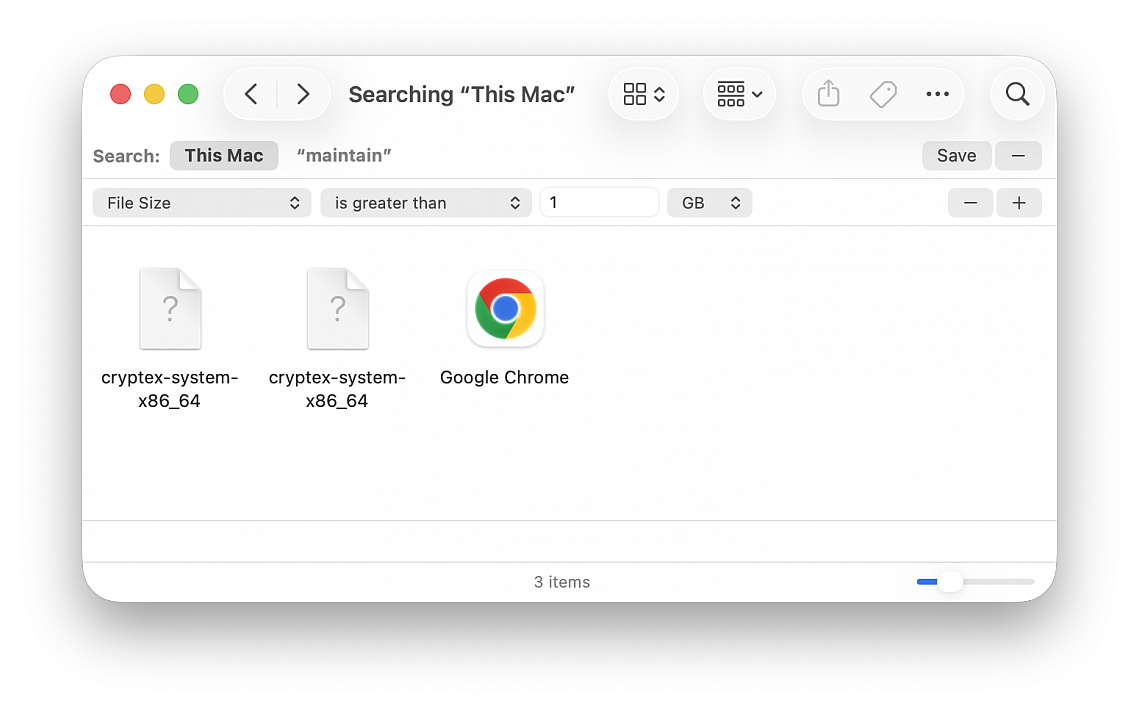
Whether you're feeling the pinch as hard drive space runs low or you're just wondering where all your disk space went, it's easy to find large files in macOS by using the built-in search tools.
Here's what to do:
• From the macOS Desktop, open any new Finder window
• Hit Command+F to bring up Search
• Click on "Kind" filter and select "Other", then select "File Size" from the attribute list
• Click on the second filter and choose "is greater than"
• In the third space, enter the size to search for anything greater than (ex: 100) and choose either MB or GB as the final filter
The file and app list below will automatically update as anything larger than the specified file size is found on the hard drive. Be sure that "This Mac" is selected if you're getting limited results, though you can also use the search limiters to find large files contained within single folders or user directories.
Want to use this feature to track down large files often? Click on the "Save" button in the upper right corner and you'll turn the File Size search into a Smart Folder that can be easily accessed from the sidebar for easy future retrieval, plus that folder will constantly be updated with large files only, making it a very useful way to instantly find any big item laying around on a Mac.
A common pit of enormous files is the user Downloads folder, when using the file size search don't be surprised if you run into a fair amount of .dmg and .zip files sitting idly in there that have long been forgotten.
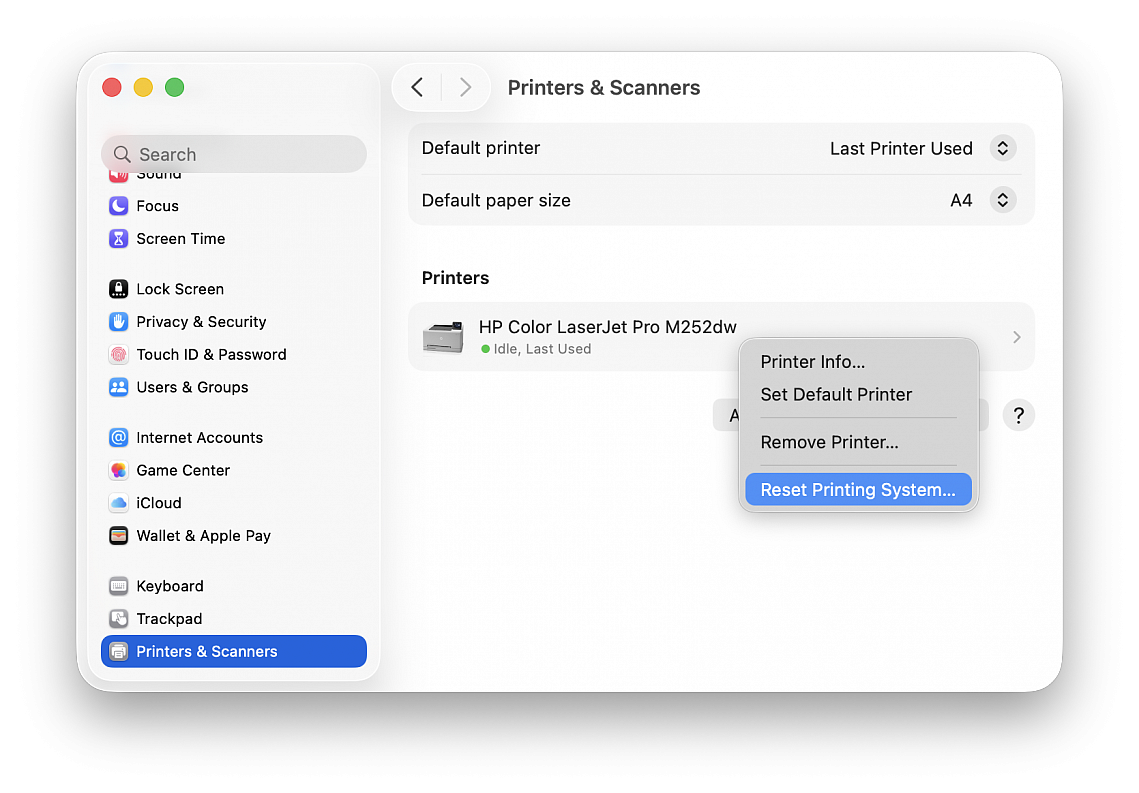
If you're having printing issues, there are lots of troubleshooting steps to try. You should check the printer's network connection and perhaps search for any new drivers your model has available. Another good idea is turning the device off and on again to see if the problem's just an intermittent one. You could even delete the printer from System Settings > Printers & Scanners and reconfigure it. There is, however, a troubleshooting step that you can attempt if nothing else seems to work - resetting your entire printing system.
This can be especially helpful if you're pretty certain that your Mac's the problem, not the printer (if your other computers can print just fine). You'll want to use this only as a last resort, though, because you'll have to set up all of your printers and scanners again.
Here's how you do it:
• Open "System Settings..." from the Apple menu
• Go to "Printers & Scanners"
• Right or Control click on any listed printer
• Choose "Reset Printing System..." and click "Reset"
• Wait for your Mac to complete the task and after it's finished, click the "Add Printer, Scanner, or Fax..." button to add back your printer(s)
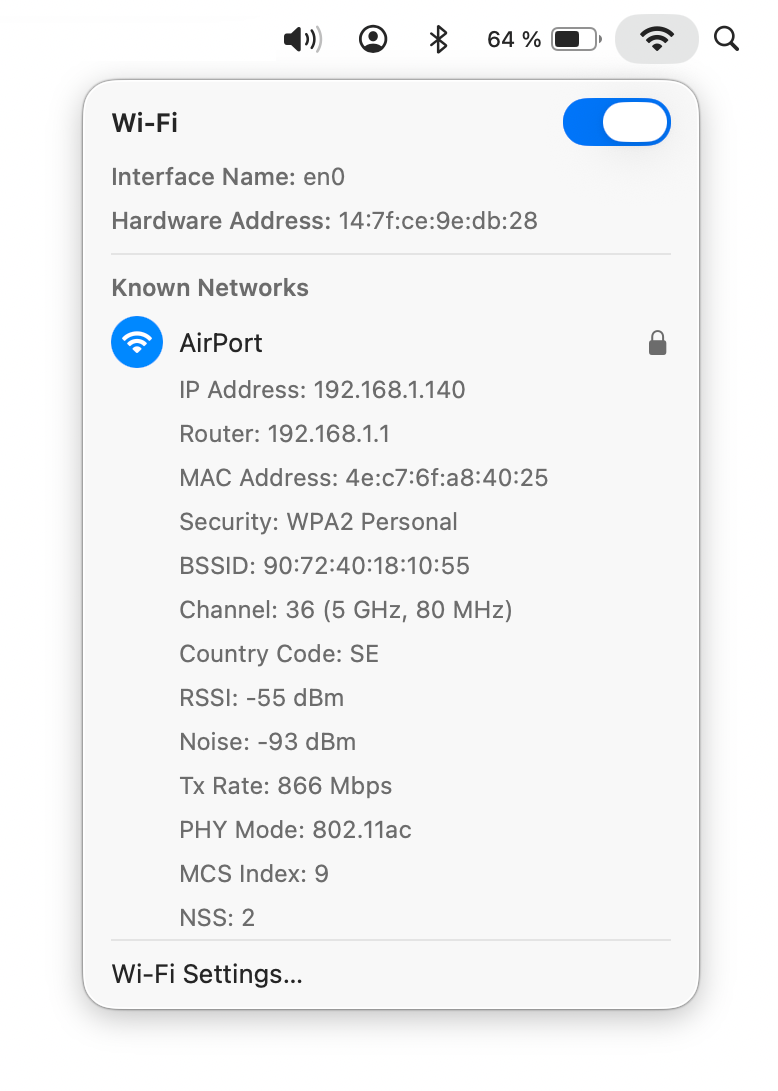
Did you know that you can quickly access information about your router, and check if your network is performing well? See your BSSID, signal-to-noise ratio, and even the transmit rate between your router and computer. All it takes is a press of a button and a click of your mouse/trackpad.
If you hold down the Option (alt) key and click the Wi-Fi icon in the menu bar, it will provide you with details about your router and the network you're using. The items in gray are all pieces of additional information seen only in this mode.
• IP Address: This is your computer's IP address.
• Router: Your router's IP address. You can type this into your browser to access your router's web interface.
• Security: Your router's security. Most routers on the market offer WPA2 Personal, and it keeps your network encrypted.
• BSSID: This is your router's MAC, or hardware address. It acts as an identifier for your router that lets it talk to other network-connected devices.
• Channel: This is your WLAN channel, and it determines which radio frequency the router uses to transmit information.
• RSSI: Received Signal Strength Indicator measures how well a device "hears" a signal from the router. It's useful for determining if you have enough signal to get a good wireless connection.
• Noise: This measures how much radio noise is interfering with the RSSI signal. Signal-to-noise ratio is a measure used in science and engineering that compares the level of a desired signal to the level of background noise. It is defined as the ratio of signal power to the noise power, often expressed in decibels.
• TX Rate: The transmit rate is the speed of the data that is transmitted between your router and your computer. Right now I have a speed of 450 Mbps.
• PHY Mode: This is the wireless protocol that the router uses, according to the IEEE 802.11 wireless standard.
• MCS Index: This number corresponds to the protocols uses to encode the radio signal.
Using symbol and text substitution, you can easily write any special character or symbol like ™ or ® just by typing something like TM or (r). You can adjust this and set your own, and it's very easy to configure.
• Open "System Settings..." from the Apple menu
• Go to "Keyboard"
• Click on the "Text Replacements..." button
• Adjust text to replace with a symbol or add more text to replace by hitting the plus (+) button
• Click "Done"
For example, if you set "JS" to be replaced with "John Smith", anytime you type JS and hit space the text will be replaced.
