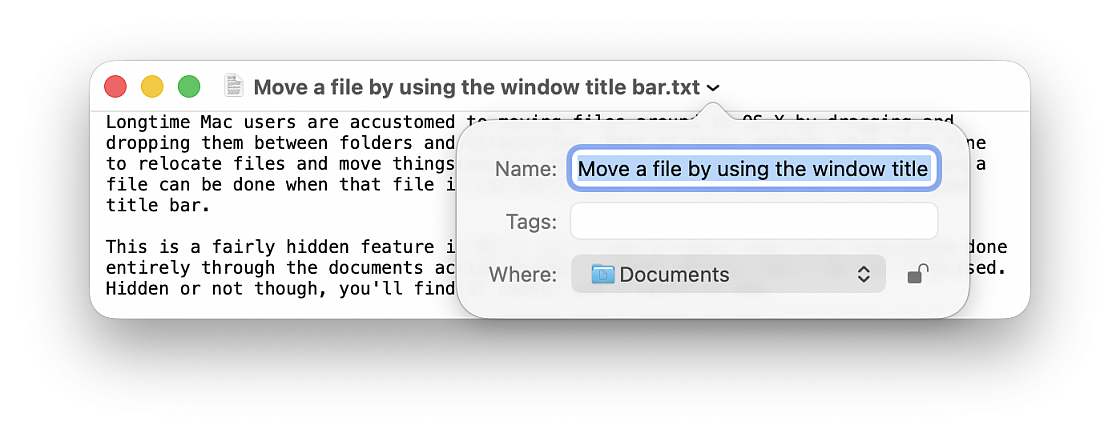
Longtime Mac users are accustomed to moving files around in macOS by dragging and dropping them between folders and directories. This method work just fine to relocate files and move things around, but another lesser known option to move a file can be done when that file is currently open, just by using the files window title bar.
This is a fairly hidden feature in macOS, so if you've never seen file relocation done entirely through the documents active window titlebar before, don't be too surprised. Hidden or not though, you'll find it useful and a cinch to use.
• With a file open, click on the files name in the window title bar to reveal a contextual menu (be sure to click on the text name itself, not the little document icon)
• Click on the pulldown menu alongside “Where” (the location shown is where the file is currently located)
• Select the destination you want to move the file to from the list (including iCloud) or choose “Other...” to browse the file system and select somewhere specific.
• Click away from the title bars contextual menu to hide it and resume work within the document as usual.
That's it, the document has moved. Simply changing the “Where” selection will move the file to the chosen destination instantly. There's no confirmation, no dragging and dropping, nothing else is necessary to relocate the file, it will move immediately as the window title bar action is taken, to the location specified by “Where”.
If you are going to sell, return, or give away a Mac, you almost certainly want to factory reset the computer first. Performing a factory reset on a Mac will erase all data on the Mac, and return it to a clean slate as if the computer were brand new, without any data or personal files on the computer at all.
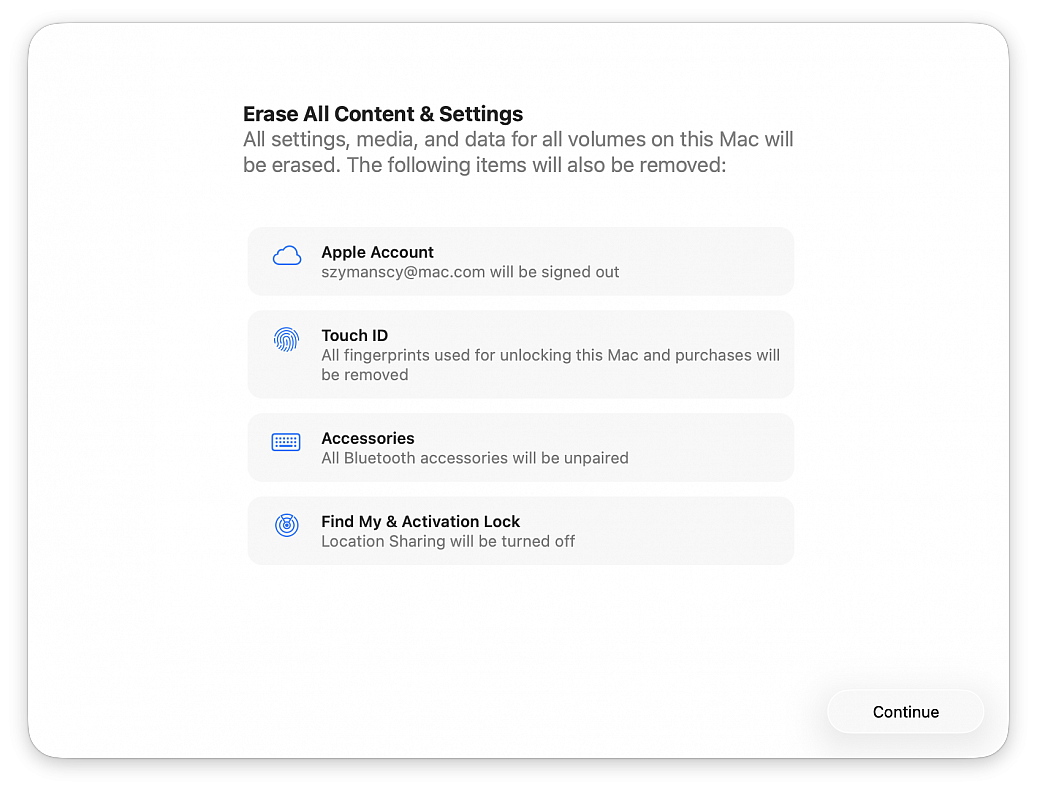
Erasing a Mac and returning it to factory defaults has never been easier, thanks to the addition of a “Erase All Content & Settings” feature introduced in newer versions of macOS system software. Gone are the days where you had to manually erase and then reinstall system software, now you can simply let MacOS handle the task for you by choosing to erase and factory reset the Mac through a handy built-in feature.
The approach is available in macOS Ventura and newer only.
Be sure to back up the Mac with Time Machine first! Proceeding will erase all data, files, and information from the computer. This will erase all data on the Mac. Do not proceed unless you have backups of your data. Failure to backup will result in permanent data loss!
• Pull down the Apple menu and go to “System Settings...“
• Go to “General“
• Choose “Transfer or Reset”
• Click on “Erase All Content and Settings”
• Confirm that you want to erase everything, log out of your Apple ID, and remove all data from the Mac by clicking “Continue”
• Follow the onscreen instructions to complete the process
When the Mac has finished factory resetting and erasing everything, a freshly installed version of the current version of macOS will boot into the typical “Hello” screen. Assuming you’re going to be gifting this Mac or selling it, you probably do not want to set it up yourself, instead let the recipient handle it.
This same factory reset feature also exists in macOS Monterey, but it is accessed slightly differently on those Macs. To factory reset a macOS Monterey Mac, go to the Apple menu > System Preferences > System Preferences menu > Erase All Content And Settings. Be sure to backup all data beforehand, as usual.
macOS Tahoe has killed Launchpad, but if you miss it, here are two alternatives to Launchpad that you can use to see Mac apps in one spot and open them quickly.
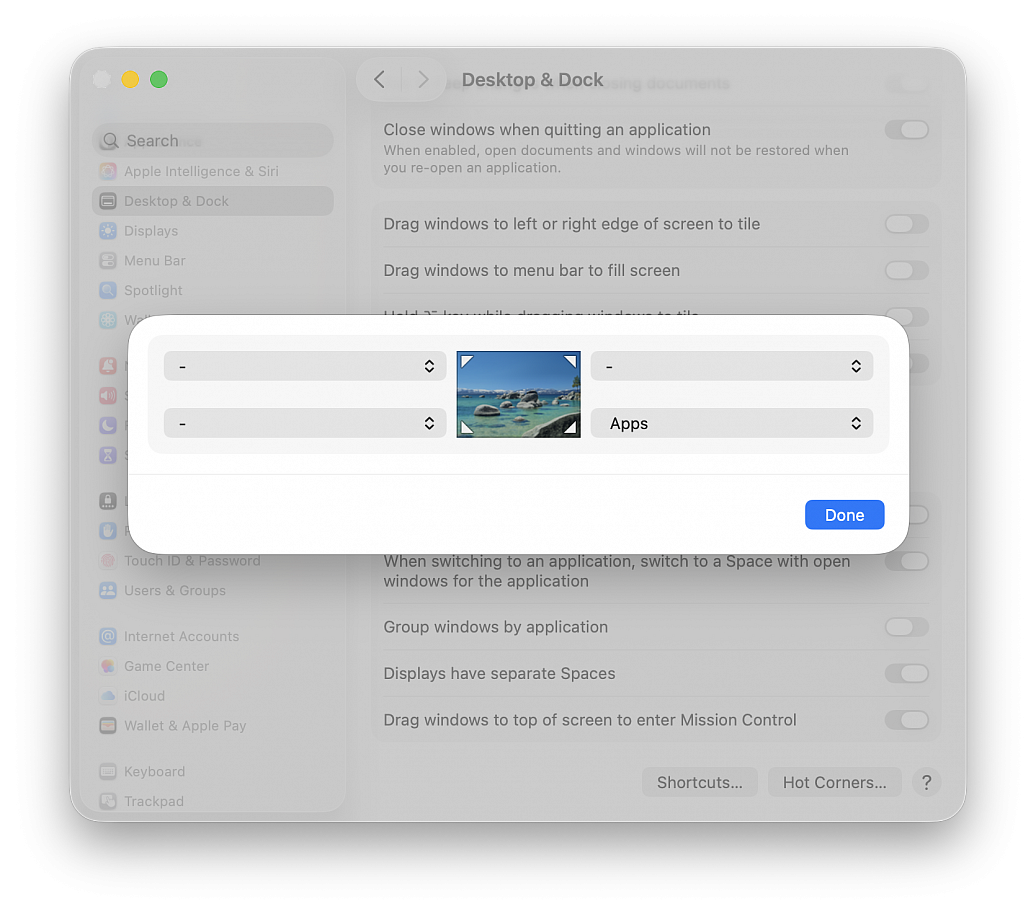
Add Apps to a Hot Corner. Setting up Hot Corners is very easy:
• Go to the Apple menu and choose "System Settings..."
• Click Desktop & Dock in the side column
• Click the Hot Corners... button at the bottom of the menu
• In the dialog that appears, click the chevrons to open the dropdown menu corresponding to the screen corner that you want to use and assign this corner to Apps, then click Done
• Now, you can open the new macOS Tahoe Applications overlay by taking the pointer to that corner of the screen
Add an Applications folder to the Dock:
• Open a Finder window
• Right-click over Applications in the sidebar and select Add to Dock
• An Applications shortcut will be added to the left of the Trash icon, click it to view all apps and open one (you can also right-click on this icon and change a few things)
If you’re a legal or governmental official, journalist, researcher or in a similar profession, you may need to enter the current date and/or time in your documents for timestamping, record-keeping, regulatory compliance, etc. Learn how to use a Mac shortcut to quickly enter the current date and/or time in a text field without typing those details manually.
Instead of checking your computer’s clock and manually typing the date and/or time, you can automate it using a shortcut. This also ensures you can fill in the precise current date and/or time without the possibility of an error. It involves two simple steps: creating the shortcut once and then using it whenever needed.
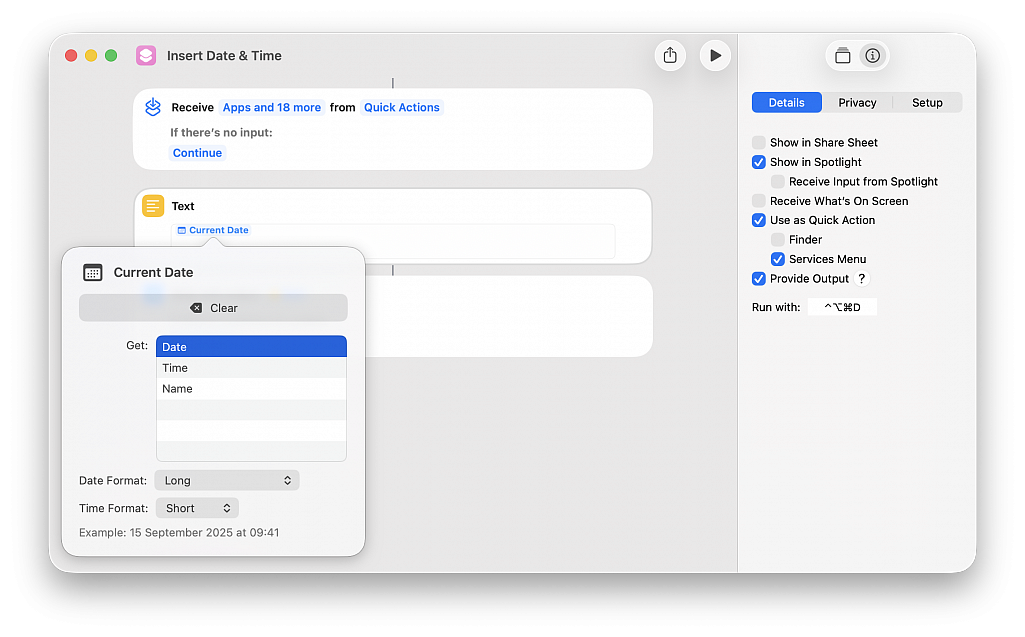
• Open the Shortcuts app and choose File > New Shortcut
• Type “Text” in the top right search field and double-click the Text action to add it to your build
• Click in the text field, start typing “Current,” and select Current Date from the suggestions
• Select a Date Format (you can also pick a format for Time or set it to None if you only want to insert the date)
• Click the triangle Run button at the top to test your build; you’ll see the date and/or time appear on the screen
• Click the info button (i) in the top right corner of the window and check the box for Provide Output
• Click Add Keyboard Shortcut and press the keys you want to assign to run this shortcut (for instance, Control + Option + Command + D)
• Give a name to your shortcut (for instance, Insert Date & Time) and save the shortcut by closing the window (hit the red traffic light button)
• Open an app like Pages, Text Edit or Google Docs in Chrome and press the key combination; you’ll see that the current date and/or time are automatically typed in
New Liquid Glass design has received most of the attention in news about macOS Tahoe, but there are quite a few new features that make the Mac better than ever, including some that are not super obvious.
Customize Lock Screen Font
macOS Tahoe lets you customize the clock that appears on your Mac's Lock Screen. You can't adjust size like you can in iOS 26, but you can change the font style and thickness. To adjust your clock, go to System Settings > Wallpaper > Clock Appearance. You can choose from six different font styles, and adjust the weight with a slider. You can opt to have the clock show on your Lock Screen or on the Lock Screen and Screen Saver.
Search Your Tabs
When you search in Spotlight, the results include the Safari tabs that you have open. If you tend to have dozens of tabs open at once, it can be a good way to find the specific tab you're looking for rather than clicking through them one-by-one. Open tabs show up at the top of the list when you enter a relevant search term.
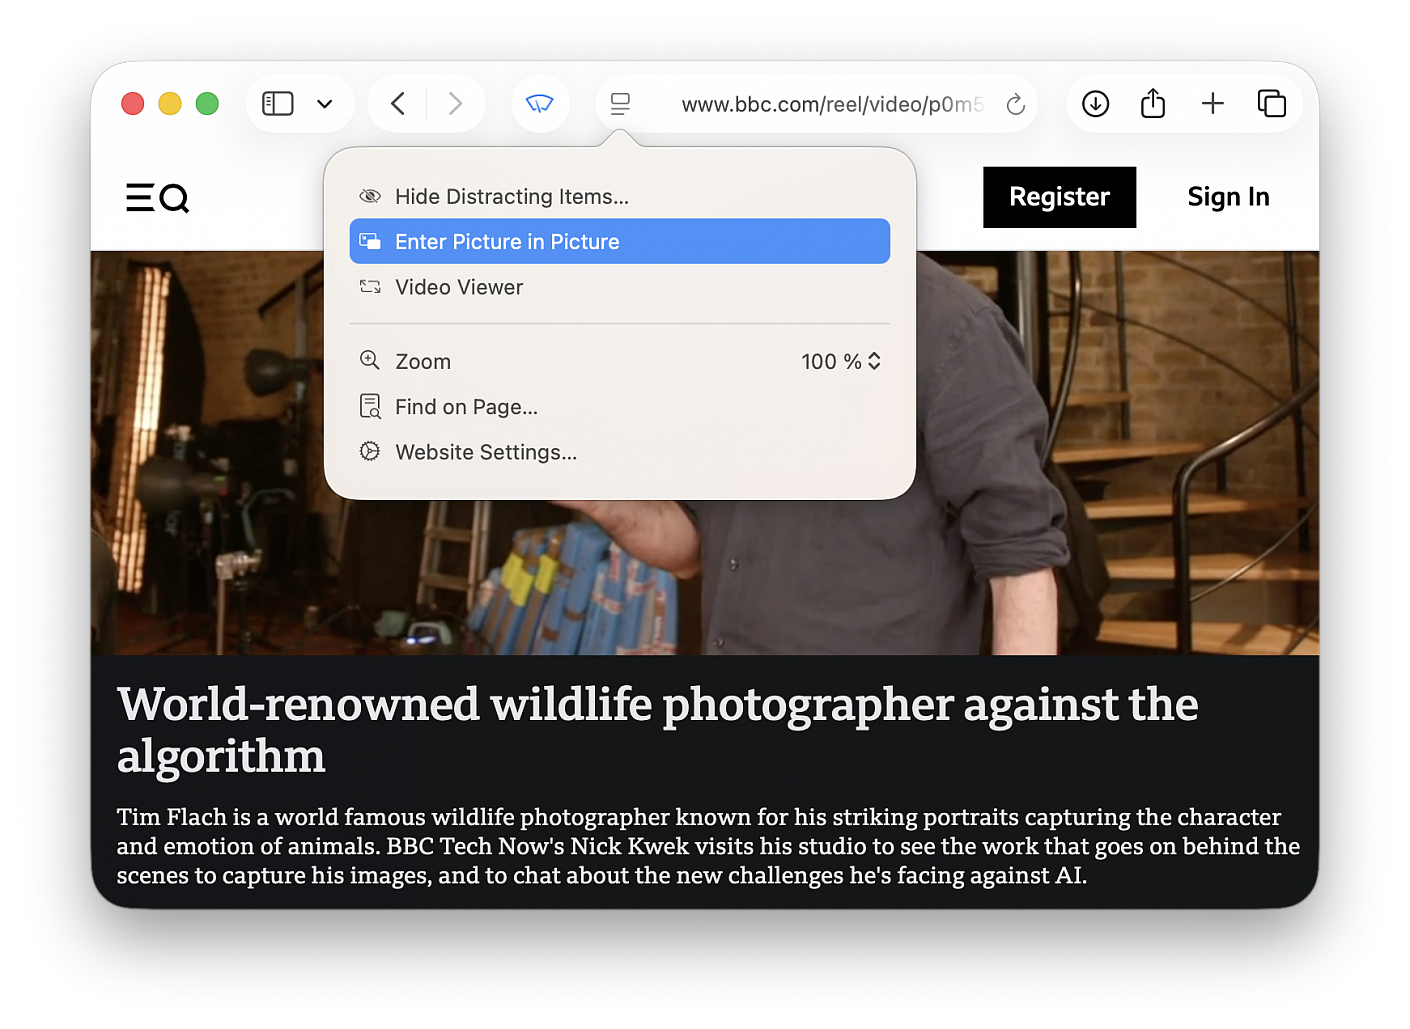
Safari Picture in Picture
Picture-in-picture has been available in Safari for several years, but macOS Tahoe brings easier activation, new controls, and customization options. In an article where there's a video, click on the Page Menu icon in the left side of the URL bar to enter picture-in-picture mode. You can now access playback controls for skipping forward and backward, and you can skip ads directly from the picture-in-picture window.
See Your Spotlight History
You can see your past Spotlight searches and actions in macOS Tahoe, which makes it easy to get back to something that you did before. With Spotlight open, press on the up arrow to scroll through your past queries.
Game Overlay
When you're playing a game in macOS Tahoe, you can tap Command + ESC to bring up a new Game Overlay. From the Game Overlay, you can view achievements and leaderboards, connect with friends, and adjust settings like brightness and volume.