One of the good things about Reminders app is that it allows you to set due dates and times with each task you enter. You can set these times and dates manually, or you can use natural language expressions with the app to set up your time-sensitive tasks a lot more quickly. Here’s how to do it.
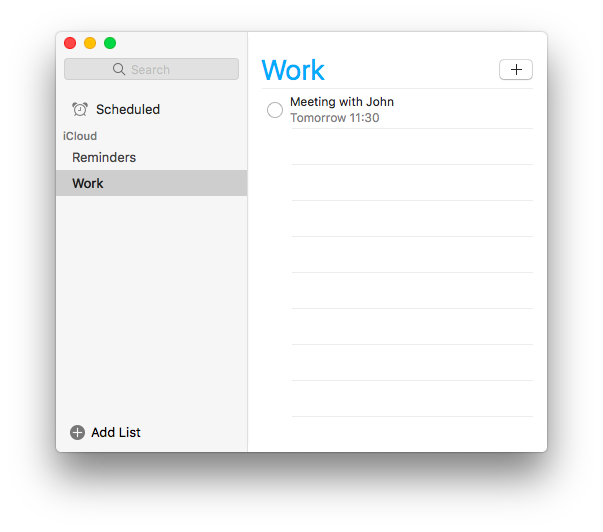
Launch Reminders and select a list of reminders you want to add tasks to, or create an entirely new list. Then, click on the little Plus icon in the upper right; this should create a spot for you to make a new reminder. Now, type in your natural language request, like "Meeting with John tomorrow at 11:30".
Reminders will create the actual task, but will also set up a notification to let you know when the event is about. You don't have to create the reminder, select the info button, and put in the details one at a time.
First you need to physically copy the picture library to the new location, and then you have to tell Photos where the new location is. Here's how to do this:
• Go to the Pictures folder (in your home directory) and locate the "Photos Library" package
• Copy the "Photos Library" package to the new destination by dragging and dropping it to the desired location
• Hold the Option (Alt) key down and launch Photos
• Find the Photos Library in the list or click the "Other Library…" button to manually navigate to the new location and then click the "Choose" button
Now Photos will use the library you have specified in the new location. Be aware that if the library is located on an an external hard drive and you launch Photos without that drive connected, your images won’t be available.

Mac users in higher security risk situations may wish to enable an optional firmware password on their machines, which offers an advanced level of protection. In short, a firmware password is a lower level layer of security that is set on the actual Mac logic board firmware, rather than at the software layer like FileVault encryption or the standard login password.
The result of setting an firmware password is that a Mac can not be booted from an external boot volume, single user mode, or target disk mode, and it also prevents resetting of PRAM and the ability to boot into safe mode, without logging in through the firmware password first. This effectively prevents a wide variety of methods that could potentially be used to compromise a Mac, and offers exceptional security for users who require such protection.
Like any other essential password, use something memorable but complex, and do not forget a firmware password after it has been set. A lost firmware password is unrecoverable on most modern Macs without a visit to an Apple Store for service and recovery.
Setting a firmware password is rather simple.
• Start up from macOS recovery mode by holding down Command (⌘)-R immediately after turning on your Mac. Release the keys when you see the Apple logo.
• When the utilities window appears, choose Utilities > Firmware Password Utility from the menu bar. On iMac Pro, choose Startup Security Utility instead.
• Click Turn On Firmware Password.
• Enter a firmware password in the fields provided, then click Set Password.
• Quit the utility, then choose Apple () menu > Restart.
The firmware password will not appear during a regular restart or boot of the Mac, it only becomes mandatory when the Mac is attempted to boot from alternate methods. This may be in situations where a Mac is attempted to boot from an macOS installer drive, an external boot volume, recovery mode, single user mode, verbose mode, target disk mode, resetting the PRAM, or any other alternative booting approach that will summon the rather plain looking firmware password window. There are no password hints or additional details provided, only a simple lock logo and a text entry screen. An incorrectly entered firmware password does nothing and offers no indication of login failure except that the Mac won't boot as anticipated.
Safari for both macOS and iOS have a setting you may never have noticed, since we so often have Internet access. This is an easily overlooked feature that’s actually really cool. Here’s how to save your Safari reading list for offline viewing.
In Safari for macOS, choose Safari > Preferences and then click Advanced. You can then check next to the Reading List label Save Articles for Offline Reading Automatically. If that option isn't checked, you can also view the Reading List in the sidebar, right-click an item, and choose Save Offline.
With iOS Safari, you navigate to Settings > Safari and swipe down to the bottom, and then tap the switch to on for Automatically Save Offline. If you have that option disabled, which it is by default, you’re prompted the first time you choose Add to Reading List from the Sharing sheet whether or not to save items from then for offline reading automatically.
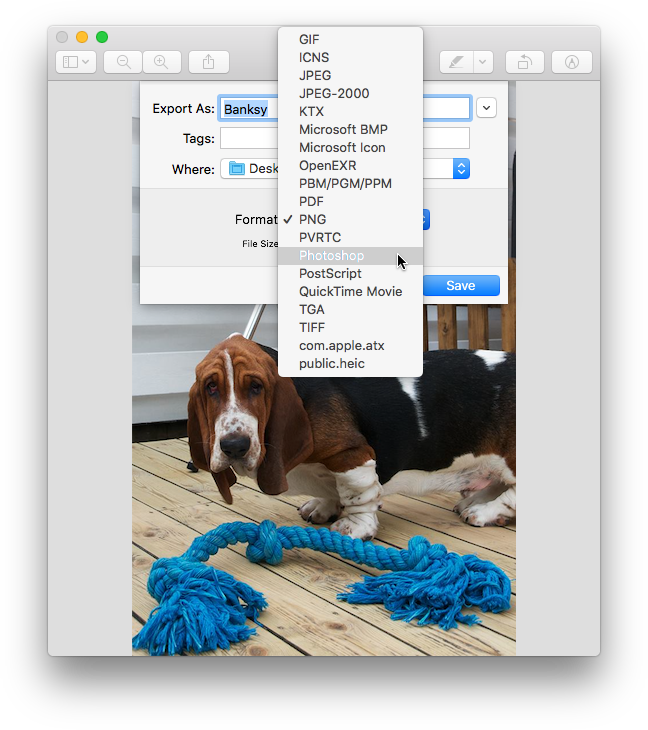
Preview is a great basic image editing application bundled with macOS, but recent versions have simplified the available image export format options down to JPEG, JPEG 2000, OpenEXR, PDF, PNG and TIFF. Or at least that's what you see on first glance.
It turns out you can still access all the traditional image format options from the Save and Export panels just by holding down the Option (Alt) key when clicking on the Format menu.
Holding the Option (Alt) key when selecting format reveals all possible image formats. You can use this to convert existing images to different formats, or to save the file as a less common format.