Beyond customizing the Safari start page for things like Favorites, Reading List, and Frequently Visited, you can also change the background image used by Safari. This allows you to use any picture you want as the default background image in Safari.
To be able to set a custom background image in Safari, you’ll need Safari 14 or newer on a modern macOS release, like macOS Mojave or newer.
• Launch Safari.
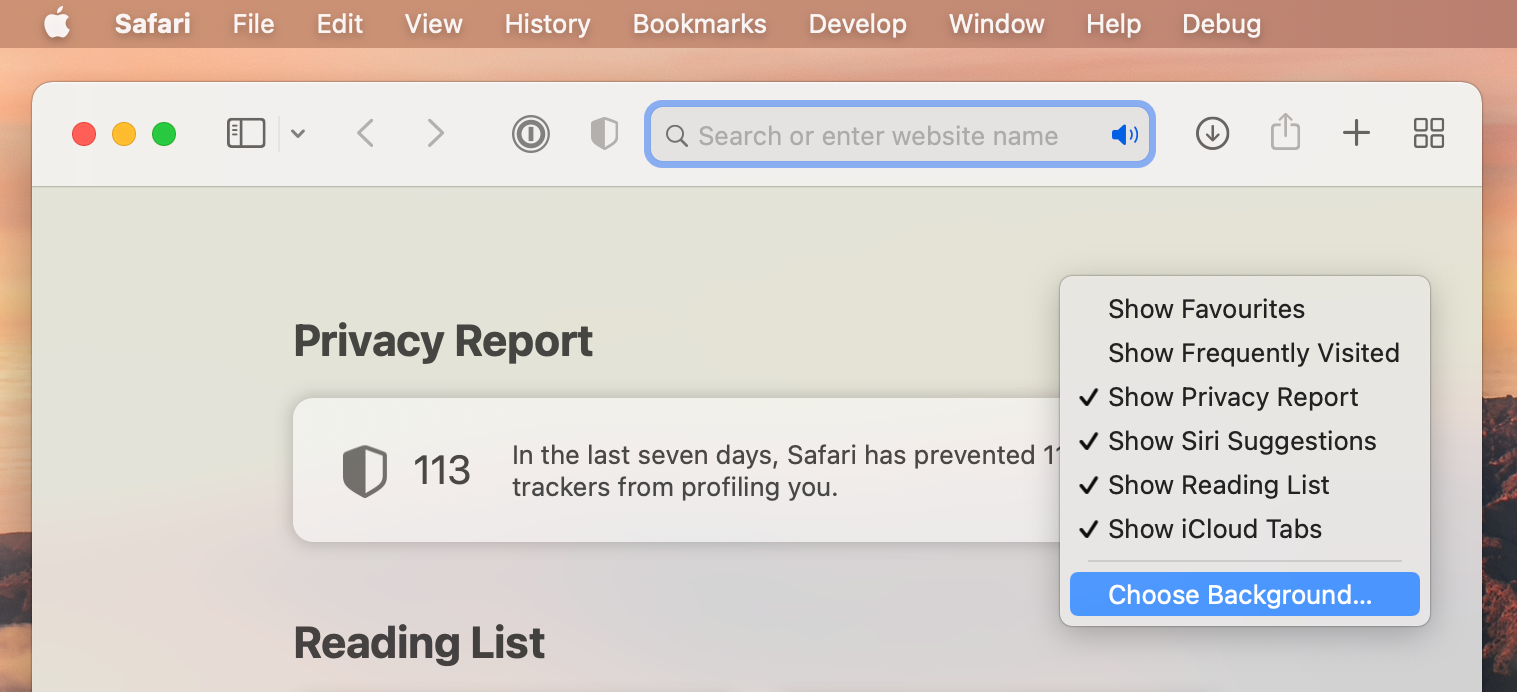
• Now, simply right-click (or Ctrl+Click) in the empty area on the start page and click on Choose Background. This will open up a file selection window.
• Find the picture that you want to set as the background from the file selection window and select it. Now, click on Choose.
• From now on your start page will look completely different.
If you feel like removing the custom background at any point, just right-click (or Ctrl+Click) in the empty area and choose Clear Background.
Resetting an Apple ID password can be annoying, though it’s made much easier if you have access to a device that you are already signed into. Without another device though, the process of resetting an Apple ID account login can be frustrating, but a Recovery Key makes this situation easier.
Apple ID Recovery Key serves as an additional way of authenticating your Apple account, and it can be used if you forget your password and lose access to another trusted device. Using a recovery key eliminates the need to visit Apple’s website to jump through hoops like verifying payment method details and answering security questions for a password reset. The ability to generate a recovery key from the Mac requires macOS Big Sur or macOS Monterey.
If you have a Mac, it’s pretty easy to generate and use a recovery key.
• Open “System Preferences” on the Mac (from Apple menu or Dock).
• This will open a new window on your Mac. Click on the Apple ID option located at the top-right corner.
• Now, click on “Password & Security” from the left pane. In this section, you’ll find the Recovery Key option below Trusted phone numbers. Click on “Turn on” next to the Recovery key option to continue.
• When you’re prompted to confirm your action, click on “Use recovery key” to proceed.
• Next, you’ll be asked to enter your Mac user password. Type in the password and click “OK”.
• If you have an iPhone, you’ll also be prompted the enter the passcode you use to unlock your iPhone.
• Now, your unique recovery key will be shown to you on the screen. Make sure to write it down in a safe place that you’re able to easily access. Once you’re done, click on “Continue”.
• Next, you’ll be asked to enter your 28-character recovery key to verify that you’ve noted it down. Click on “Done” after typing it in.
• The feature is now turned on. If you want to change the recovery key for any reason, you can click on “Create new key”. You also have the option to turn this feature off at any time.
From now on, you’ll have just two ways to reset the password for your Apple account. You can either reset the password from a device that you’re already logged into, whether it’s your Mac, iPhone, or iPad, or you can use the recovery key instead. The latter could prove to be invaluable if you don’t have access to another trusted device, or if you only have one Apple device.
Note that when you disable and re-enable the Recovery Key feature, a completely new key will be generated for your account. If you lost your current recovery key somehow, you can replace the key with a new one on your Mac from the same menu using the “Create new key” option.
If you’re the kind of Mac user who personalizes their computer a lot, you may also be interested in changing the way Siri sounds when she replies to your voice commands. This is something that wasn’t possible until recently.
Ever since the release of macOS Big Sur 11.3 software update Apple is giving users multiple voice options for Siri. Now you have a total of four different voice options that change how Siri sounds without affecting the accent. Two of them are masculine deeper voices whereas the other two are feminine higher pitched voices, though the voices are plainly labeled as Voice 1, Voice 2, Voice 3, and Voice 4, without any gender suggested or implied.
Before you get started with the following procedure, make sure your Mac is running at least macOS Big Sur 11.3 or later, since the new voice options aren’t available on older versions. Once you’re done, follow these steps.
• Head over to System Preferences on your Mac from the Dock. Alternatively, you can click on the Apple menu and choose “System Preferences” from the dropdown menu. This will launch a new window on your screen. Here, click on the Siri option which is located in the first row.
• Now, you’ll see that the older voice selection has been changed to “Voice Variety”. Right below, you’ll see the new Siri Voice setting with four different voices to choose from. Check out all of them and select the one that you prefer.
If you're having persistent networking issues on a Mac, like constantly dropping from a Wi-Fi network, inability to join networks, inappropriately sluggish internet connections that only impact the particular Mac, or other networking related issues, it may be helpful to reset the network settings.
The easiest way to reset Wi-Fi settings is to delete Wi-Fi related configuration files. Please note that by resetting network settings you will need to re-add and re-join any networks and enter the passwords again.
• Disable Wi-Fi by pulling down the Wi-Fi menu and choosing to toggle the Wi-Fi switch Off
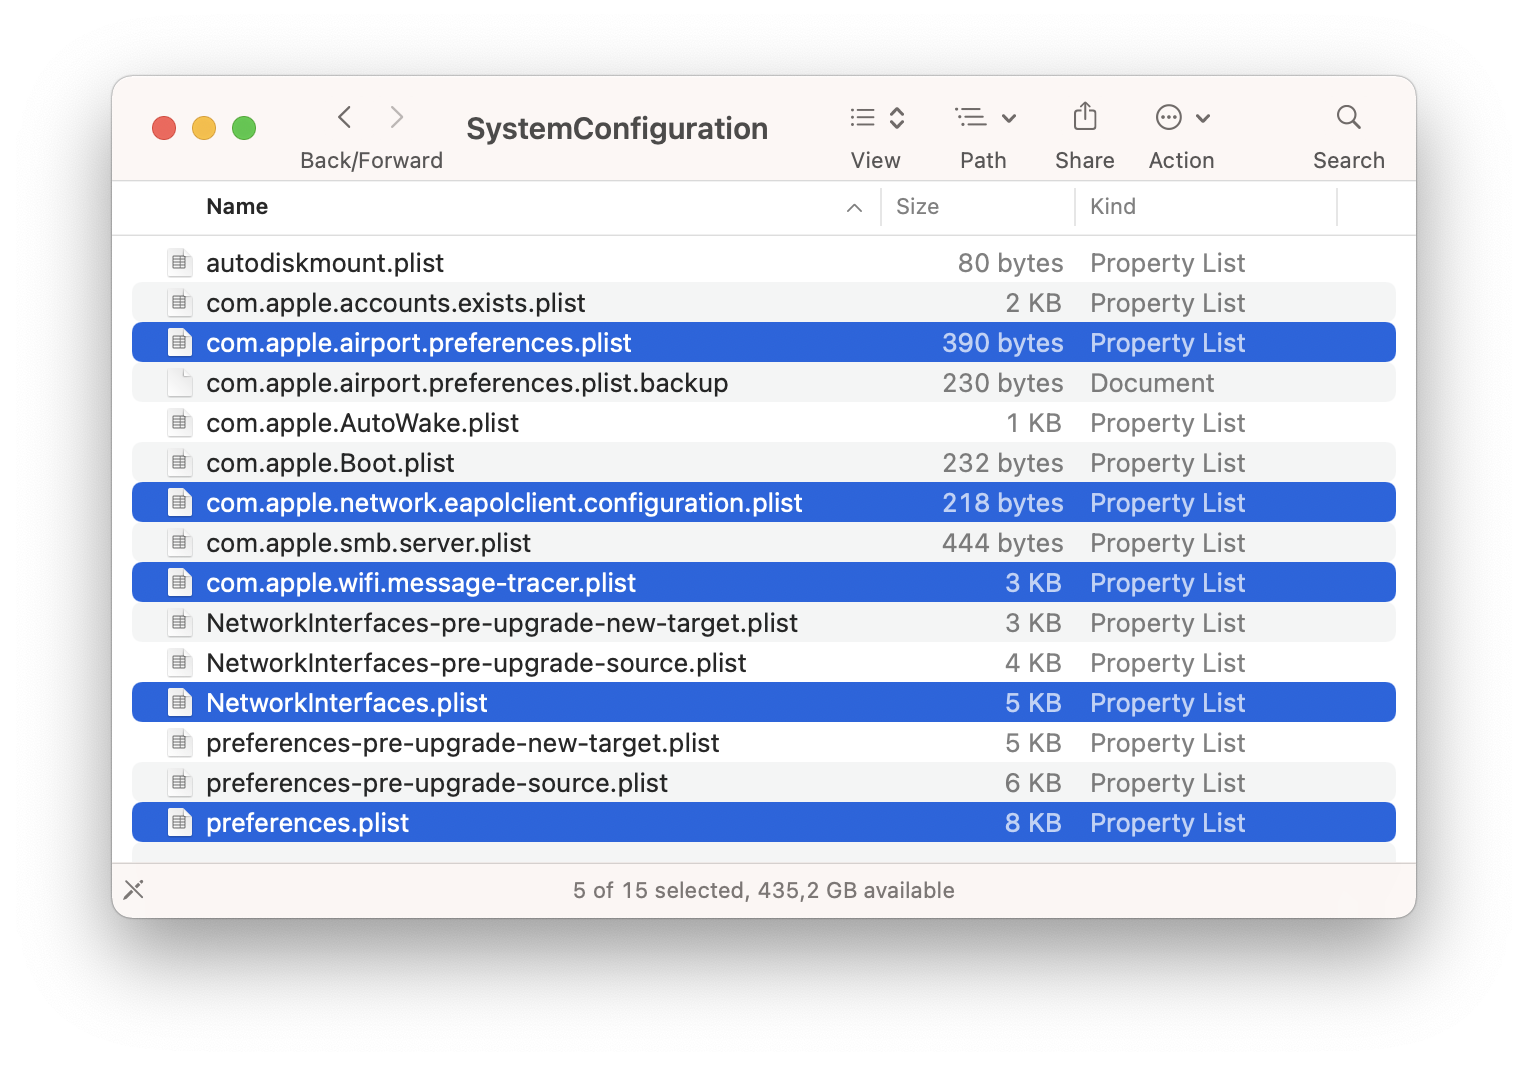
• Go to the Finder, pull down the "Go" menu, choose "Go to Folder..." and enter the following path:
/Library/Preferences/SystemConfiguration/
the click the "Go" button
• Select and delete the following files from this folder:
com.apple.airport.preferences.plist
com.apple.network.identification.plist
com.apple.wifi.message-tracer.plist
com.apple.network.eapolclient.configuration.plist
NetworkInterfaces.plist
preferences.plist
• Restart the Mac by going to the Apple () menu and choosing "Restart..."
• When the Mac boots back up, enable Wi-Fi again by going to the Wi-Fi menu and toggling it back On
• Select the network you wish to join
This approach will often resolve many wireless networking issues encountered on the Mac, but if you're still experiencing any Wi-Fi networking issues, you might want to reset the router and the modem itself, which typically involves unplugging those devices from power source for 10-15 seconds and then plugging them back in again, then waiting a few minutes for those to rejoin the appropriate networks.
If you need to quickly offer help to another Mac user you know, there's no quicker way to remotely provide assistance than via Apple's own Messages. Here's how to take control of another person's Mac on their behalf, and how to allow others to do the same to your desktop.
As part of the Messages app in macOS, it is possible to establish a remote desktop session where you have control of a Mac across the Internet or someone else has control over your Mac desktop. What's more, as well as being simple to get going, it also doesn't require any real installation of extensions or other components.
What does Messages' screen sharing feature do? When a screen share is initiated, the screen from the Mac being controlled will be streamed as a live video feed to the other participant, the Mac that will be used for control. This will allow the user on the controlling Mac to see what is on the desktop of the Mac being controlled. At the same time, a FaceTime Audio call is started between the two users, providing two-way audio. This enables the users to speak to each other, such as advising on what they are doing for the other user or additional instructions. The feature doesn't automatically enable the ability to remote control the other person's display by default, but the option is presented. If control isn't provided by one party to the other, the screen is shared but it is not remotely controllable.
To share your screen with another user:
• Open Messages on your Mac.
• Select the conversation with the person you want to share the screen with. If no prior conversation exists, send a message to them.
• In the main menu, select Conversations then Invite to Share My Screen. The sharing and audio call will begin automatically once the remote user accepts the invitation.
To request another user shares their screen:
• Open Messages on your Mac.
• Select the conversation with the person you want to share the screen with. If no prior conversation exists, send a message to them.
• In the main menu, select Conversations then Ask to Share Screen. The sharing and audio call will begin automatically once the invitation is accepted.
Once sharing is enabled, a new window appears called Screen Sharing, which will host the call and show the sharing user's desktop. There are also some options within the window that can be used. Clicking the mouse pointer icon in the menu will send a request to the sharer to enable remote control of the Mac. Clicking on the remote display will highlight elements on the shared Mac, which can be useful for pointing out elements of an app's interface without taking control. When you have control of the remote Mac, you can also control the Clipboard, which means you can copy and paste text and images between the two computers. This is handy to save you from retyping a URL into a remote browser when you have the link locally. You can even transmit files from the remotely-controlling Mac to the shared Mac by dragging and dropping them onto the window.
To end a screen sharing session:
• For the screen-sharing Mac, click the Sharing icon in the menu bar then End Screen Sharing. Alternately, you can select Pause Screen Sharing if you want to stop for a while.
• The remote controlling Mac can do the same by selecting Screen Sharing in the menu followed by Quit Screen Sharing.
If screen sharing doesn't work, make sure the user of the Mac being shared is signed in to iCloud on that Mac using the same Apple ID that they are using for messages. If they are using different IDs, add both Apple IDs to the same contact within the Contacts app and try again. Also, make sure that they are not limited by Screen Time. If one party is restricted and the initial Messages communication cannot be established, that could prevent Screen Sharing from functioning properly.