The "macOS could not be installed on your computer" error is one of the last ones you want to see. It pops up when you're updating your Mac's operating system but can't complete the operation. Despite the wording, it doesn't mean your installation will never work. It just means it failed that one time. The bad news is this error could be occurring due to a number of reasons. The good news is you can get your Mac back up and functional with a little work.
What causes the "macOS could not be installed on your computer" error? Several issues could cause the problem. However, the error screen should give you some idea of what's gone amiss. Here are some messages you might see underneath the warning:
• The path /System/Installation/Packages/OSInstall.mpkg appears to be missing or damaged
• An error occurred installing macOS
• Unable to unmount volume for repair
• Storage system verify or repair failed
• An error occurred while verifying firmware
Some of these offer more information than others, but they point to different stages of the installation that failed. The following steps and fixes should sort out any of the problems mentioned above.
Fixing this error may require some patience. It's best to start with the simple fixes, which often solve the problem, but if they don't, you have other options. Here are the approaches to try.
1. Restart and try the installation again. This may seem counterintuitive to redo the thing that didn't work, but sometimes a restart is all your Mac needs to sort itself out.
2. Check the Date & Time setting. If the displayed date and time don't match reality, this could be the problem. Restart your Mac again if necessary, then go to System Settings > Date & Time and enable "Set time and date automatically" setting. After this, try the installation again to see if it works.
3. Free up space. In some cases, macOS fails to install because there isn't enough room on the hard drive. To see how much is available, click the Apple logo and select About This Mac, click More Info, scroll down and click Storage Settings. You'll see a breakdown of what's living on your computer. If the available space seems low, move some nonessential files off temporarily to see if that lets the installation proceed.
4. Reset the NVRAM (https://support.apple.com/en-gb/HT204063). This tiny chunk of memory stores basic information such as the time, monitor resolution, and which disk to start up from. You may need to go back into System Settings to switch any settings this changed, but you can try the installation again before that to make sure the problem is resolved.
5. Restore from a backup. If you use Time Machine to regularly back up your Mac, you can go back to an earlier state using Recovery Mode to see if it's more compatible with the installer.
6. Run Disk First Aid (launch Disk Utility located in /Applications/Utilities). This may help if you're getting the "Unable to mount volume" error. First Aid checks the internal hard drive and makes any fixes it can. It may even be able to mount the volume after it's done. Then you can retry the installation.
If none of the above worked, it may be time to turn your computer over to the professionals.
Google's Chrome browser has long been criticised for being a system resource hog, which is why developers have been busy working on ways to free up memory and keep things running smoothly when users have multiple windows and tabs open. The latest effort in that regard comes in the form of Memory Saver, a new feature that deactivates open tabs you haven't used in a while so that the tabs you are using offer the smoothest possible experience. With Memory Saver enabled, your inactive tabs remain open, and when you access an inactive tab, it reloads automatically. Google claims the new Memory Saver feature means Chrome uses up to 40% and 10 GB less memory. The company says the new performance setting is particularly good at keeping active video and gaming tabs running smoothly.
Google is rolling out Memory Saver mode over the next several weeks, but not everyone will see it yet. Fortunately, if the new Settings -> Performance menu is not visible for you, you can activate it manually by using the experimental features in Chrome Flags.
Before you proceed, be sure to bookmark any important tabs and save anything important that you're working on in Chrome, then update the browser to the latest version available (109.0.5414.119 as of writing).
• Launch Chrome and paste the following into the address bar: chrome://flags/#high-efficiency-mode-available
• Next to "Enable the high efficiency mode feature in the settings", change the Default setting to Enabled, then restart Chrome
• Now paste the following into the address bar: chrome://settings/performance
• In the new "Performance" menu, toggle the switch next to Memory Saver to enable it
• Restart Chrome for the changes to take effect
Apart from Memory Saver, Google is also rolling out an Energy Saver mode that makes Chrome automatically limit battery draining tasks when the battery hits 20 percent. It does this by reducing its image capture rate and other background tasks, so you may notice changes in gaming and video performance.
The mode can be toggled on or off in the same "Performance" page in Settings. If you don't see it (this setting is only visible on portable computers) and don't want to wait for it to roll out to you, simply follow the same steps as above, but replace the address with chrome://flags/#battery-saver-mode-available and select Enabled next to "Enable the battery saver mode feature in the settings", then restart the browser.
AirDrop offers a fantastic wireless file sharing option for Mac, but not everyone may want to have it enabled. If you’re a Mac user you may find yourself in a situation where you’d like to disable AirDrop on the Mac for whatever reason. Using AirDrop is super easy, and you’ll find that turning the feature off is simple too.
Whether you’re wanting to stop receiving inbound AirDrop requests for files, trying to avoid a networking conflict, troubleshooting, or just limit your network footprint, it’s easy to turn off AirDrop on MacOS.
Turning off AirDrop in MacOS is the same in all versions of macOS and Mac OS X, regardless of system software version. Here’s how:
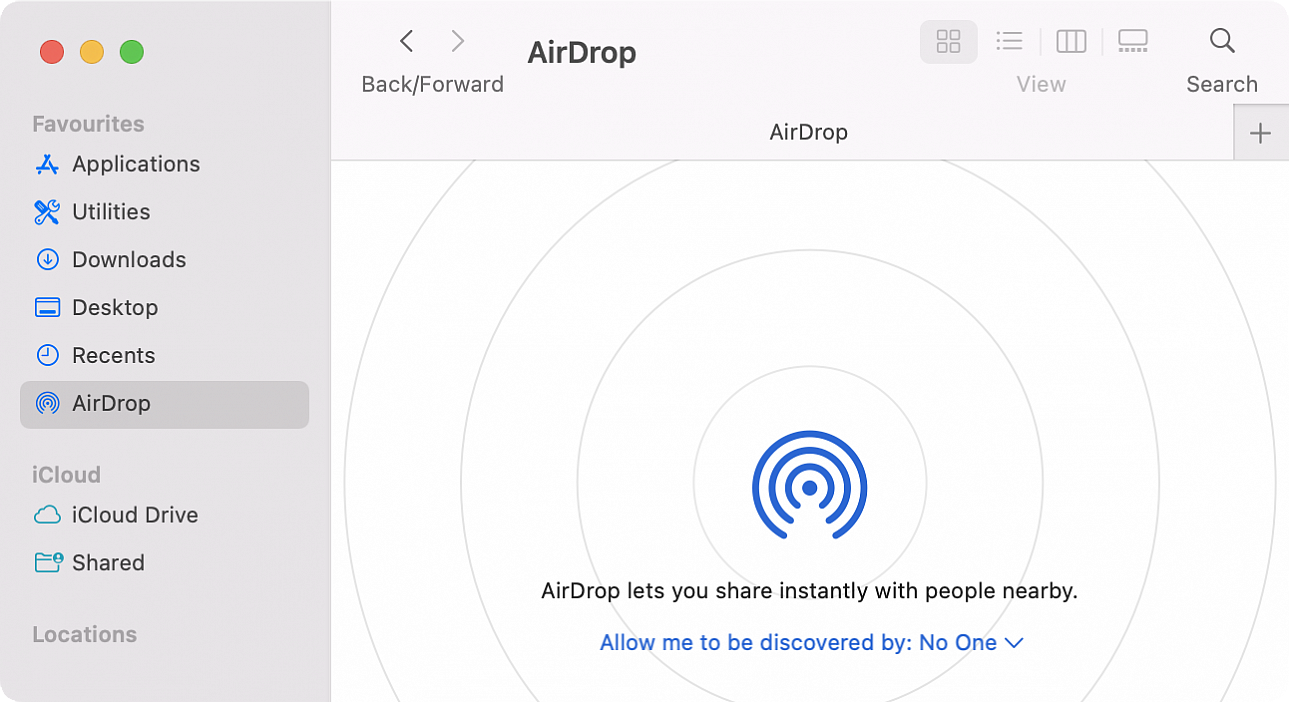
• Open the Finder on Mac
• Go to “AirDrop” in the Finder window sidebar, or pull down the Go menu and choose AirDrop from there
• Click the small blue text at the bottom of the AirDrop window that says “Allow me to be discovered by:” and select “No One” to turn AirDrop off
With AirDrop turned off you will not be discoverable by other devices that are looking for AirDrop destinations. This means you won’t be able to receive any files or data sharing requests from anyone via AirDrop.
If you’d like to enable AirDrop at any time, simply switch the AirDrop allowing options to either Contacts Only or Everyone, like so:
• Open the Finder on Mac
• Go to “AirDrop” in the Finder window sidebar, or pull down the Go menu and choose AirDrop
• Click the “Allow me to be discovered by:” text at the bottom of the window and choose “Contacts Only” or “Everyone”
This turns on AirDrop again and allows the Mac to be available for AirDrop requests. You will also need to make sure you have Bluetooth enabled on the Mac to be able to use AirDrop successfully.
Full screen mode on the Mac defaults to hiding the menu bar, and while you can swing your cursor to the top of the screen to reveal the menu bar, some Mac users may prefer to have the menu bar always visible when in full screen mode.
If you want to make sure the menu bar remains visible even when in full screen mode for any app on the Mac, here’s what you can do:
• Pull down the Apple menu and go to “System Preferences”
• Choose “Dock & Menu Bar” preferences
• Uncheck “Automatically hide and show the menu bar in full screen” so that it’s disabled
Now when you enter full screen mode on any window or app in macOS, the menu bar will remain visible at the top of the screen.
Ever ended up on a webpage in a different language and wished you could translate it instantly? With the latest versions of Safari, you can use a native translation feature to convert a webpage from a foreign language to your native tongue.
Safari's built-in language translation feature is for modern versions of Safari and macOS, so as long as you're running Safari 14 or newer in macOS Big Sur or newer, you’ll be good to go. Here's how you can translate webpages:
• Launch Safari and head over to the website that needs to be translated.
• Once the page loads up, you’ll notice a new Translate icon on the right side of the address bar.
• Click on the Translate icon and choose "Translate to English". Also, keep a note of the Preferred Languages option for now if you're interested in translating to a different language.
• Since you're using the built-in translator for the first time, you'll get a pop-up. Click on "Enable Translation" to continue.
• The page will now be translated into English. If you want to access the original page for any reason, click on the translate icon and choose "View Original".
• If you want to translate the page to a different language, click on "Preferred Languages...". This will take you to the "Language & Region" settings on your Mac. Here, click on the "+" icon under Preferred languages.
• Simply select the language you want to use and click on "Add". Now, this language will also be available in the translation menu along with English.
Current supported languages for translation are English, Spanish, Simplified Chinese, French, German, Russian, and Brazilian Portuguese.