One of Cocktail’s most useful features is the built in Pilot you can use to schedule optimizations of your computer. But that’s not all, Cocktail also lets you use Apple’s Automator to build your own workflows that can be more flexible and a great complement to the Pilot.
First, let’s get to know Automator, Apple’s excellent automation tool. Automator let’s you build workflows in a “Lego” fashion using simple actions, which you can chain together to create really complex applications without having to learn how to code. For example you can use it to resize, rename and upload pictures to your blog or to automatically sort files using Folder Actions. In this example we’re going to do something relatively simple to show how easy it is to interact with Cocktail and other applications to create fast and powerful workflows.
First, a little bit of background knowledge about what we are trying to do. Have you ever used a USB drive with macOS, then plugged it into a Windows computer only to find a bunch of .DS_Store files? macOS creates these files and uses them to keep track of the folder icon, background and other things. Normally they are hidden from the user, however, when you plug the USB drive into a Windows computer they show up since Windows doesn’t understand what a DS Store file is. This can very quickly get very messy and confusing, so let’s use Cocktail to clean it up!
What we are going to do is create a service for Finder. Services allows you to expand the functionality of Finder and virtually every other application in macOS using Automator. In this case it will add an option to the menu when you right click a folder that lets you clean up all the DS Store files inside.
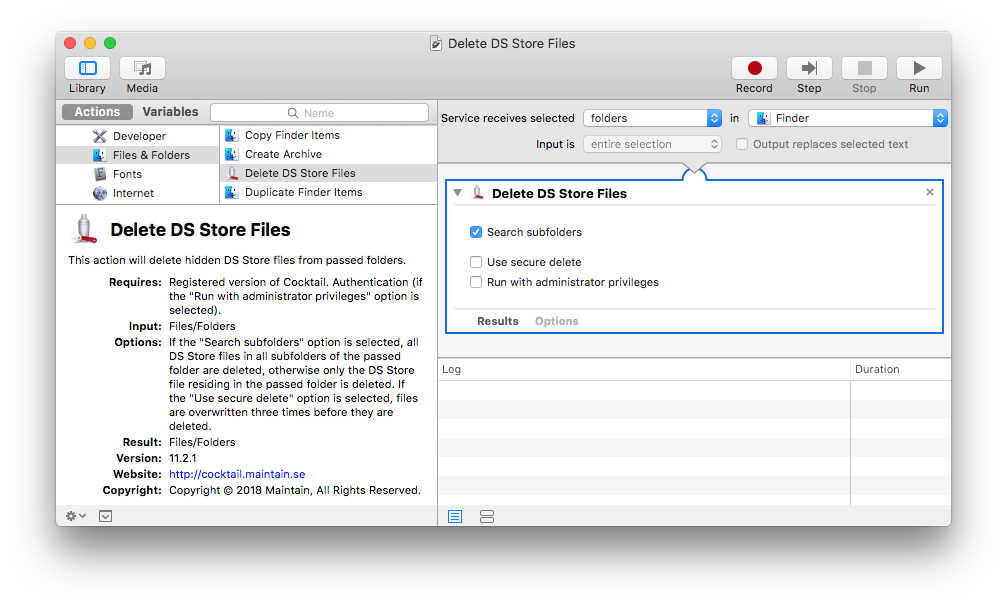
To do this, open Automator (in Applications) and when it asks you for what type of workflow you want to create, select Service. Automator will create a template for a workflow which can receive a number of different inputs from applications and lets you process these. In this case we want to deal with folders in Finder so make sure it says “Service receives selected folders in Finder” in the top of the right hand pane.
On the left side of the Automator window you have the library which contains the building blocks for the workflows. We definitely recommend that you explore these actions when you have time but for now lets carry on with our example. Select the Files & Folders category in the Library, then drag the “Delete DS Store Files” action into the workflow area on the right. When you drag it into the workflow area a few more options will appear, in this case we’d like it to search the subfolders on the drive too so make sure you tick the checkbox. When you’re done, save the service and name it “Delete DS Store Files”.
Voila, we’re done! Plug in a USB drive, then right click it and select Delete DS Store Files from the menu. Now go to a Windows computer and magically your USB drive will be a little cleaner! This works on any folder or drive so if you are emailing a folder to a friend who’s using Windows, you can clean it up the same way.
Automator lets you do much more than this, for example you can make your own maintenance scripts which you can run whenever you want by saving them as small applications (just select Application instead of Service when you create a new workflow).
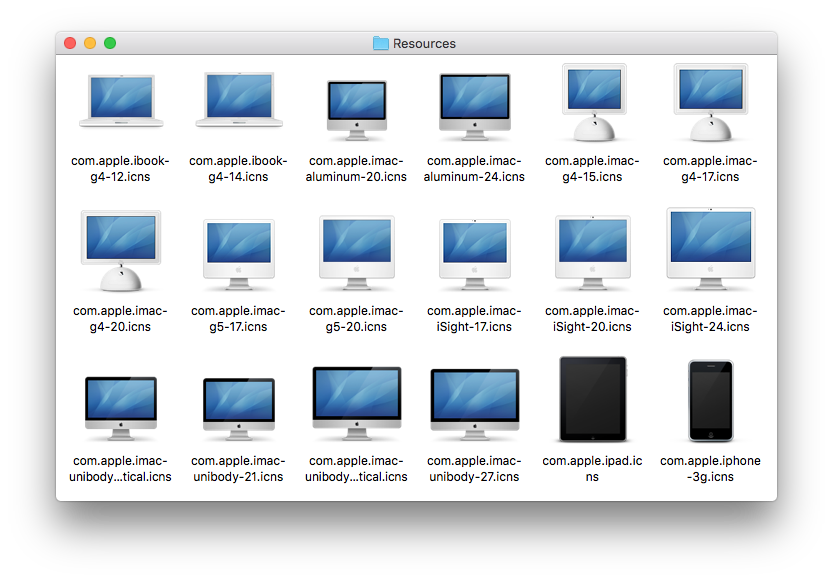
A large collection of high resolution Apple hardware icons is bundled right in macOS, including great icons for nearly all vaguely recent Mac models, iPad, iPhone, iPod, Apple TV, iMac, Mac Mini, Mac Pro, and much more, going all the way back to the G4 series.
To access the hidden hardware icon pack:
• From the Finder's Go menu choose "Go to Folder" and enter the following path:
/System/Library/CoreServices/CoreTypes.bundle/Contents/Resources/
• Scroll down until you start finding .icns files named “com.apple” followed by the hardware name
Many of these icons are what you find when using network sharing with a computer they match, but they also make for an excellent way to dress up your matching Mac, for example by replacing the generic Macintosh HD icon or anything else.
Many people equate productivity with screen size and assume it's difficult to get much work done on a small screen. Here are four ways to maximize productivity on small Mac laptop screens.
Hide inactive apps. Use Command+Option+H to hide all applications and windows except for the active app, also you can Option+Click out of a specific app to hide it as you begin working elsewhere. Hidden apps are easy to identify if you use Cocktail to enable transparent icons for hidden applications in the Dock (Interface > Dock).
Auto-hide the Dock. Hit Command+Option+D to enable auto-hiding of the Dock, summon it when needed by swiping to the bottom of the screen with the cursor. Dock is a great app launcher but keep it hidden when not in use.
Use full screen apps. Full screen apps help you stay focused and make the most of small screens. This feature was designed with Mac laptops in mind, so don’t forget to use it.
Use virtual desktops. Create new desktops through Mission Control by hovering over the right corner and clicking the + button. Use this with full screen apps to create a great desktop workflow that can be quickly swiped between.
In the old days you could reset a login password via a Mac's OS X installer disc. But with no such discs, what to do?
To reset a login password in OS X Mountain Lion or later, restart the Mac and hold down Command-R to boot into the Recovery HD partition. From the Utilities menu, choose Terminal to open it. In Terminal type:
resetpassword
and press Return.
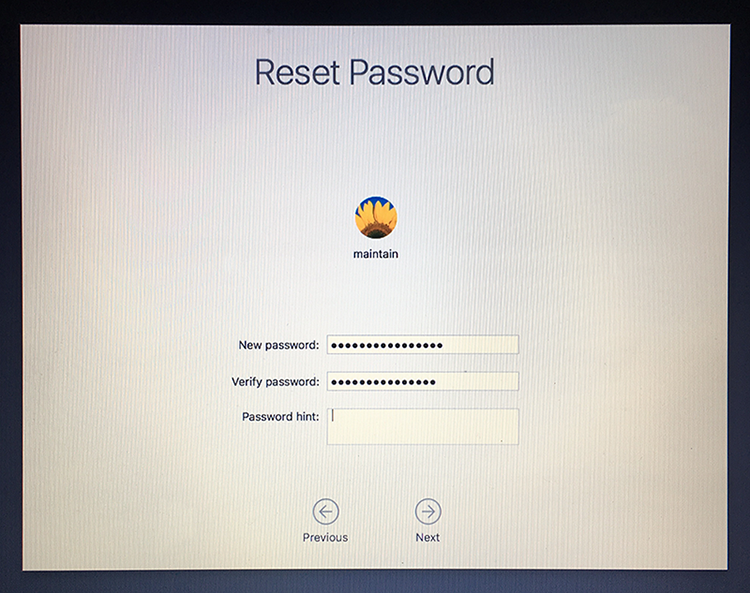
In macOS Sierra and macOS High Sierra, an Reset Password assistant will launch. Choose the user account or admin account you want to reset the password for. Enter a new password, confirm the new password, set (if you like) a password hint and then click on "Next" to set the new password for the account in question. Choose to "Restart" the Mac and when the Mac boots up, use the newly reset password to login to the computer.
In OS X Mountain Lion, OS X Mavericks, OS X Yosemite and OS X El Capitan, a Reset Password window will appear that will list all the bootable volumes attached to your Mac. Select the volume that contains the account you want to reset and choose the user name that needs its password reset. Enter and verify a new passwords in the appropriate fields and, if you like, enter a password hint. Click Save and the new password is applied to the account.
Trash is one of those overlooked aspects of macOS that you probably don't think much about. That's fine, but there are also a handful of genuinely useful keyboard shortcuts that pertain to Trash on the Mac, and if you spend any time in the file system they're worth learning.
Send an item to Trash instantly.
Command+Delete with any file or folder selected will send it instantly to the Trash.
Return items from Trash to original location.
Command+Delete with anything currently in the Trash selected returns it to the original location in the file system. You can also access this by right-clicking an item and choosing "Put Back".
Empty Trash.
Shift+Command+Delete will immediately empty the Trash. This is the safer approach since it brings up the warning dialog telling you the action is permanent.
Empty Trash without warning.
Shift+Option(Alt)+Command+Delete will immediately force empty the Trash with no warnings, regardless of what's in the Trash.