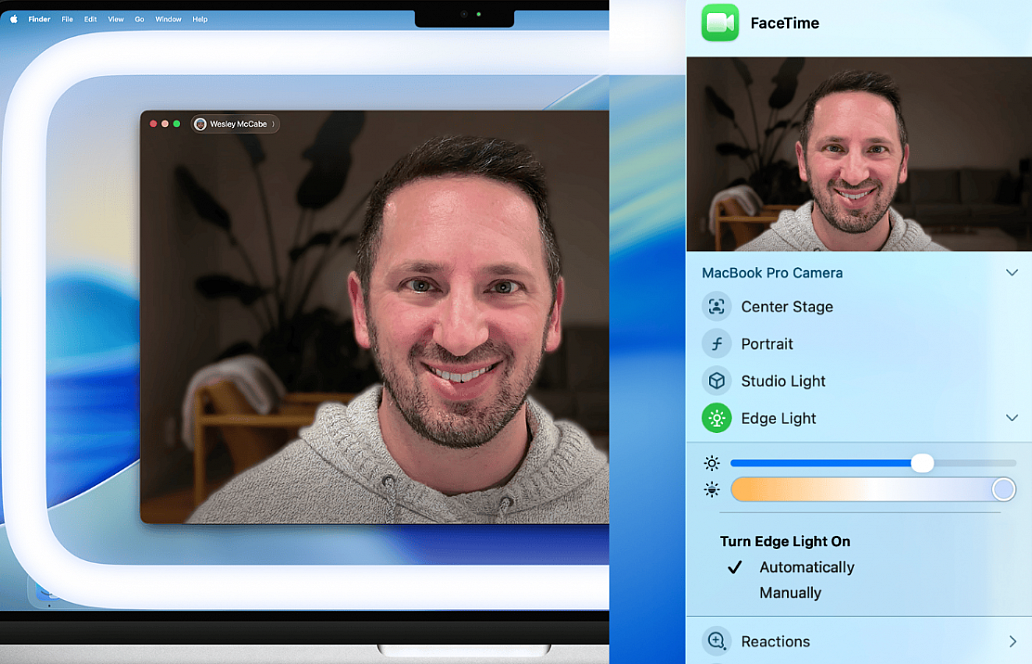
Unlike the iPhone’s front camera, the built-in webcam on Mac isn’t of very high quality. And things take a turn for the worse if you’re in a poorly lit room. To help address this problem, macOS 26.2 adds a handy Edge Light feature that transforms the computer display into a decently bright light source.
The Edge Light video effect provides a pleasing fill light to evenly illuminate your face in low-light conditions — like a virtual ring light. And to ensure that you always have access to your content, the effect automatically recedes from the area around your mouse pointer.
From the Video menu that appears in the menu bar when a video call is in progress, choose Edge Light to turn the effect on or off. If using your computer’s built-in camera, the effect appears on your built-in display. If using Continuity Camera (https://support.apple.com/en-us/102546) or other external camera, the effect appears on your primary display.
When Edge Light is turned on, click the arrow next to Edge Light in the menu to reveal additional controls:
• A brightness slider to adjust illumination by changing the width of the effect
• A color temperature slider to make the effect more or less warm. Warmer color temperatures show more yellow and less blue
• A setting to enable Edge Light to turn on automatically when you start a video call and the ambient light is low
Edge Light works best in low-light conditions, such as dim indoor lighting at night. You can combine it with any of the other effects.
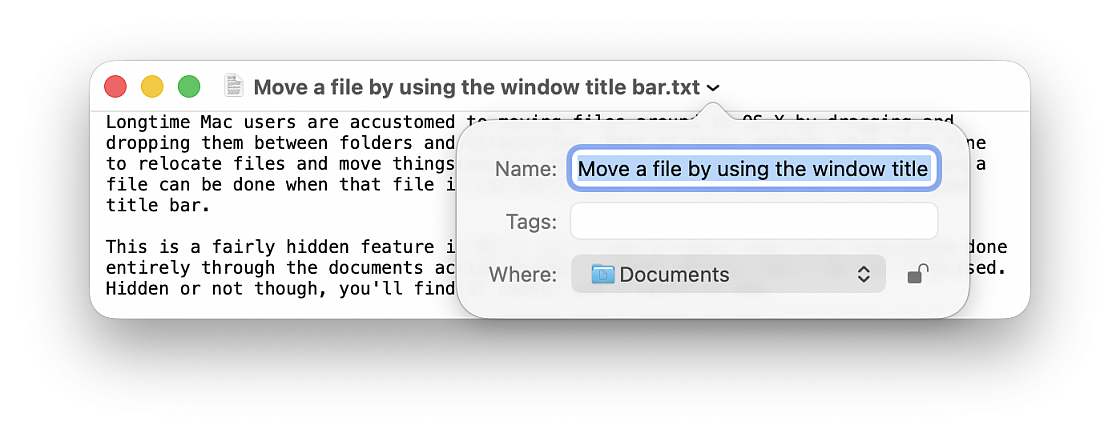
Longtime Mac users are accustomed to moving files around in macOS by dragging and dropping them between folders and directories. This method work just fine to relocate files and move things around, but another lesser known option to move a file can be done when that file is currently open, just by using the files window title bar.
This is a fairly hidden feature in macOS, so if you've never seen file relocation done entirely through the documents active window titlebar before, don't be too surprised. Hidden or not though, you'll find it useful and a cinch to use.
• With a file open, click on the files name in the window title bar to reveal a contextual menu (be sure to click on the text name itself, not the little document icon)
• Click on the pulldown menu alongside “Where” (the location shown is where the file is currently located)
• Select the destination you want to move the file to from the list (including iCloud) or choose “Other...” to browse the file system and select somewhere specific.
• Click away from the title bars contextual menu to hide it and resume work within the document as usual.
That's it, the document has moved. Simply changing the “Where” selection will move the file to the chosen destination instantly. There's no confirmation, no dragging and dropping, nothing else is necessary to relocate the file, it will move immediately as the window title bar action is taken, to the location specified by “Where”.
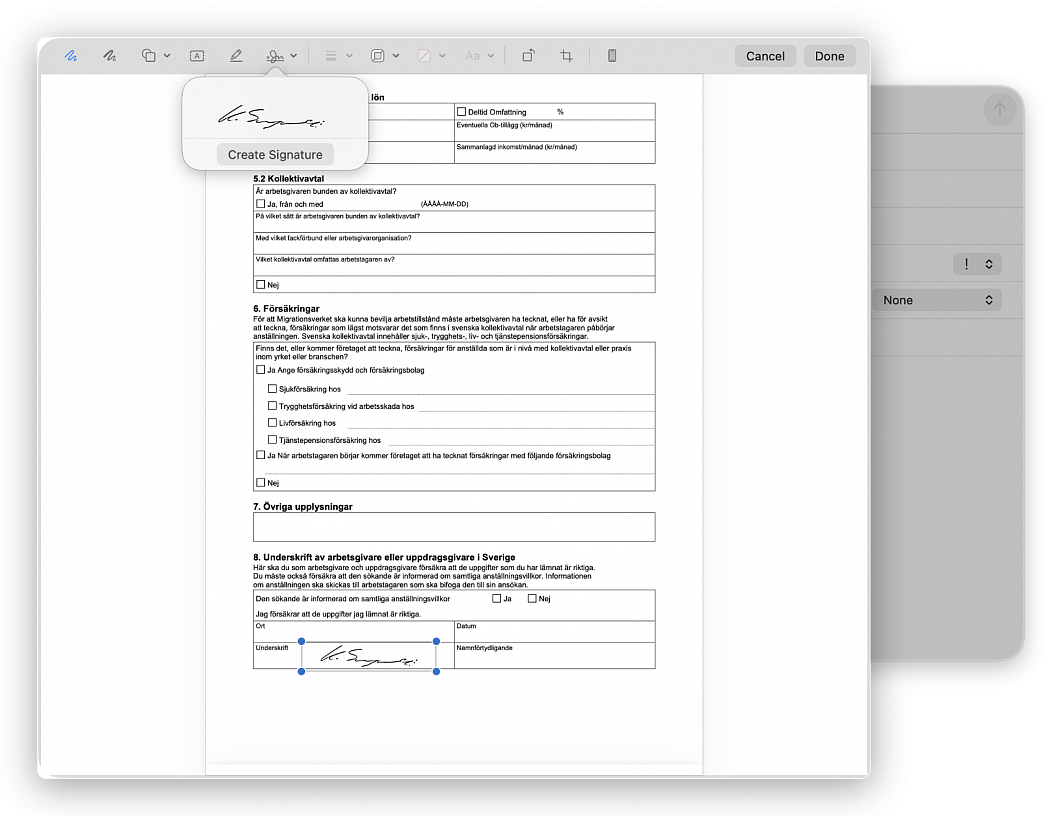
While you might think you have to print out a document, physically sign it, scan it and send it back, thankfully there is an easier way. It's possible to sign PDFs directly from the Mail app so there's no need to waste any paper.
Drag the PDF you need to sign into a new email in Mail. Hover over it to see a small arrow button appear in the top right corner. From here, select Mark Up. The PDF will then open and you'll see a signature option at the top - it's the icon with a squiggle that looks like a signature with a cross to the left.
You can either select a signature you have used in the past, or you can create a new signature. If you choose to create a new signature, you can either use the trackpad on your Mac to draw one, your iPhone, or you can write your signature on a piece of paper and then hold it up to the webcam on your Mac.
This is particularly helpful if you use a third-party password manager or prefer managing your login credentials manually.
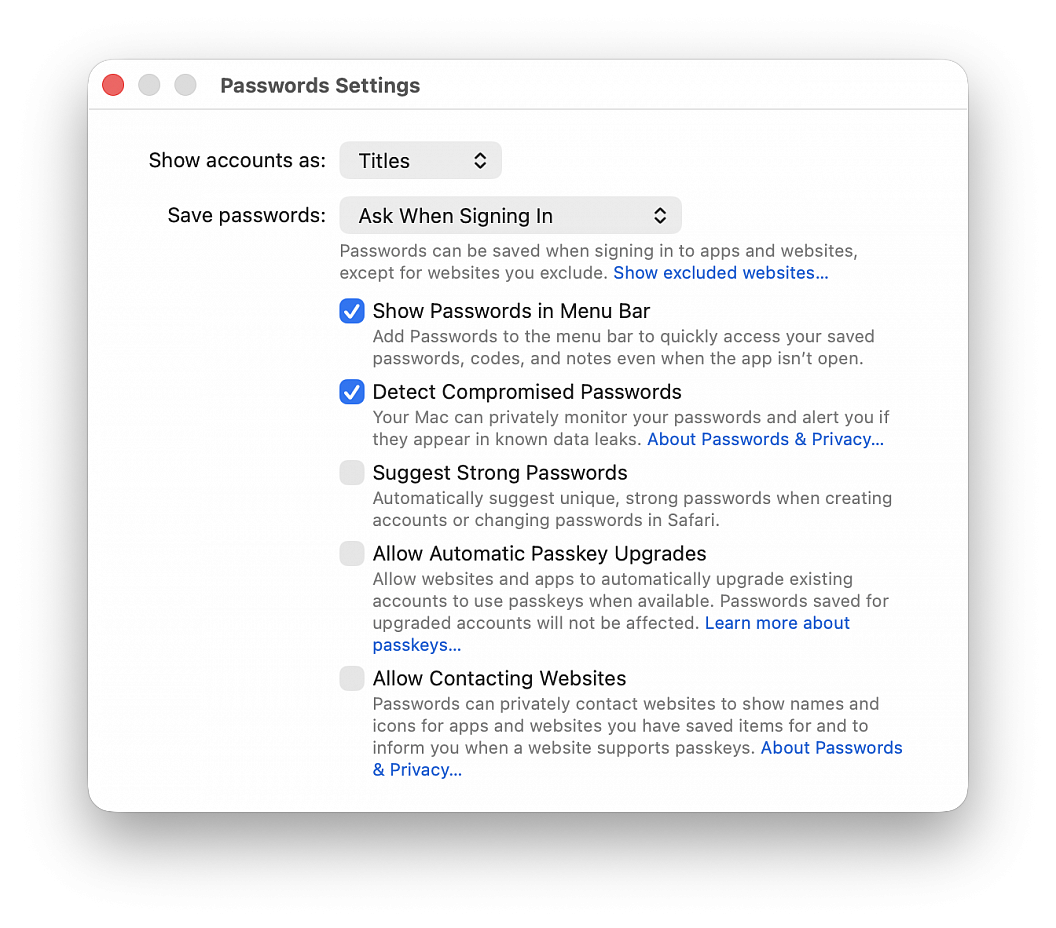
• Open the Passwords app
• Choose Passwords > Settings in the top menu bar, then authenticate with Touch ID or your computer password
• Uncheck Suggest Strong Password
You’ll no longer get suggestions in Safari to create a new password (and save it to the Passwords app) when you’re signing up for a new account on a website or changing the password of an existing website. But you should still see a tiny key icon in the password field, which you can click to generate a new password. If you don’t want to see even the tiny key icon in the password field to use the Passwords app, go to Safari settings > AutoFill and uncheck the box for "User names and passwords".
Many services use two-factor authentication nowadays, where your phone or email address gets sent a code that you must enter as part of the login process into an online service. These codes are one time use only and therefore don’t make a lot of sense to keep around forever, but manually going through and deleting all those verification codes from Messages and Mail can be annoying.
Apple has realized the endlessly piling up verification codes clutter is a hassle, and has created a handy optional feature that allows the operating system to automatically go through and delete those verification codes after they have been successfully used. This optional setting is particularly great when used in combination with the automatic security code fill feature available to macOS.
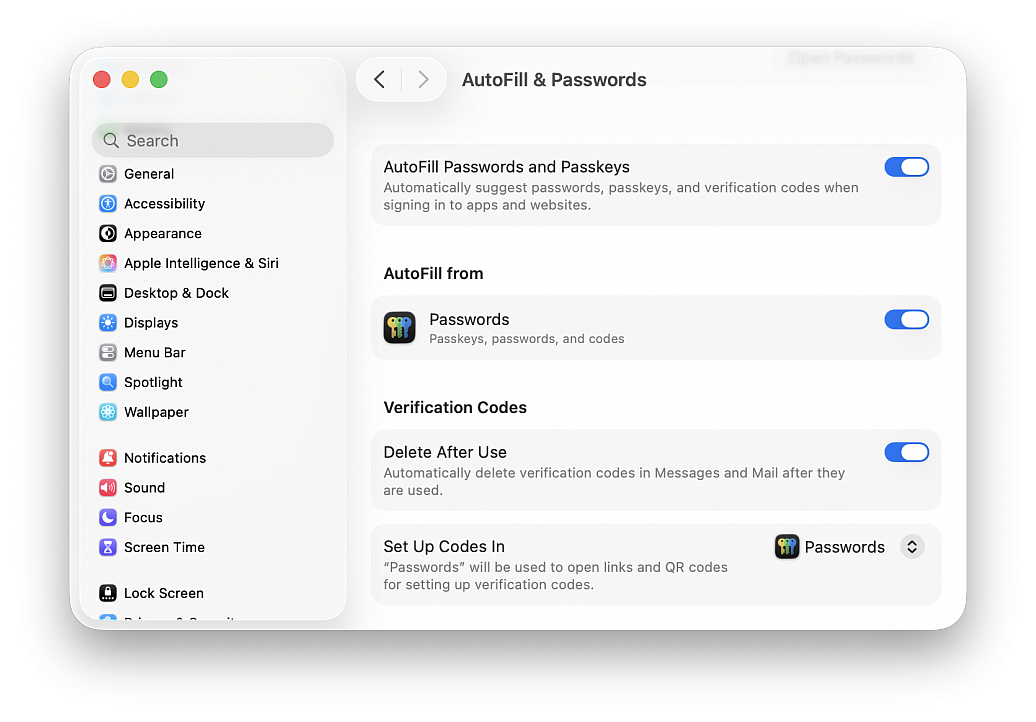
• From the Apple menu go to “System Settings...”
• Go to “General” and then choose “AutoFill and Passwords”
• Under the “Verification Codes” section, toggle the setting for “Delete After Use”
With this feature enabled on the Mac, your verification codes will now automatically be deleted after they have been used.