Want to switch to Apple Music because you can't find your favorite indie band on Spotify or Amazon Music? Apple made it easier last month when it quietly rolled out a new feature allowing users to import libraries from rival sites.
The first thing you need to do is to have an active Apple Music subscription. Then, the transfers can be done through a web browser at music.apple.com.
• On your web browser and go to https://music.apple.com
• Click Sign In and sign in with the Apple Account you use for Apple Music
• Click your photo or monogram in the top right-hand corner, then select Transfer Music
• Choose what you want to transfer
• Tap Add to Library
• Wait for Apple Music to find matches for your music in the Apple Music catalogue
After this process has been completed, you’ll see one of the following messages in the bottom of the sidebar:
Transfer Complete: Apple Music found matches for the music in the Apple Music catalogue and added the music to your library.
Some Music Needs Review: Apple Music didn’t find an exact match but found similar alternative versions for the music. Tap Review Now, choose an alternative version, then tap Save to add the music to your library.
Apple says that there may be some differences between its music library and its competitors’, so users have “30 days from the initial transfer to review unmatched music and choose from alternate versions to add to your music library.”
The company also notes that the tool only works for playlists created by the user, rather than also for playlists created by the platform from which the user is migrating.
To transfer to Apple Music on your iPhone, iPad, or Android:
• Go to Music Settings:
On an iPhone or iPad, go to Settings > Apps > Music
On an Android device, open the Apple Music app, tap the More button, then tap Settings
• Tap Transfer Music from Other Music Services
• Choose from the list of supported music services and sign in to the music service
• Choose what you want to transfer
• Tap Add to Library
• Wait for Apple Music to find matches for your music in the Apple Music catalogue
Apple released macOS Tahoe on September 15, which means it's now available for all Macs that support it. If you didn't download the new software yet, here are some features that might entice you to upgrade.
Liquid Glass
macOS Tahoe has a new design. Buttons, navigation bars, widgets, the Dock, menus, side bars, and more all have a more translucent look that reflects the background underneath and refracts light. There are new icon options, including tinted and entirely clear.
Customizable Control Center
You can rearrange the Control Center in macOS Tahoe, putting what you access most often front and center. You're also able to use multiple Control Center pages, and add third-party app controls.
Customizable Menu Bar
You can also rearrange the Menu Bar, plus add Control Center controls to it. Live Activities from the iPhone will also show up in the Menu Bar now through iPhone Mirroring.
Spotlight Redesign
Spotlight is very different in macOS Tahoe, and it might take some getting used to. There's no more Launchpad, because the new Spotlight functionality has replaced it. There are four main Spotlight options to access apps, files, complete actions, and access the Clipboard History.
Clipboard
Spotlight now saves what you copy and paste, so you have a log of what you've been doing that you can go back and reference. You can see your entire history for the day, but it is limited to 24 hours.
Spotlight Actions
You can use Spotlight Actions to do all kinds of things without opening an app. You can send texts, emails, create shortcuts for features in apps, set timers, create Calendar events, make reminders, and much more, plus there's integration with the Shortcuts app to take things even further. There are quick access phrases you can assign to launch tasks quickly, like CH for bringing up ChatGPT.
Folder Customization
You can assign colors to folders, and also add an emoji or character to help you better organize your files. Folders get a color tag, which is a useful way to group things together.
Widgets
You can move widgets from the Notification Center to the desktop for quicker access. This works with widgets from Apple apps and from third-party apps.
Shortcuts
The macOS Shortcuts app supports creating automations. You can make Shortcuts that run at a specific time of day, with a trigger action, when an accessory connects, when an action in an app takes place, when the battery drains to a certain level, when activating a Focus mode, and more. It's super powerful when paired with Spotlight's new functionality.
Phone App
Apple brought the Phone app to the Mac, so you can make calls, accept calls, and use features like Hold Assist and Call Screening. You still need a connected iPhone with Wi-Fi Assist turned on.
Journal App
The Journal app is new to the Mac, and it makes a lot of sense on a platform that has a full keyboard. It works just like the iOS version of the app, but there are also some added features like the option to create multiple journals.
Games App
The Games app is also new to the Mac. It's a cross-platform app that aggregates Mac App Store games and Apple Arcade games with your own games library, plus it provides options for playing with friends. There's a new Game Overlay that lets you adjust game settings and connect with friends without exiting the game, and if you're on battery, there's a Low Power Mode so you can play longer.
Images of tax, banking or wire transfer forms containing sensitive information can easily be viewed by anyone with physical or remote access to your machine. Unfortunately, macOS Preview doesn’t support file-level password protection, but there is a quick workaround that don't require third-party software.
By converting your graphics file to a PDF, you can unlock a handy password feature tucked away in its settings, turning your image into an encrypted password-protected PDF. This takes just a few seconds.
• Right-click the image you want to password protect, hover over “Open With,” and choose Preview
• Go to File > Export...
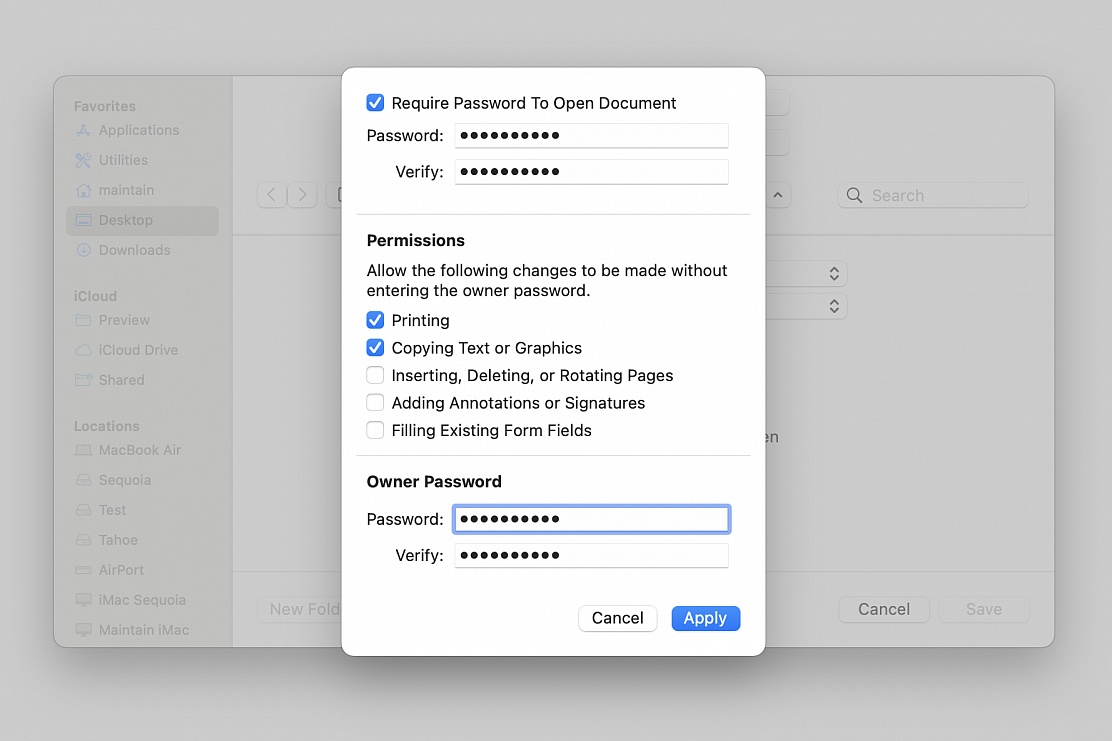
• Name your file, choose its location on your machine, choose PDF as format and click "Permissions..." to give you more options, including the one to add a password to the file
• Check the “Require Password To Open Document” box
• Enter the password
• Set permissions to allow actions and/or changes to be made without entering the "Owner Password"
• Enter the "Owner Password" required to allow any actions and/or changes not selected in the Permissions section
• Click on “Apply” and then click “Save”
Some Mac users have content blockers installed into Safari, which are designed to prevent a part of a webpage from loading, things like preventing a remote javascript that tracks cookies or loads ads, or something that places a cookie into your browser, etc. However, content blockers can cause interference with certain webpages, and it’s not unusual for content blockers to completely break a website or webpage from functioning.
Problems with content blockers are particularly common with finance and banking sites, wi-fi captive portals, and video sharing sites, so you may find yourself wanting to disable content blockers for a specific site as you browse the web in Safari on your Mac.
It’s not unusual to need to disable content blockers for certain websites to work properly, so here’s how to do that:
• Navigate to the site you want to disable content blockers for in Safari on the Mac
• After the webpage has loaded, right-click on the website URL in the address bar, and choose “Settings for DomainName.com”
• Uncheck the box next to “Enable content blockers” to disable content blockers for this particular domain
• Refresh the webpage, and content blockers will now be disabled
Notice that you can even change other settings for a specific website in the same popup window.
With the content blockers disabled, the website should now load and function as intended. There are also sites that you choose to not run content blockers on for other reasons, maybe so they function properly, maybe to support them, or maybe to even load them at all, since there are some examples where content blockers prevent a site from accessible at all.

Learn how to efficiently manipulate text on your Mac using Find and Replace, simplifying tasks and boosting productivity in popular apps like Notes, Pages, Numbers, TextEdit, etc.
In addition to words, you can also find and replace spaces, numbers, and special characters from your document. You can use it to substitute a word or make corrections in a lengthy document. Other times, it can be handy if you want to delete specific words, symbols, or phrases from your writing.
• Open Notes, Pages, or Numbers and go inside the relevant note or document
• Click Edit from the top menu bar and select Find > Find or Find and Replace (in apps like Pages and Numbers, you can also click the View button from the top left of the app window and choose Show Find & Replace
• Enter the term you want to look for (click the tiny arrow next to the search glass icon for more options, for instance, you can uncheck Ignore Case to find the words that exactly match the capitalization style you specify
• In the second box, enter what you want to replace the found term with
If you type nothing in the Replace box and go ahead with the next steps, it will delete the found words from the document. In other words, you will be replacing found words with nothing, which obviously equates to deleting the searched-for word. You can also choose to replace the found words with just a space (press the Space Bar once) or the desired symbol.
• Click All, and it will replace the found word with the replacement at every instance, or, click Replace, and it will replace only at the selected position (you can also use the arrow icons or press the return key to cycle through the found instances of the word without actually replacing them with the said term)
If you’re using Pages or Numbers, you will see three buttons: Replace All, Replace & Find, or Replace buttons. Replace & Find will replace the selected match with the replacement text and then automatically move to the next match. The Replace button replaces the selected match but does not auto-move to the next one.
