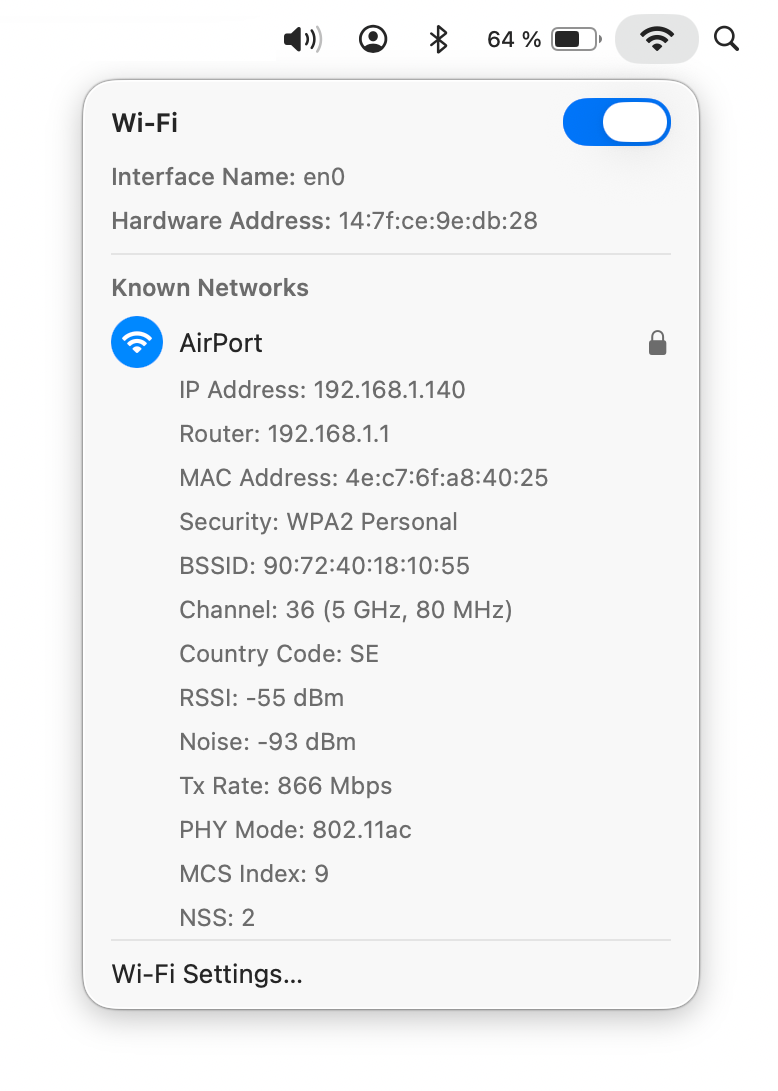
Did you know that you can quickly access information about your router, and check if your network is performing well? See your BSSID, signal-to-noise ratio, and even the transmit rate between your router and computer. All it takes is a press of a button and a click of your mouse/trackpad.
If you hold down the Option (alt) key and click the Wi-Fi icon in the menu bar, it will provide you with details about your router and the network you're using. The items in gray are all pieces of additional information seen only in this mode.
• IP Address: This is your computer's IP address.
• Router: Your router's IP address. You can type this into your browser to access your router's web interface.
• Security: Your router's security. Most routers on the market offer WPA2 Personal, and it keeps your network encrypted.
• BSSID: This is your router's MAC, or hardware address. It acts as an identifier for your router that lets it talk to other network-connected devices.
• Channel: This is your WLAN channel, and it determines which radio frequency the router uses to transmit information.
• RSSI: Received Signal Strength Indicator measures how well a device "hears" a signal from the router. It's useful for determining if you have enough signal to get a good wireless connection.
• Noise: This measures how much radio noise is interfering with the RSSI signal. Signal-to-noise ratio is a measure used in science and engineering that compares the level of a desired signal to the level of background noise. It is defined as the ratio of signal power to the noise power, often expressed in decibels.
• TX Rate: The transmit rate is the speed of the data that is transmitted between your router and your computer. Right now I have a speed of 450 Mbps.
• PHY Mode: This is the wireless protocol that the router uses, according to the IEEE 802.11 wireless standard.
• MCS Index: This number corresponds to the protocols uses to encode the radio signal.
Learn what to do if your Apple’s Magic Keyboard, Trackpad, or Mouse fails to connect and work with your Mac. Note that the solutions are for fixing the wireless connection between your Mac and Magic accessories. You can always connect your Magic Keyboard or Trackpad via a cable to your Mac, and it should work, provided there are no hardware problems.
Make sure you have the following:
Lightning cable: You will need it to establish a wired connection between your Mac and the Magic Keyboard, Trackpad, or Mouse. You will also need a USB hub if the Lightning cable has a USB-A port on one end and your Mac only has USB-C ports.
Wired keyboard or mouse: Since your wireless Magic accessories are not working, you will need to directly plug in a wired keyboard or mouse to navigate around your Mac. Of course, you don’t need these if you are troubleshooting the connection issue on your MacBook.
Fix Magic Keyboard, Trackpad, or Mouse not working when you power on your Mac.
After you switch on your MacBook, its built-in trackpad and keyboard are ready to use the moment you see the Lock Screen. However, when you boot up your desktop Mac, it takes a moment for the wireless Magic Keyboard/Trackpad/Mouse to become available for use. When you enter the password and go to the Desktop, you will again have a brief moment of downtime until the accessories starts working.
Both these short connection wait times are a normal occurrence. However, if your Magic Keyboard, Trackpad, or Mouse are not connecting automatically to your desktop Mac and you have waited for a while, just connect them with a Lightning cable, and it should become available for use. Leave your Magic accessory connected to your Mac via a cable for a minute or two. After that, you can disconnect the cable, and the accessory will continue to work wirelessly. You can also force your Mac to shut down using its power button, wait for a while, and then power it back on. It should auto-connect to your Magic Keyboard, Trackpad, or Mouse.
What to do if your Magic Keyboard, Trackpad, or Mouse has suddenly stopped working?
In rare cases, your keyboard, trackpad, or mouse may stop working midway after losing connection or going out of battery. Here are all the effective tips to fix it.
Plug the accessories. If you get an alert when your Magic Keyboard, Trackpad, or Mouse battery gets critically low, simply connect it to your Mac with a cable, and you can start using it. You can check the battery percentage of it by going to the Bluetooth section in macOS Control Center or using the Batteries widget.
Restart your Magic accessory. Turn off your Magic Keyboard, Trackpad, or Mouse using the small power button and wait for at least 30 seconds. After that, flip the switch back on and wait once again for it to connect automatically to your Mac. Of course, make sure your Mac’s Bluetooth is enabled in Apple menu > System Settings... In case auto-connect doesn’t work, connect it manually from Apple menu > System Settings... > Bluetooth.
Restart your Mac. Random glitches in macOS can cause all sorts of trouble, including issues between your Magic Keyboard, Trackpad, and Mouse. So, simply restart your Mac using the wired mouse, and hopefully, the problem will go away. You can also force your Mac to turn off by holding the power button for a few seconds until the screen goes black. After that, wait for about a minute, and then press the power button once to turn it back on.
Toggle Bluetooth off and on. You cannot turn off Bluetooth on your desktop Mac if the Magic Keyboard and Magic Trackpad/Mouse are connected to it. So, connect a wired keyboard and mouse to your Mac and then go to System Settings to turn Bluetooth off and back on.
Forget the accessory and connect again. If the problem continues, you should forget the Magic Keyboard, Trackpad, or Mouse from Mac’s Bluetooth settings and then reconnect it. Grab your Lightning cable and follow these detailed steps on your Mac with a wired keyboard and mouse connected to it:
• Open Apple menu > System Settings... and select Bluetooth
• Click the info button (i) next to your Magic Keyboard/Trackpad/Mouse and hit Forget This Device > Forget Device
• Turn off your Magic Keyboard/Trackpad/Mouse using its power switch, and then restart your Mac
• Lastly, turn on your Magic Keyboard/Trackpad/Mouse and go to Apple menu > System Settings... > Bluetooth to connect it to your Mac
This step should address connection issues, and now your Magic accessory will work as intended.
Also, don't forget to update your Mac. If your Mac is not running the latest version of macOS, go to Apple menu> System Settings... > General > Software Update to download and install the newest version of the operating system.

Modern MacBooks can last 18 hours or more on a single battery charge, but like all rechargeable batteries, the one in your Mac has a finite lifespan. Over time, its capacity to hold a charge gradually diminishes, potentially leaving you tethered to a power outlet more often than you'd like. This is where understanding your Mac's battery cycle count can be important.
Checking your Mac's battery cycle count provides valuable insight into its overall health and remaining lifespan. A cycle count represents the number of times your battery has gone through a full charge cycle, which occurs when you use 100% of its capacity – whether in one sitting or spread across multiple partial charges. By monitoring this number, you can gauge how much life your battery has left and plan accordingly, whether that means adjusting your usage habits or preparing for a potential battery replacement down the line.
Here's how to check it your Mac's battery cycle count:
• Click the Apple symbol () in the menu bar while holding the Option key
• Select System Information from the dropdown menu
• In the new window, click the Hardware list in the left sidebar if its contents aren't showing
• Click Power in the expanded Hardware list
• Look for Cycle Count under "Health Information" in the Battery Information section of the main window
This number represents how many times your battery has been fully discharged and recharged.
Apple designs MacBook batteries to maintain up to 80% of their original capacity at their maximum cycle count, which varies by model. Recent MacBooks typically have a maximum cycle count of 1,000, while older models range from 300 to 500. You can find your specific model's maximum on Apple's support website. Remember, reaching the maximum cycle count doesn't mean your battery stops working. It simply indicates when you might notice a decrease in battery life.
Every new Mac bought from Apple comes with a one-year warranty that includes service coverage for a defective battery. If your Mac is out of warranty and the battery hasn't aged well, Apple offers battery service for a charge.

Some macOS users have found that file sharing between a Mac running macOS Ventura or Sonoma does not work reliably between such Mac and another Mac with older OS, iPhone, iPad, Windows PC, and even some NAS drives like Synology. For many users, file sharing setups that worked fine for years prior to updating to macOS Ventura or Sonoma are now no longer working at all or behaving in an inconsistent manner.
If you’re experiencing problems with file sharing not working in macOS Ventura or Sonoma, there is a fix to resolve the issue. This solution applies to SMB file sharing with macOS Ventura or Sonoma and devices connecting to or from the Mac, whether you’re experiencing connectivity failures, time outs, server unavailable, server may not exist, or other similar error messages.
• Open the "System Settings" on Mac from the Apple menu
• Go to "General" and then to "Sharing"
• Find the switch for "File Sharing" and toggle it Off
• Restart the Mac by going to the Apple menu and choosing Restart
• Upon reboot, return to the Sharing system settings panel and turn "File Sharing" back to the On position
• Resume file sharing as usual, it should work as expected
You may need to repeat this process after a few days, or at random, if file sharing suddenly stops working again between the macOS Ventura or Sonoma Mac and another Mac or device. Why you need to disable file sharing, reboot, then re-enable file sharing, is a bit of a mystery. Simply toggling file sharing off and on does not do the trick.
The "macOS could not be installed on your computer" error is one of the last ones you want to see. It pops up when you're updating your Mac's operating system but can't complete the operation. Despite the wording, it doesn't mean your installation will never work. It just means it failed that one time. The bad news is this error could be occurring due to a number of reasons. The good news is you can get your Mac back up and functional with a little work.
What causes the "macOS could not be installed on your computer" error? Several issues could cause the problem. However, the error screen should give you some idea of what's gone amiss. Here are some messages you might see underneath the warning:
• The path /System/Installation/Packages/OSInstall.mpkg appears to be missing or damaged
• An error occurred installing macOS
• Unable to unmount volume for repair
• Storage system verify or repair failed
• An error occurred while verifying firmware
Some of these offer more information than others, but they point to different stages of the installation that failed. The following steps and fixes should sort out any of the problems mentioned above.
Fixing this error may require some patience. It's best to start with the simple fixes, which often solve the problem, but if they don't, you have other options. Here are the approaches to try.
1. Restart and try the installation again. This may seem counterintuitive to redo the thing that didn't work, but sometimes a restart is all your Mac needs to sort itself out.
2. Check the Date & Time setting. If the displayed date and time don't match reality, this could be the problem. Restart your Mac again if necessary, then go to System Settings > Date & Time and enable "Set time and date automatically" setting. After this, try the installation again to see if it works.
3. Free up space. In some cases, macOS fails to install because there isn't enough room on the hard drive. To see how much is available, click the Apple logo and select About This Mac, click More Info, scroll down and click Storage Settings. You'll see a breakdown of what's living on your computer. If the available space seems low, move some nonessential files off temporarily to see if that lets the installation proceed.
4. Reset the NVRAM (https://support.apple.com/en-gb/HT204063). This tiny chunk of memory stores basic information such as the time, monitor resolution, and which disk to start up from. You may need to go back into System Settings to switch any settings this changed, but you can try the installation again before that to make sure the problem is resolved.
5. Restore from a backup. If you use Time Machine to regularly back up your Mac, you can go back to an earlier state using Recovery Mode to see if it's more compatible with the installer.
6. Run Disk First Aid (launch Disk Utility located in /Applications/Utilities). This may help if you're getting the "Unable to mount volume" error. First Aid checks the internal hard drive and makes any fixes it can. It may even be able to mount the volume after it's done. Then you can retry the installation.
If none of the above worked, it may be time to turn your computer over to the professionals.