Wireless interference can cause Wi-Fi and Bluetooth devices to disconnect or perform poorly. Bluetooth enabled keyboards and mice may not pair or connect consistently, or audio from Bluetooth enabled earphones or speakers may be choppy, but you can take steps to reduce or overcome it.
Any of these symptoms could be caused by interference affecting the Wi-Fi or Bluetooth signal:
• Device doesn't connect or stay connected
• Connection is slow and signal strength is low
• Bluetooth audio skips, stutters, cuts off, or has static or buzzing
• Pointer movement is erratic or jumpy
These general steps can help achieve a cleaner, stronger wireless signal:
• Bring your Wi-Fi device and Wi-Fi router closer together. Bring the Bluetooth devices that are connecting to each other closer together.
• Avoid using your wireless devices near common sources of interference, such as power cables, microwave ovens, fluorescent lights, wireless video cameras, and cordless phones.
• Reduce the number of active devices that use the same wireless frequency band. Both Bluetooth and Wi-Fi devices use the 2.4 GHz band, but many Wi-Fi devices can use the 5 GHz band instead. If your Wi-Fi router supports both bands, it might help to connect more of your Wi-Fi devices to the 5GHz band. Some dual-band routers manage this for you automatically.
• Configure your Wi-Fi router to use a different Wi-Fi channel, or have it scan for the channel with the least interference. Most routers perform this scan automatically on startup or when reset.
If you're using USB 3 devices with your computer, you can limit their potential to interfere with nearby wireless devices:
• Use a high-quality, shielded USB cable with each USB 3 device.
• Move your USB 3 devices—including any USB hubs—farther away from your wireless devices.
• Connect USB 3 devices to the ports farthest from your computer's Wi-Fi antenna. For example, if your computer has ports on the back, prefer the USB ports closest to the middle. If your computer has ports on the side, prefer the USB ports closest to the front.
• Turn off any USB 3 devices that aren't in use.
Avoid physical obstructions in the path of your wireless signal. For example, a metal surface between your Bluetooth mouse and computer could cause the mouse to perform poorly, and a metal-reinforced concrete floor between your Wi-Fi router and Wi-Fi device could cause poor Wi-Fi performance.
• Low interference potential: wood, glass, and many synthetic materials
• Medium interference potential: water, bricks, marble
• High interference potential: plaster, concrete, bulletproof glass
• Very high interference potential: metal
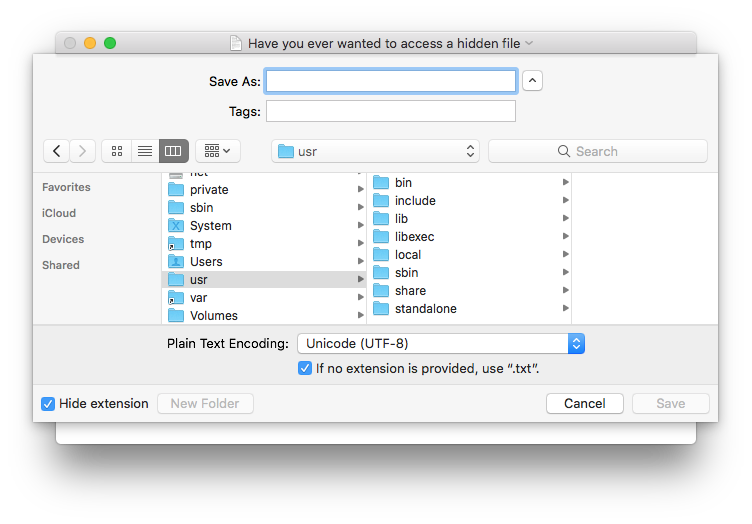
You can easily toggle hidden files by hitting Command+Shift+Period in any dialog window.

The "Save As..." keyboard shortcut allows you to quickly save a new version of an active document without re-writing the currently active document, which is perfect for many productivity situations where you'd want to save a current file as a different file type for compatibility reasons or as a backup version, or as a different copy in a new location.
"Save As..." used to be a default option in the File menu but now it's hidden by default. Not to worry, with a simple keyboard app shortcut you can regain the uber convenient "Save As..." option in the File menu.
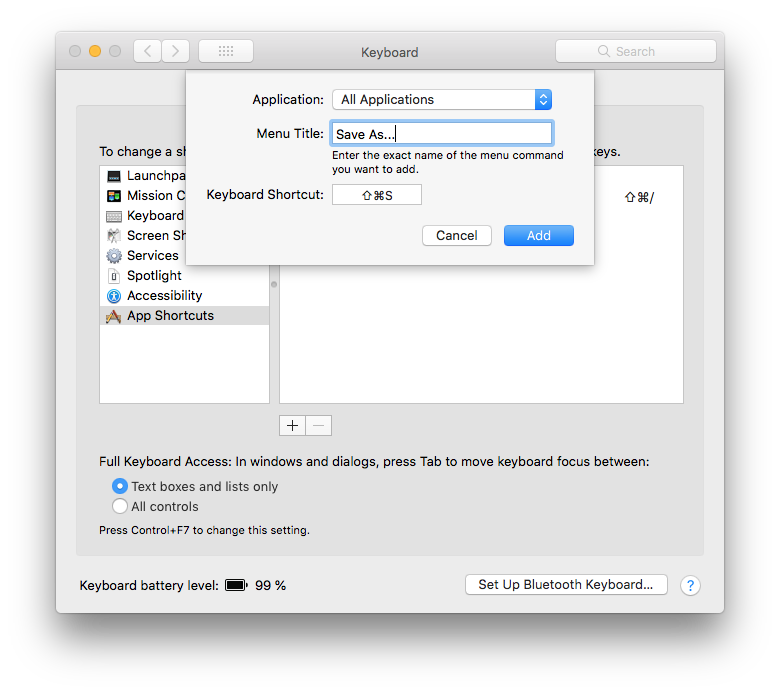
• Open the Apple menu and choose "System Preferences"
• Select "Keyboard" and then choose the "Shortcuts" tab
• Select "App Shortcuts" then press the + plus button to create a new shortcut for All Applications
• Set the following for the keyboard shortcut:
Application: All Applications
Menu Title: "Save As…"
Keyboard Shortcut: click into the field, then press Command + Shift + S
• Click "Add" to finish adding the "Save As..." keyboard shortcut and close out of System Preferences
The "Save As..." will now appear by default in the File menu of apps, and be available instantly as the Command + Shift + S keyboard shortcut. You can test this out yourself by going to any app that supports file saving and you'll find the File menu now includes the "Save As..." option by default, along with the keyboard shortcut.
The modern macOS default keyboard shortcut for "Save As..." is the finger twisting combo of Command + Option + Shift + S. All we're doing in this particular App Shortcut is to remap that complex keystroke into the familiar and easier to manage Command + Shift + S keystroke, which was the default in Mac OS for much of Mac history. This change may not be for everyone, but if you're a fan of using "Save As...", you'll undoubtedly appreciate knowing that you can get this great file saving feature back with a simple effort.

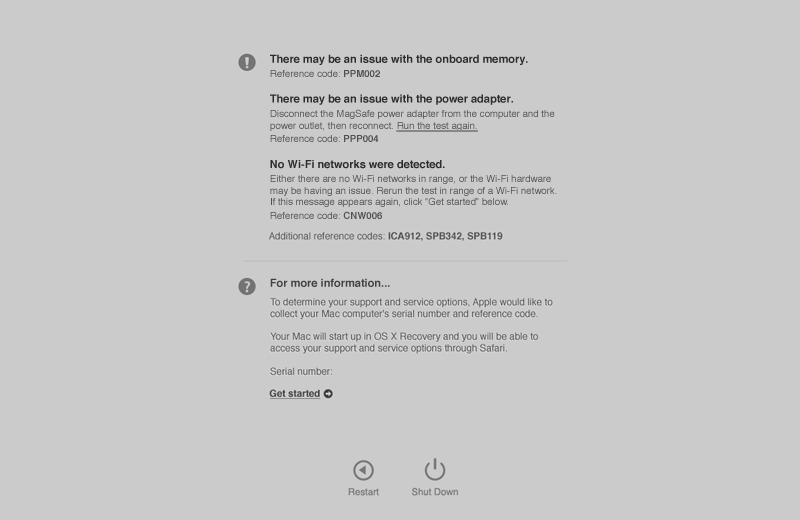
Apple Hardware Test (AHT) contains a suite of diagnostics that will test the hardware of your computer. It's a great way to rule out a hardware issue when troubleshooting your computer.
To start up your computer in AHT:
• Shut down your computer
• Press and hold the D key
• Press the power button to turn on your computer
Computers that shipped with OS X Mountain Lion (or later versions of OS X/macOS) support the use of AHT over the Internet. These computers will start up to an Internet-based version of AHT if the hard drive does not contain AHT. An Internet-enabled connection via Ethernet or Wi-Fi is required to use this feature. To start up to an Internet-based version of AHT:
• Shut down your computer
• Press and hold Option (Alt) and D
• Press the power button to turn on your computer
If the Apple Hardware Test indicates that the RAM memory is faulty you should be able to find instructions on how to replace it in your computer’s manual without voiding the warranty. However, if the problem is related to any other component the only option is usually to hand over the computer to Apple.

If you’ve been using FileVault from the time you set up your Mac, that encryption is extremely strong, and erasing the drive deletes the passphrase-protected encryption key. That makes the contents effectively irretrievable, and no additional erasure is needed for an SSD or HDD. If you didn’t use FileVault, here are your options.
HDDs
Unless you’re dealing with secrets that would lead to the overthrow of governments, using Disk Utility’s secure erase feature meets the mark. HDDs can also be physically destroyed with a drill equipped with a bit suitable for puncturing the metal casing. A hammer and chisel could work, too. If you have a dead HDD and if you think anyone with motivation might pay to have the data recovered, physical destruction is the only way to ensure data isn’t readable.
SSDs
Data is written in an unpredictable fashion on SSDs to distribute the wear across all the memory cells in the solid-state device. As a result, a secure erase feature doesn’t work at all, as it may not overwrite all the data. Physical destruction is really the only course of action, which is an unfortunate waste of technology. And if you have a Mac in which the SSD isn’t removable, but part of the computer, that’s even worse.
RAM
Fortunately, the various kinds of RAMs used by generations of Macs are all volatile memory: the contents disappear instantly or shortly after a device is powered down. So far, there’s no way to recover any traces of data from RAM chips.


