Apple has today launched its new Data and Privacy website, allowing Apple users to download everything that Apple personally associates with your account, from Apple ID info, App Store activity, AppleCare history to data stored in iCloud like photos and documents. This is currently only available in European Union, Iceland, Liechtenstein, Norway, and Switzerland to comply with GDPR, but will roll out worldwide in the coming months.
The new online tools allow customers to get a copy of all data associated with an Apple ID. You can request account details and sign-in records and data such as contacts, calendars, notes, bookmarks, reminders, photos and documents. Apple also stores info like app usage statistics for Apple Music and Game Center, a purchase history of items bought from the App Store and iTunes Store, AppleCare support history and marketing records.
Only data that is personally identifiable can be found here. This can all be downloaded with a few simple clicks on the privacy portal. To obtain a copy of your data:
1. Log in to privacy.apple.com.
2. Select the "Get started" link under the "Get a copy of your data" heading.
3. Tick the boxes of the categories of data you want to download (iCloud Photos, Mail and Drive are separated into a separate list as this data may be exceptionally large).
4. Press Continue.
5. Select what is your preferred maximum file size (Apple will split up the data into chunks, up to a maximum of 25 GB) and press Continue.
Your data request is now in progress. Data like iCloud Photos will take a long time to generate as there are potentially tens of gigabytes of files. It can take up to a week to prepare the downloads. Apple notifies you when the data is ready to download, and it is automatically deleted after 2 weeks.
Apple says it provides all data in standards-compatible formats. This means it can be used as a way to move all your data to a new cloud service, as well as transparently showing customers what data Apple keeps on you.
Whilst these features will roll out later in the year for other regions, all customers can request data corrections, deactivate or delete their account. You can do this by following the links on the main page.
Deactivation means that Apple will stop processing any data relating to your Apple ID. You will not be able to access any store purchases from iTunes, iBooks or the App Store. You will not be able to access any iCloud data, or use iCloud services like FaceTime or iMessage (see here for more conditions about account deactivation). You are literally cutting yourself off from the Apple connected world. Apple will verify all deactivation requests to prevent abuse. Apple doesn’t delete your info, it just stops anyone - including Apple - from accessing it whilst the account is deactivated. You can re-enable the account by logging back in to the privacy portal and choosing to reactivate it.
Permanent deletion takes this one step further, essentially asking Apple to remove all data they have stored on you - forever. This process is not reversible once initiated.
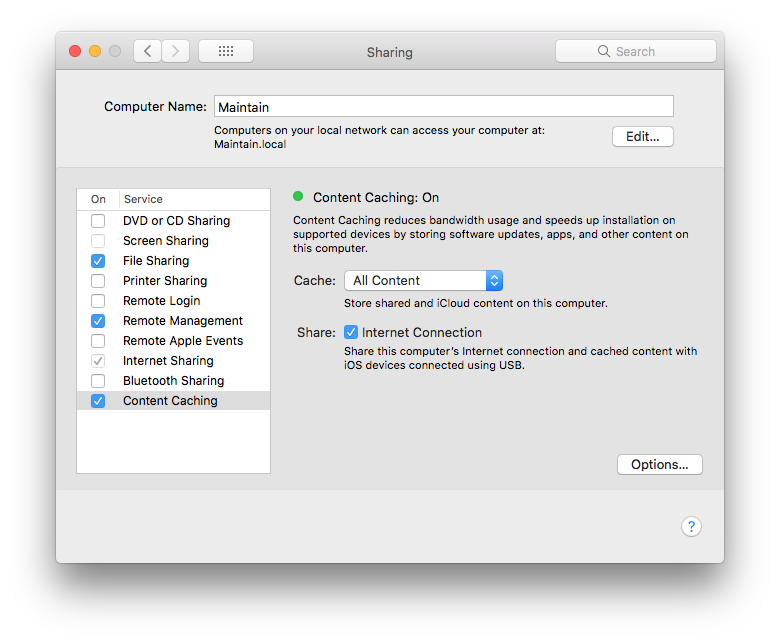
Content caching is a new feature available in macOS High Sierra. Content caching reduces bandwidth usage and speeds up installation on supported devices by storing software updates, apps, and other content on local computer.
Content caching is a great idea, especially if you have an always-on (or often-on) Mac in your home or office. Instead of having to download the same stuff over and over, you only do it once. Then, any other devices on your network pull their data from your Mac, instead of from Apple's servers. That's probably a boon for Apple's data bills, but for us it could make a huge difference to update speeds. When this feature is switched on, both Mac and iOS content is saved locally.
How to set up content caching in macOS High Sierra?
• Open Sharing from System Preferences.
• Unlock the pane. Click the padlock icon in the lower-left and authenticate.
• Configure the Content Caching service.
Shared content: store apps and software updates.
iCloud content: store iCloud data, such as photos and documents.
Share Internet connection: share this computer's Internet connection and cached content with iOS devices connected using USB.
• Switch it on. Click the checkbox on the left of the service name to enable it.
Keep in mind that content caching will download all content requested by any client device, so the service will consume vast quantities of storage space unless you limit the storage. You can inspect how much storage space is being used on your Mac by the caching service by clicking the Options button. You can also use Cocktail (Preferences > Caches > System > Content caches) to flush/clear content caches.
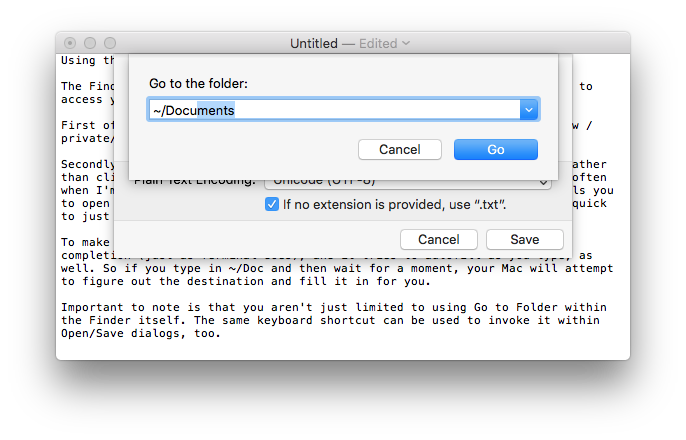
The Finder's Go > "Go to Folder..." (Shift-Command-G) menu item is a nifty way to access your file system.
First of all, you can use it to see hidden folders, so if you need to view /private/var, you don't have to open a Terminal window to do so.
Secondly, the "Go to Folder" window is an excellent place to paste a path rather than clicking around to get to a deeply nested folder. I use this pretty often when I'm troubleshooting. After all, if Apple's support documentation tells you to open ~/Library/Mail/V2/MailData to access a file within it, it's very quick to just copy that path and paste it into the window.
To make typing stuff in even faster, the "Go to Folder" window allows tab completion (just as Terminal does), and it tries to autofill as you type, as well. So if you type in ~/Doc and then wait for a moment, your Mac will attempt to figure out the destination and fill it in for you.
Important to note is that you aren't just limited to using "Go to Folder" within the Finder itself. The same keyboard shortcut can be used to invoke it within Open/Save dialogs, too.
You can use these keyboard shortcuts to shut down or restart Macs that have a keyboard with an Eject key. If you have a computer without an Eject key, simply replace the Eject key with the Power Button in the tips below.
Please note that key names are separated by a hyphen (-), such as "Control-Eject". You do not type the hyphen as part of the key combination.
Control-Eject
The dialog box "Are you sure you want to shut down your computer now?" appears with options to Restart, Sleep, Cancel or Shut Down. After the dialog appears, press the R key to Restart, press the S key to Sleep, press the Esc key to Cancel, or press the Return key to Shut Down.
Control-Command-Eject
Quits all applications (after giving you a chance to save changes to open documents) and restarts the computer.
Control-Option(Alt)-Command-Eject
Quits all applications (after giving you a chance to save changes to open documents) and shuts the computer down.
Command-Option(Alt)-Eject
Puts the computer to sleep.
Shift-Control-Eject
Puts all displays to sleep.
Power Button (if the computer is not responding)
Press and hold the power button on the computer for six seconds to shut down the computer.
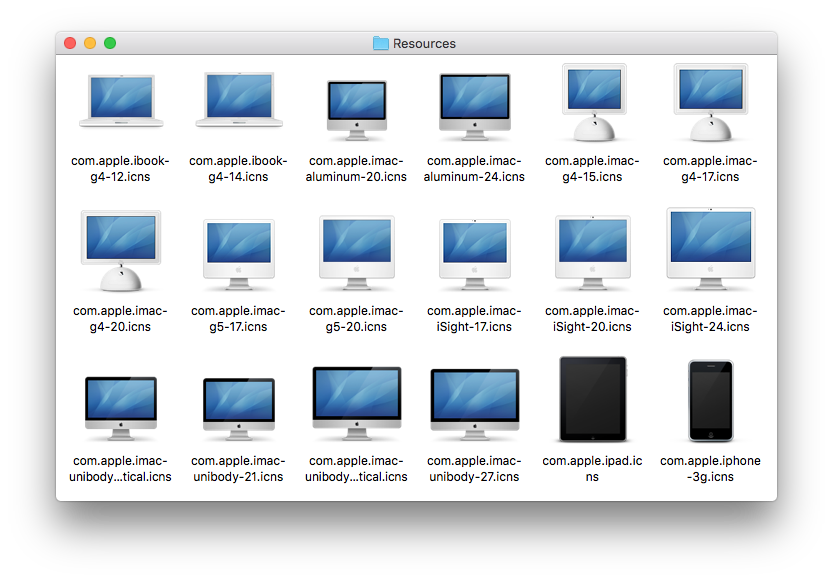
A large collection of high resolution Apple hardware icons is bundled right in macOS, including great icons for nearly all vaguely recent Mac models, iPad, iPhone, iPod, Apple TV, iMac, Mac Mini, Mac Pro, and much more, going all the way back to the G4 series.
To access the hidden hardware icon pack:
• From the Finder's Go menu choose "Go to Folder" and enter the following path:
/System/Library/CoreServices/CoreTypes.bundle/Contents/Resources/
• Scroll down until you start finding .icns files named “com.apple” followed by the hardware name
Many of these icons are what you find when using network sharing with a computer they match, but they also make for an excellent way to dress up your matching Mac, for example by replacing the generic Macintosh HD icon or anything else.