macOS offers a super simple and fast way to convert images, directly from the Finder. Thanks to the handy Quick Actions feature, Mac users are able to convert any images from anywhere in the Finder, with just a few clicks.
This is a powerful and useful feature that is often overlooked. Here’s how it works:
• From Finder, locate the image you want to convert
• Right-click, control-click, or two-finger click on the image you wish to convert, and go to “Quick Actions” and then select "Convert Image" from the menu
• Select the file format type you wish to convert the image to and select the image size (choose "Actual Size" if you do not want to resize the image), choose whether or not you wish to preserve metadata, then click on the "Convert" button
The image will convert almost instantly and appear in the same folder with the same file name as the origin image. This Quick Action image conversion tool is super fast and powerful, but is limited to JPG, PNG, and HEIF/HEIC formats. If you wish to convert to additional image file formats, you will have to use Preview.
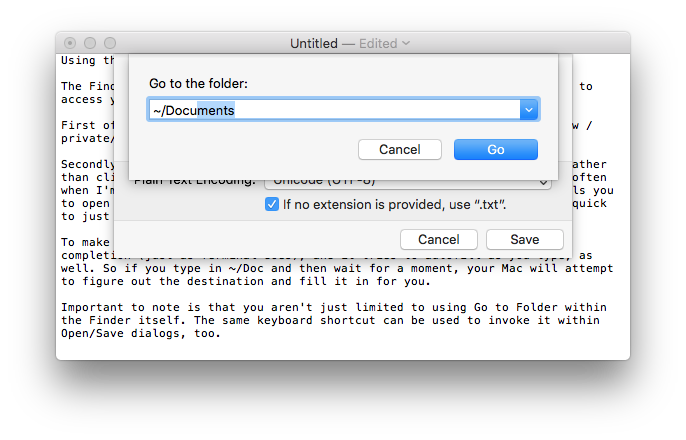
The Finder's Go > "Go to Folder..." (Shift-Command-G) menu item is a nifty way to access your file system.
First of all, you can use it to see hidden folders, so if you need to view /private/var, you don't have to open a Terminal window to do so.
Secondly, the "Go to Folder" window is an excellent place to paste a path rather than clicking around to get to a deeply nested folder. I use this pretty often when I'm troubleshooting. After all, if Apple's support documentation tells you to open ~/Library/Mail/V2/MailData to access a file within it, it's very quick to just copy that path and paste it into the window.
To make typing stuff in even faster, the "Go to Folder" window allows tab completion (just as Terminal does), and it tries to autofill as you type, as well. So if you type in ~/Doc and then wait for a moment, your Mac will attempt to figure out the destination and fill it in for you.
Important to note is that you aren't just limited to using "Go to Folder" within the Finder itself. The same keyboard shortcut can be used to invoke it within Open/Save dialogs, too.
One of Cocktail’s most useful features is the built in Pilot you can use to schedule optimizations of your computer. But that’s not all, Cocktail also lets you use Apple’s Automator to build your own workflows that can be more flexible and a great complement to the Pilot.
First, let’s get to know Automator, Apple’s excellent automation tool. Automator let’s you build workflows in a “Lego” fashion using simple actions, which you can chain together to create really complex applications without having to learn how to code. For example you can use it to resize, rename and upload pictures to your blog or to automatically sort files using Folder Actions. In this example we’re going to do something relatively simple to show how easy it is to interact with Cocktail and other applications to create fast and powerful workflows.
First, a little bit of background knowledge about what we are trying to do. Have you ever used a USB drive with macOS, then plugged it into a Windows computer only to find a bunch of .DS_Store files? macOS creates these files and uses them to keep track of the folder icon, background and other things. Normally they are hidden from the user, however, when you plug the USB drive into a Windows computer they show up since Windows doesn’t understand what a DS Store file is. This can very quickly get very messy and confusing, so let’s use Cocktail to clean it up!
What we are going to do is create a service for Finder. Services allows you to expand the functionality of Finder and virtually every other application in macOS using Automator. In this case it will add an option to the menu when you right click a folder that lets you clean up all the DS Store files inside.
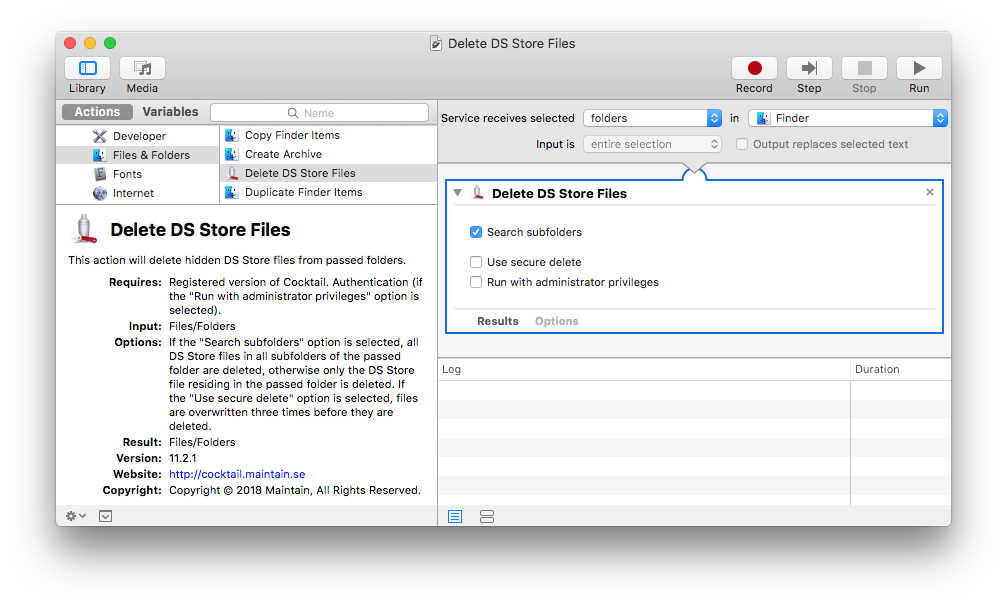
To do this, open Automator (in Applications) and when it asks you for what type of workflow you want to create, select Service. Automator will create a template for a workflow which can receive a number of different inputs from applications and lets you process these. In this case we want to deal with folders in Finder so make sure it says “Service receives selected folders in Finder” in the top of the right hand pane.
On the left side of the Automator window you have the library which contains the building blocks for the workflows. We definitely recommend that you explore these actions when you have time but for now lets carry on with our example. Select the Files & Folders category in the Library, then drag the “Delete DS Store Files” action into the workflow area on the right. When you drag it into the workflow area a few more options will appear, in this case we’d like it to search the subfolders on the drive too so make sure you tick the checkbox. When you’re done, save the service and name it “Delete DS Store Files”.
Voila, we’re done! Plug in a USB drive, then right click it and select Delete DS Store Files from the menu. Now go to a Windows computer and magically your USB drive will be a little cleaner! This works on any folder or drive so if you are emailing a folder to a friend who’s using Windows, you can clean it up the same way.
Automator lets you do much more than this, for example you can make your own maintenance scripts which you can run whenever you want by saving them as small applications (just select Application instead of Service when you create a new workflow).
Trash is one of those overlooked aspects of macOS that you probably don't think much about. That's fine, but there are also a handful of genuinely useful keyboard shortcuts that pertain to Trash on the Mac, and if you spend any time in the file system they're worth learning.
Send an item to Trash instantly.
Command+Delete with any file or folder selected will send it instantly to the Trash.
Return items from Trash to original location.
Command+Delete with anything currently in the Trash selected returns it to the original location in the file system. You can also access this by right-clicking an item and choosing "Put Back".
Empty Trash.
Shift+Command+Delete will immediately empty the Trash. This is the safer approach since it brings up the warning dialog telling you the action is permanent.
Empty Trash without warning.
Shift+Option(Alt)+Command+Delete will immediately force empty the Trash with no warnings, regardless of what's in the Trash.
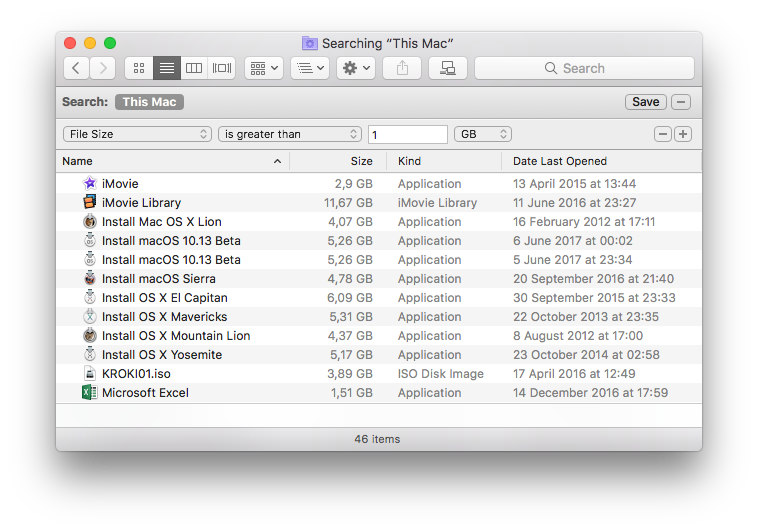
Whether you're feeling the pinch as hard drive space runs low or you're just wondering where all your disk space went, it's easy to find large files in macOS by using the built-in search tools.
Here's what to do:
• From the macOS Desktop, open any new Finder window
• Hit Command+F to bring up Search
• Click on "Kind" filter and select "Other", then select "File Size" from the attribute list
• Click on the second filter and choose "is greater than"
• In the third space, enter the size to search for anything greater than (ex: 100) and choose either MB or GB as the final filter
The file and app list below will automatically update as anything larger than the specified file size is found on the hard drive. Be sure that "This Mac" is selected if you're getting limited results, though you can also use the search limiters to find large files contained within single folders or user directories.
Want to use this feature to track down large files often? Click on the "Save" button in the upper right corner and you'll turn the File Size search into a Smart Folder that can be easily accessed from the sidebar for easy future retrieval, plus that folder will constantly be updated with large files only, making it a very useful way to instantly find any big item laying around on a Mac.
A common pit of enormous files is the user Downloads folder, when using the file size search don't be surprised if you run into a fair amount of .dmg and .zip files sitting idly in there that have long been forgotten.