macOS High Sierra is easy to install. However, we recommend a full back up before you install it.
Apple makes it very easy to back up your Mac using Time Machine, so there is no excuse not to create a Time Machine backup before installing macOS High Sierra.
Follow these steps to back up your Mac using Time Machine.
• Connect an external hard drive to your Mac. Choose a new hard drive, or one that you don't mind erasing.
• An alert may appear asking if you want to use the drive to backup your Mac. If so, Use as Backup Disk.
• If not, open System Preferences > Time Machine and click Select Backup Disk. Choose the external drive.
• Switch Time Machine to On.
• A progress bar will appear in the Time Machine system preference pane. Wait for the Time Machine backup to complete before continuing with the macOS High Sierra installation.
Follow these instructions to install the macOS High Sierra update on your Mac.
• Once you've backed up your Mac, launch the App Store (located in /Applications) and search for macOS High Sierra.
• Click Download to initiate the download, and fill out your Apple ID information if prompted. Download progress will appear in your Purchases tab.
• Once the download has finished, you'll see a macOS High Sierra installer launch. Follow the on-screen instructions to finish installing the software update, which should take around half an hour depending on the spec of your Mac.
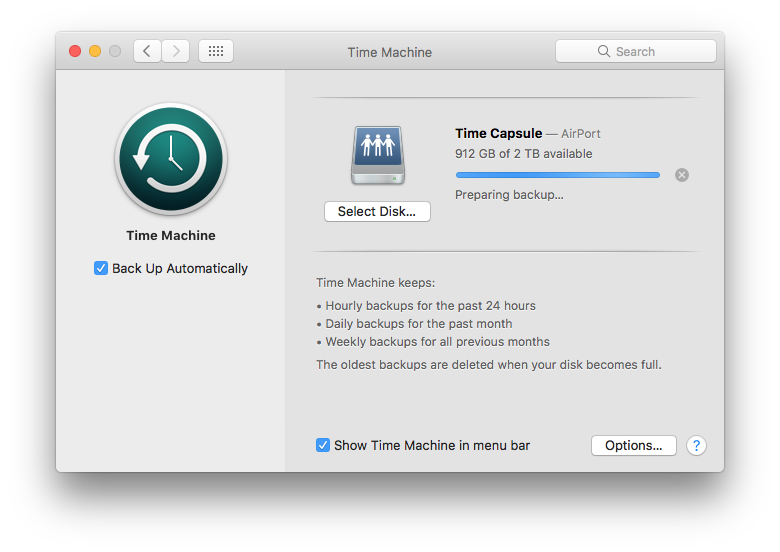
Time Machine is the simplest way to keep regular backups of a Mac. On some rare occasions though, Time Machine may get stuck on the "Preparing backup…" stage for an inordinately long amount of time, causing a backup to never start. So lets fix this specific Time Machine issue.
The first thing you need to do is cease the currently failed backup attempt:
• Open System Preferences from the Apple menu and click "Time Machine"
• Click the (x) icon on the right side of the progress bar to stop the backup attempt
When the progress bar disappears and it no longer says "Preparing backup…" you're good to begin the troubleshooting process.
• Open the Time Machine drive in the Finder and navigate to the "Backups.backupd" folder
• Open the folder within Backups.backupd that is the name of the current Mac which is stuck on preparing
• Put this directory into "List View" and sort by ‘Date Modified', or just search the folder for a file with a ".inProgress" file extension
• Delete the "xxxx-xx-xx-xxxxxx.inProgress" file. The .inProgress file is always in the form of xxxx-xx-xx-xxxxxx.inProgress, where the first 8 digits are the year-month-day (date) and the next 6 or so digits are random numbers, followed by the inProgress file extension.
• Restart your Mac
• Once rebooted, let Spotlight run completely (you can either just wait it out or watch the mdworker, mrs, and related processes in Activity Monitor). This should cause macOS to re-index the attached Time Machine drive if it's needed, which may be getting in the way of Time Machine backing up properly thus causing the computer to get stuck on "Preparing backup..." for a very long time.
• Start a back up yourself. Pull down the Time Machine icon and choose "Back Up Now". You will still see a "Preparing backup…" message but it should be gone within a few minutes, depending on the size of the hard drive, the speed of the Mac, and the size of the backup to be made. At this point, your Time Machine backup will proceed as expected, so just let it run and you're good to go again.
Wondering whether you need antivirus software to protect your Mac? macOS is more secure than Windows, but you'd be wise to look carefully at your security options.
The Mac is generally considered to be safe and secure, and there are a number of reasons why Macs are considered more secure than PCs. Malware writers are less likely to target Mac users because of the perception that it has a far smaller market share than Windows. There is also the fact that the Mac operating system is Unix-based, and Unix offers a number of security features built in.
Apple goes to great lengths to protect you from malware by making it impossible for you to download it in the first place. The company has built-in antimalware protection in macOS. The Mac's malware scanning tool, Xprotect, works invisibly and automatically in the background and requires no user configuration. Apple has a list of malicious applications that it checks against when you open downloaded applications. Updates happen invisibly too. This is similar to having antivirus software from another software developer running on your Mac, with the bonus of being written into the operating system and therefore it doesn't hamper the speed of your Mac. If you download and try to open files contaminated with malware, you may see an explicit warning that the files will "damage your computer", along with a reference to type of malware. You should delete the file immediately.
In addition, macOS blocks downloaded software that hasn't been digitally signed - a process in which Apple approves the developer. This leads to the familiar error message when you try to use or install unsigned software: "[this app] can't be opened because it is from an unidentified developer.". The system at work here is called Gatekeeper and can be controlled via the Security & Privacy section of System Preferences. In addition to Gatekeeper, which should keep malware off you Mac, FileVault 2 makes sure your data is safe and secure by encrypting it.
It's certainly not an essential requirement to install antivirus software on your Mac. Apple does a pretty good job of keeping on top of vulnerabilities and exploits and the updates to the MacOS that will protect your Mac will be pushed out over auto-update very quickly. However, sometimes Apple doesn't respond as quickly as Mac users might hope. In that case there are some free anti-virus apps (such as Sophos Anti-Virus for Mac Home Edition or ClamXav) that might give you some peace of mind.
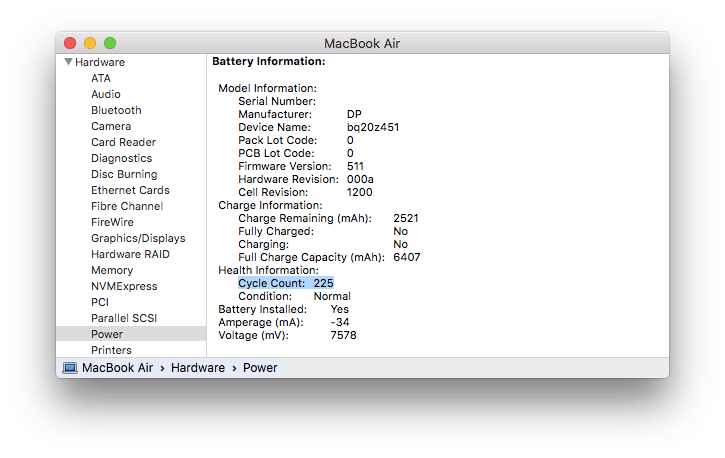
If you have a MacBook, MacBook Air or MacBook Pro, you can check the battery cycle count to get an idea of overall battery health. Here’s how you can do that yourself, right from the macOS built in system management functions.
This works for all batteries in portable Mac models.
• Pull down the () Apple menu and choose "About This Mac".
• Click the "System Report…" button.
• Under Hardware, select "Power" and look for "Cycle Count" under the "Battery Information" portion.
The number shown is the cycle count of the current battery. A battery charge cycle is when the battery has been drained to 0% and then refilled to 100% of it's maximum capacity. Knowing the cycle count is helpful if you suspect your battery is having problems retaining a charge. Apple says new notebook batteries are designed to retain 80% of original capacity after 1000 cycles. If your battery is performing at less than expected and is still under warranty, it may be a good idea to schedule an appointment with an Apple Genius.
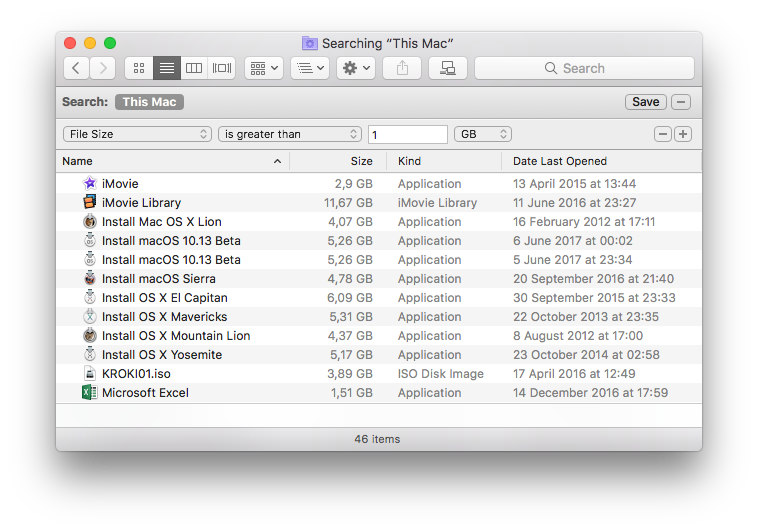
Whether you're feeling the pinch as hard drive space runs low or you're just wondering where all your disk space went, it's easy to find large files in macOS by using the built-in search tools.
Here's what to do:
• From the macOS Desktop, open any new Finder window
• Hit Command+F to bring up Search
• Click on "Kind" filter and select "Other", then select "File Size" from the attribute list
• Click on the second filter and choose "is greater than"
• In the third space, enter the size to search for anything greater than (ex: 100) and choose either MB or GB as the final filter
The file and app list below will automatically update as anything larger than the specified file size is found on the hard drive. Be sure that "This Mac" is selected if you're getting limited results, though you can also use the search limiters to find large files contained within single folders or user directories.
Want to use this feature to track down large files often? Click on the "Save" button in the upper right corner and you'll turn the File Size search into a Smart Folder that can be easily accessed from the sidebar for easy future retrieval, plus that folder will constantly be updated with large files only, making it a very useful way to instantly find any big item laying around on a Mac.
A common pit of enormous files is the user Downloads folder, when using the file size search don't be surprised if you run into a fair amount of .dmg and .zip files sitting idly in there that have long been forgotten.